.svg)


If you have a Python background and are stepping into the world of real-time data processing for the first time, you might feel a little intimidated by Apache Flink which, during its earlier days, used to address Java or Scala developers only. Luckily, times have changed significantly in recent years and as a developer who lives and breathes Python, nothing should stop you from building on top of Apache Flink today.
What is PyFlink?
In simple terms, PyFlink is a Python-based API for Flink. It allows you to build on top of Flink's robust processing capabilities to handle large data streams in a scalable and fault tolerant way while staying deeply rooted in Python and its vast ecosystem. Flink itself essentially offers two APIs on different abstraction levels for data processing, namely, the Table API and DataStream API. Both of them are available in PyFlink as well.
Table API
The Table API provides a declarative, SQL-like interface designed to simplify complex data transformations. It’s ideal for developers who prefer to describe what they want to do with their data rather than how it should be processed. One of its standout features is its tight integration with standard SQL syntax for both DDL (data definition language) and DML (data manipulation language) statements. This opens the door to familiar operations like filtering, aggregating, and joining data. Under the hood, code written against the Table API automatically optimizes query execution, leaving you free to focus on core business logic. It also seamlessly supports both batch and streaming data, letting you unify offline analytics and real-time applications with no code changes. If you’re transitioning from SQL-based systems, the Table API offers a low-friction learning curve, plus access to Python’s ecosystem for more advanced data analytics.
DataStream API
The DataStream API is a lower level, more flexible interface that gives you fine-grained control in several aspects. It is event-driven and time-aware, making it particularly powerful for handling unbounded streaming sources and applying complex stateful operations. You can apply custom business logic through transformations and operations such as map, filter, keyBy, and window. You can also directly influence several specifics related to asynchronous I/O, state management, and define arbitrary processing functions to build reactive data streaming applications.
The API Choice is Yours
Choose the Table API if you want quick development cycles, a straightforward query-based approach, and built-in optimizations. It excels when working with structured or semi-structured data and when you need to reuse SQL or table-based logic. Common use cases include aggregations, joins, windowed operations, and reporting pipelines that benefit from concise high-level syntax.
The DataStream API shines if you need high flexibility and explicit control over event time, state management, or custom logic. It’s the go-to choice for building more complex streaming scenarios, or when you need to handle non-tabular data that don’t map neatly to relational schemas. If you’re comfortable diving deeper into more advanced data streaming concepts and want maximum freedom, the DataStream API should be your tool of choice.
It’s important to note that the API choice is not a strict either or decision as you can even go back and forth between the two APIs whenever necessary.
Prerequisites for PyFlink Development
Setting up a local development environment for PyFlink involves a few key steps to ensure that the most important prerequisites are met. If you don’t want to install any of this to your local machine directly, jump to the end of this section which explains how to conveniently use dev containers instead.
Here’s a quick overview of what you’ll need to set it up on your machine to get started:
- Python Environment: Make sure you have a compatible version of Python installed (a version between 3.7 and 3.11 is recommended depending on the actual Flink version used). Tools like <span class="inline-code">venv</span> or <span class="inline-code">conda</span> can help you isolate your development environment and avoid version conflicts or dependency clashes on your host system.
- JDK Installation: A working installation of Java is crucial (JDK 11 or 17 are commonly used). Also ensure that the JAVA_HOME environment variable is set properly on your host.
- PyFlink: The easiest way to get PyFlink is to install it from PyPI, e.g., <span class="inline-code">pip install apache-flink==1.20.0</span>. If you plan to work with any additional 3rd party libraries in your PyFlink application, install them alongside as well.
- Apache Flink Installation (OPTIONAL): It’s often helpful to download a full Apache Flink distribution, especially if you want to run a full-fledged local Flink cluster. You can grab the latest stable release from the Apache Flink downloads page. Unzip the distribution and set the <span class="inline-code">FLINK_HOME</span> environment variable to point to this directory.
With these steps, you should be all set to experiment and prototype your data processing pipelines using PyFlink in a local development environment.
Dev Containers Setup
Sometimes the devil is in the details. Hence, a pretty convenient alternative to setting up everything for PyFlink development from scratch on your local machine is to work with dev containers. They allow you to use a pre-defined container as a full-featured development environment. Dev containers can be run anywhere (locally or remotely, in a private or public cloud) and are supported by a variety of tools and editors.
To directly start working with the PyFlink applications in the context of this article, there is a turn-key ready dev container setup available in this folder of the examples repo. Given the proper plugin or extension is in place for your IDE, you can open the respective folder and are good to go.
Running Your First PyFlink Job
The rest of the article assumes you have a working installation of Docker available and are working in VS Code with the Dev Containers extension installed. Clone the Decodable examples repo and open the project folder <span class="inline-code">pyflink-intro</span> in VS Code.
Note that the first time you do this it takes a few minutes. Besides the dev container image—used as a self-contained development environment for PyFlink—two more images to run MySQL and MongoDB (used for a more elaborate example later in this article) are pulled to your host.
What’s happening in the background is that Docker Compose starts the respective containers. Once everything is up and running, your terminal in VS Code should be directly attached to the <span class="inline-code">pyflink-app-dev</span> container’s bash. In the VS Code workspace explorer, navigate to the folder <span class="inline-code">apps/hello/</span> and open <span class="inline-code">hello_data_stream_api.py</span>. It contains a very basic PyFlink job which:
- Creates a <span class="inline-code">TableEnvironment</span> in streaming mode.
- Defines a source table, in this example a single-column table which uses Flink’s DataGen connector to create a stream of random numbers.
- Defines a sink table, in this example a table with one numeric and one string column that uses Flink’s Print connector to write all the rows it receives to stdout.
- Defines the actual data processing to read from the source table.
You can run this basic PyFlink application directly from within the GUI in VS Code or from the terminal attached to the dev container by typing:
Either way, you are expected to see terminal output similar to the following:
Every second, a new row is added to the source table by the DataGen source connector which gets processed according to your code. Using the DSL, the input data gets transformed to a random number between 0 and 9 (1st column) and a constant string <span class="inline-code">’hello 🐍 pyflink 🐿️’</span> (2nd column) before it’s inserted into the sink table, and finally written to <span class="inline-code">stdout</span> by the Print sink connector.
The nice thing about the Table API is that you can also choose to work directly with SQL instead of using its DSL. You can find the same example written with SQL (<span class="inline-code">hello_table_api_sql.py</span>) to create the source and sink tables by means of DDL statements <span class="inline-code">CREATE TABLE … WITH (...)</span> and define the data processing with a single <span class="inline-code">INSERT INTO … SELECT … FROM …</span> statement. If you are interested in seeing the roughly equivalent DataStream API code for this basic example, take a look at <span class="inline-code">hello_datastream_api.py</span>.
Admittedly, this is only a “hello world” example, but it should give you a basic understanding of what simple PyFlink jobs can look like. The pattern is often very similar; namely, using a <span class="inline-code">read-process-write</span> loop on top of the defined source and sink tables or streams, depending on the PyFlink API you choose.
What about any additional dependencies?
Basic PyFlink jobs like the ones referred to above are self-contained in the sense that they don’t use anything that’s not bundled within PyFlink already. More concretely, there are neither any additional Python packages necessary, nor does this job use any Flink connectors to external systems like databases or other Java libraries in general. For real-world applications, this looks different and oftentimes you need to include some Python and/or Java dependencies.
Including Python Packages
Chances are your custom Python code uses, for instance, selected machine learning, data science, or AI-related packages. If so, there are several different options to make them available to your PyFlink job. To accomplish this, you can:
- specify them in the <span class="inline-code">requirements.txt</span> file and have them resolved (upfront) with <span class="inline-code">pip</span> from PyPi
- explicitly add them to the table or stream environment in the code:
Including Java Dependencies
Your PyFlink job almost certainly requires some 3rd party JARs, first and foremost Flink connectors to interact with source and sink systems, which aren’t bundled with the Flink distribution. You can include these in your PyFlink job in different ways, most commonly like so:
We’ll explore additional dependencies as part of another PyFlink job example in a bit. Before that, let’s briefly discuss what’s happening behind the scenes and how your job written in Python can run as an actual Flink job and how it interacts with Java code and the JVM. Feel free to skip over this next section if you prefer to dive into a more realistic and useful PyFlink job example right away.
Detour: Bridging between the Two Worlds
When you write PyFlink jobs, you are in fact driving portions of Flink’s JVM-based engine from Python code. Under the hood, PyFlink bridges these two language runtimes in ways that allow Python code to invoke, control, or embed Java objects, and vice versa, which is needed for two main reasons. First, Python code needs to make calls as though it was interacting with native Python APIs, but these calls should delegate to Flink’s Java APIs. Second, for certain processing stages—especially when dealing with user-defined functions—Flink needs to efficiently pass data structures from the JVM side to the Python side (and back).
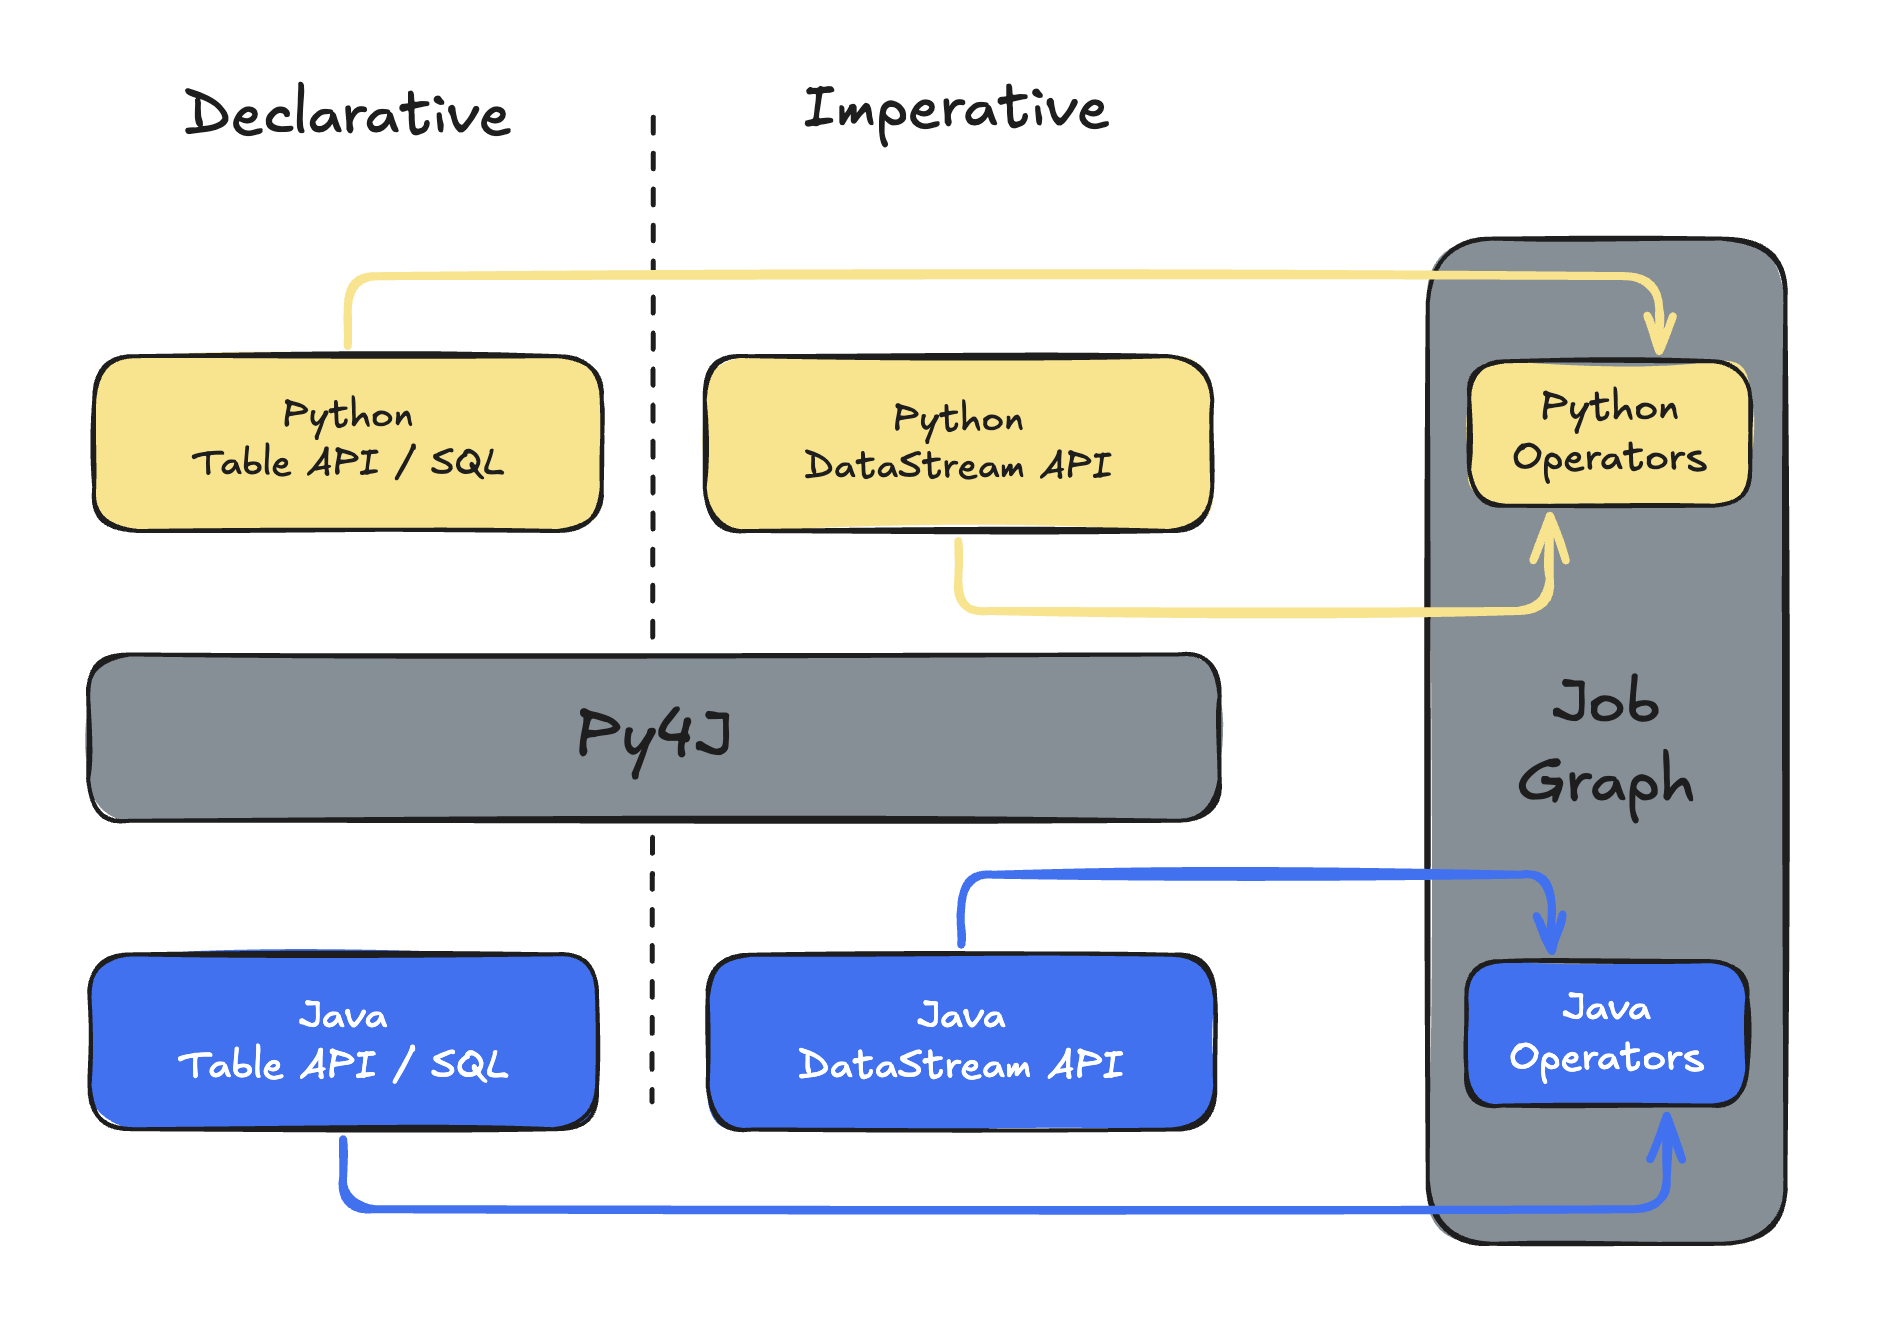
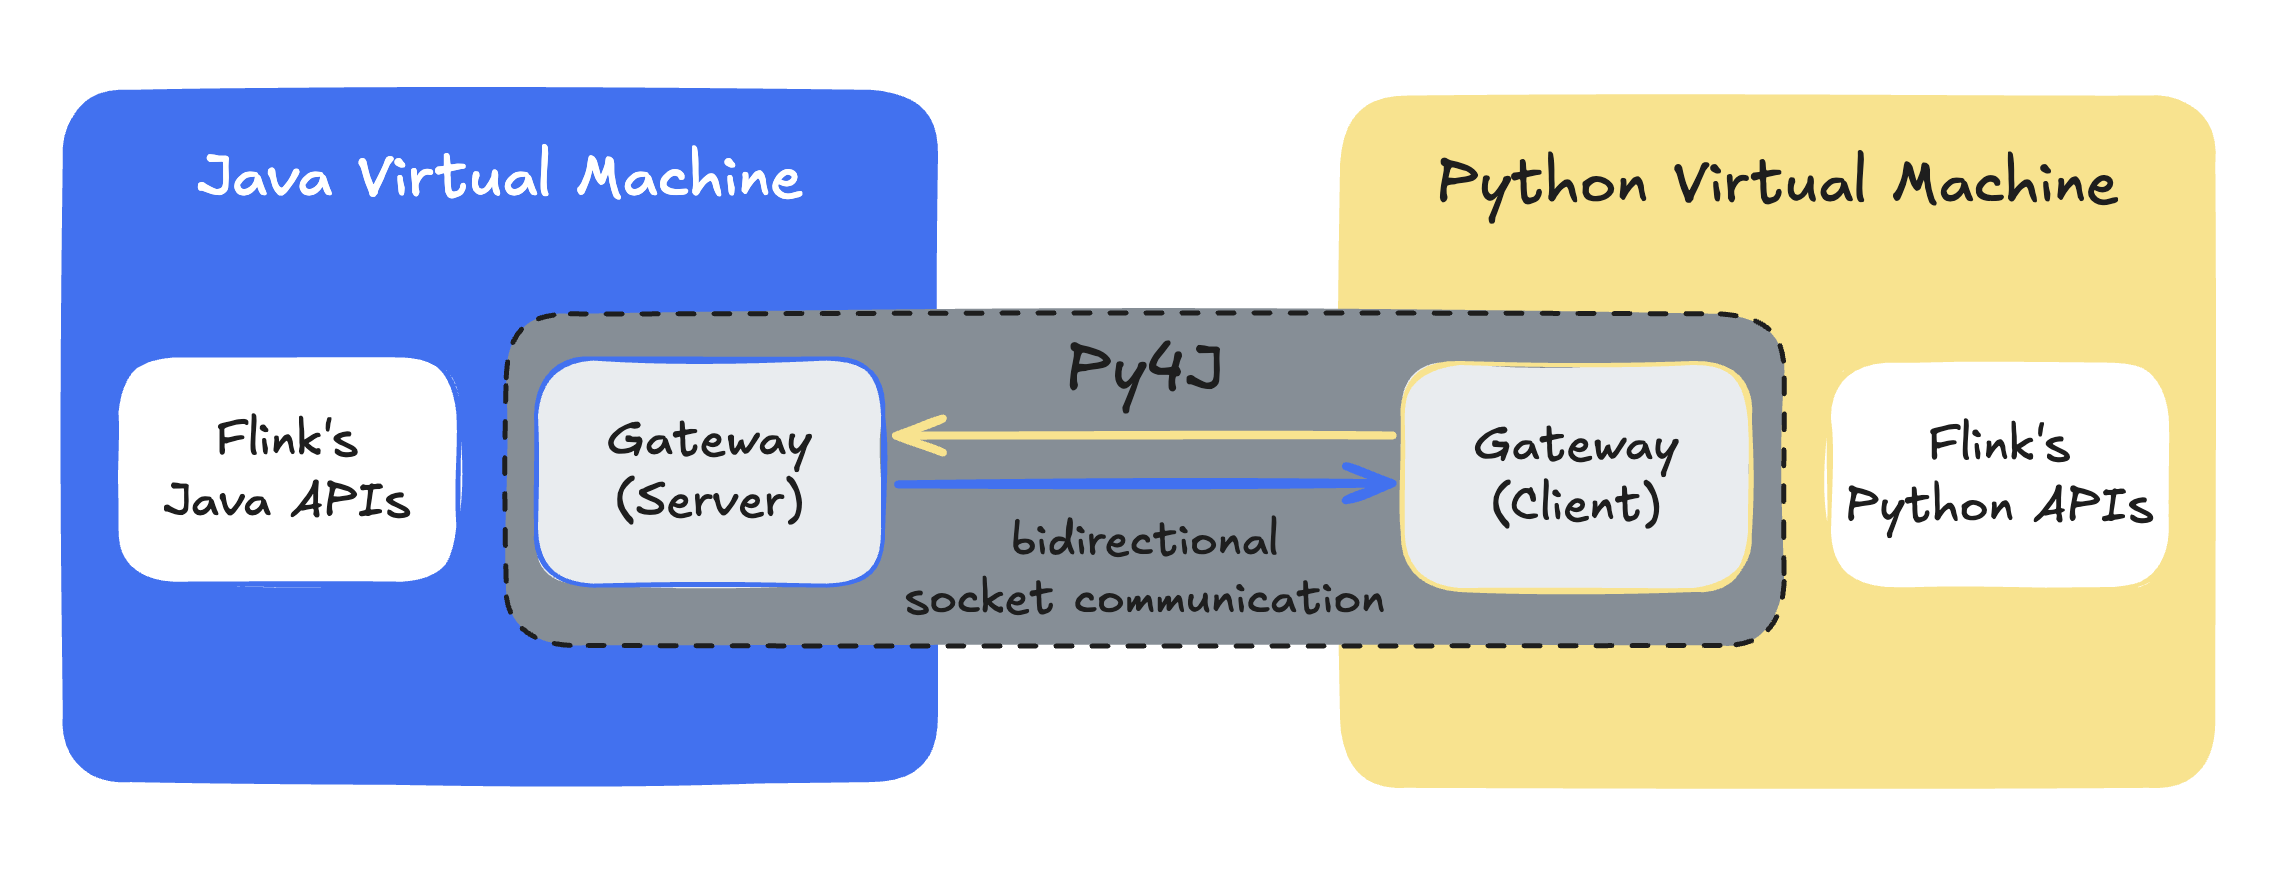
This interoperability has evolved over various releases since PyFlink was introduced in Flink 1.9. Broadly speaking, it relies on mechanisms such as Py4J and, in newer versions, also PemJa to establish a bidirectional communication layer between the Python and Java runtimes.
- Py4J: sets up a gateway in Java that listens on a socket, and a Python client that can call into that gateway. Java objects are exposed to Python as proxies, and method calls, property reads, etc., are forwarded from Python to Java over this socket. Conversely, Java can call back into Python if needed. Until Flink 1.14, this so-called “process” mode was the only option to execute Python user-defined functions that required inter-process communication.
- PemJa: a newer library to embed CPython inside a Java process. Unlike Py4J, it builds upon JNI bindings which simplify certain call paths and improves performance compared to a Py4J-based approach—you are effectively running Python code “inside” the JVM runtime process. In Flink 1.15+, PemJa allows for “thread” mode execution, which means that your Python user-defined functions will run in the same JVM process as Flink itself, thereby avoiding costly inter-process communication and data serialization overhead.
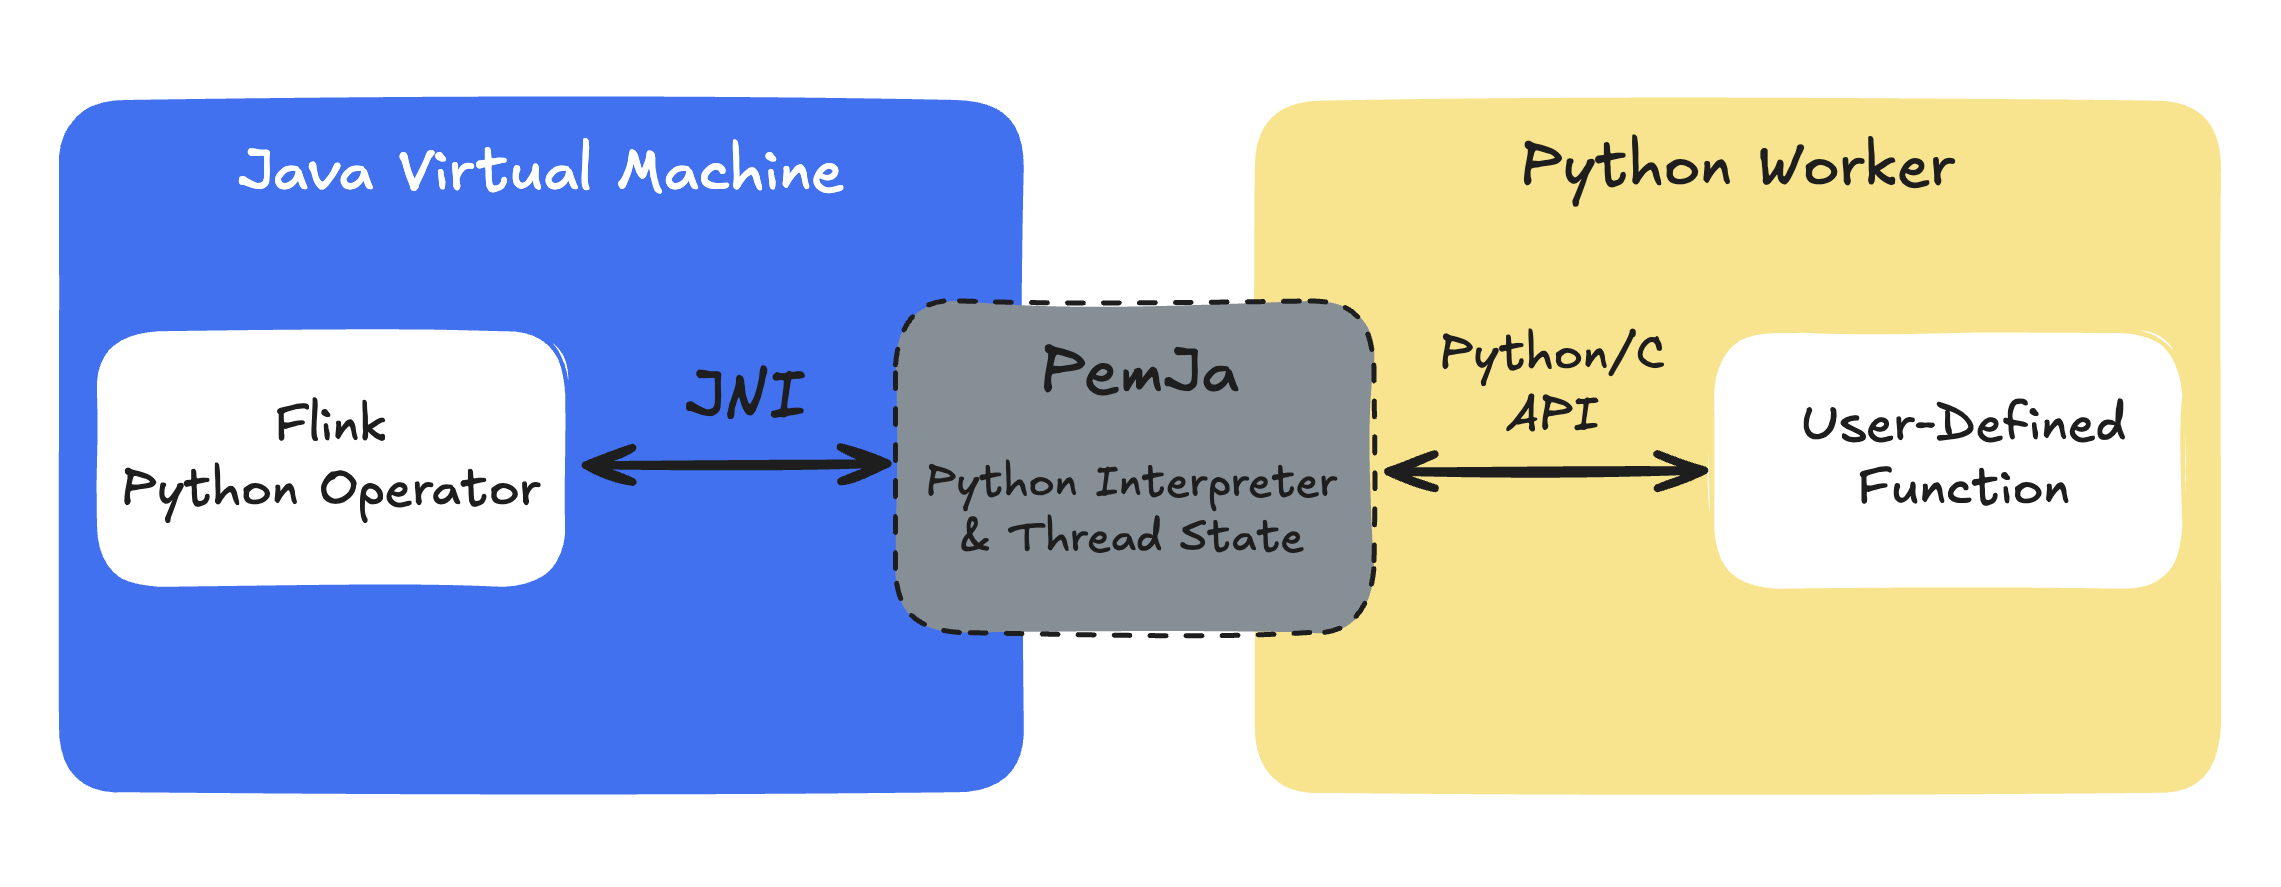
In short, PyFlink’s interoperability approach sits at two levels: a “control plane” layer where you define the job graph in Python, bridging to Flink’s Java APIs and a “data plane” layer where your user-defined function code either runs in a separate process or embedded via JNI.
Real-time Vector Ingestion with PyFlink
After your very first steps with PyFlink, you can put these learnings to good use and explore a rather popular use case these days, namely, vector database ingestion. You are going to write a PyFlink job to build a real-time data pipeline that continuously reads records from an operational database, loads externally referenced content, transforms natural language text into vector embeddings in-flight, and feeds a vector database.
Overview
The PyFlink job reads from a MySQL database table storing books. However, the actual content of the books isn’t directly stored in the database, but instead referenced via URLs pointing to the Gutenberg Books project.
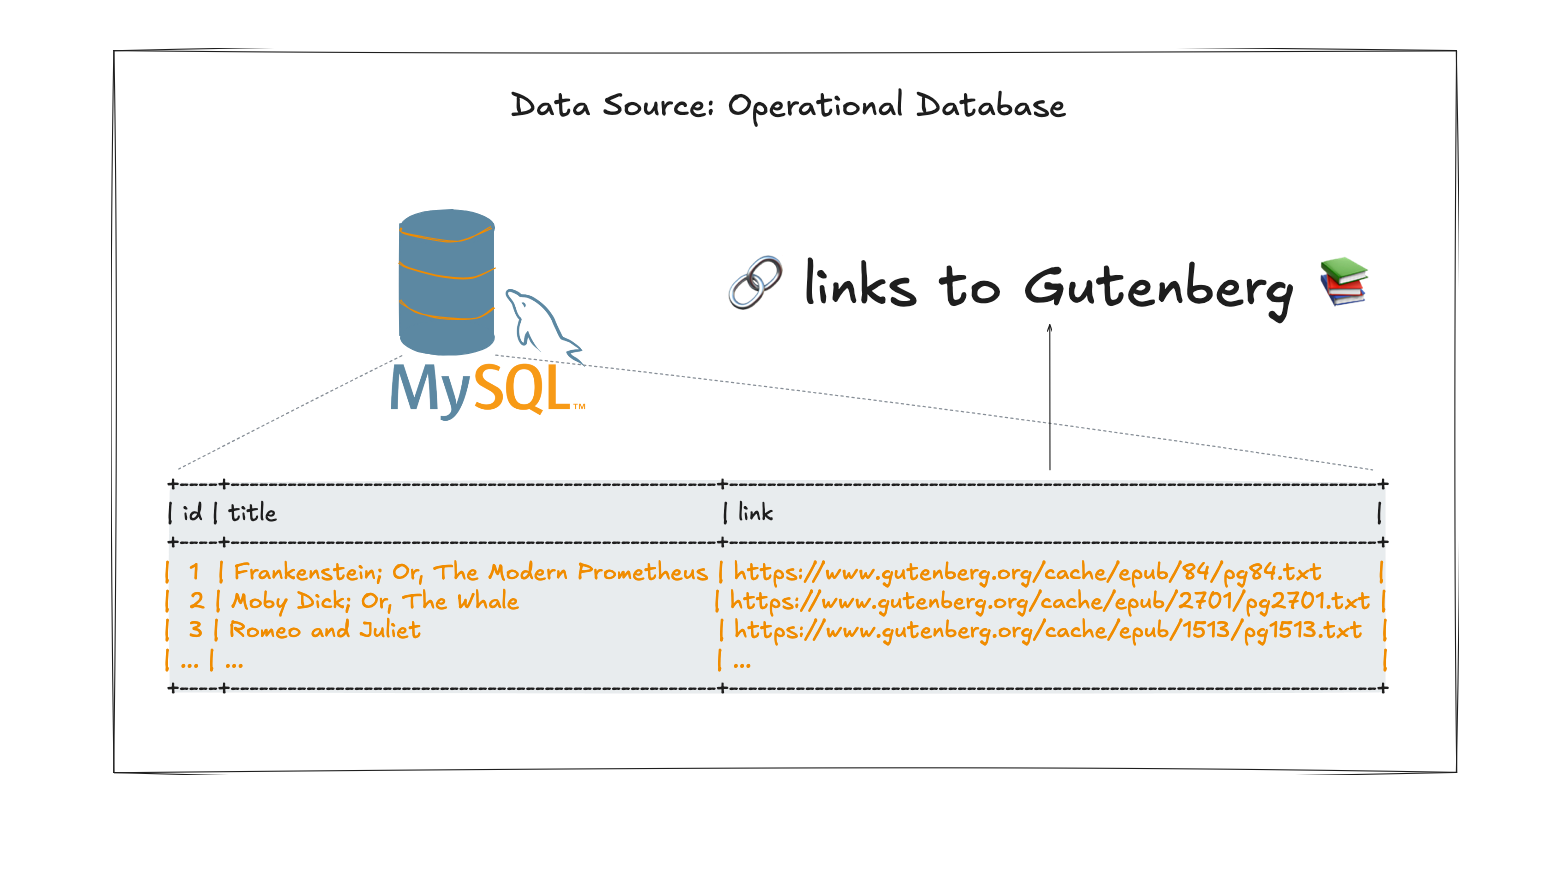
At a high-level, each of these books needs to be processed in multiple steps:
- Load the book content via a URL.
- Split the content into several chunks.
- Calculate vector embeddings for each chunk.
To do this custom data processing, the PyFlink job defines three corresponding user-defined functions (UDFs).

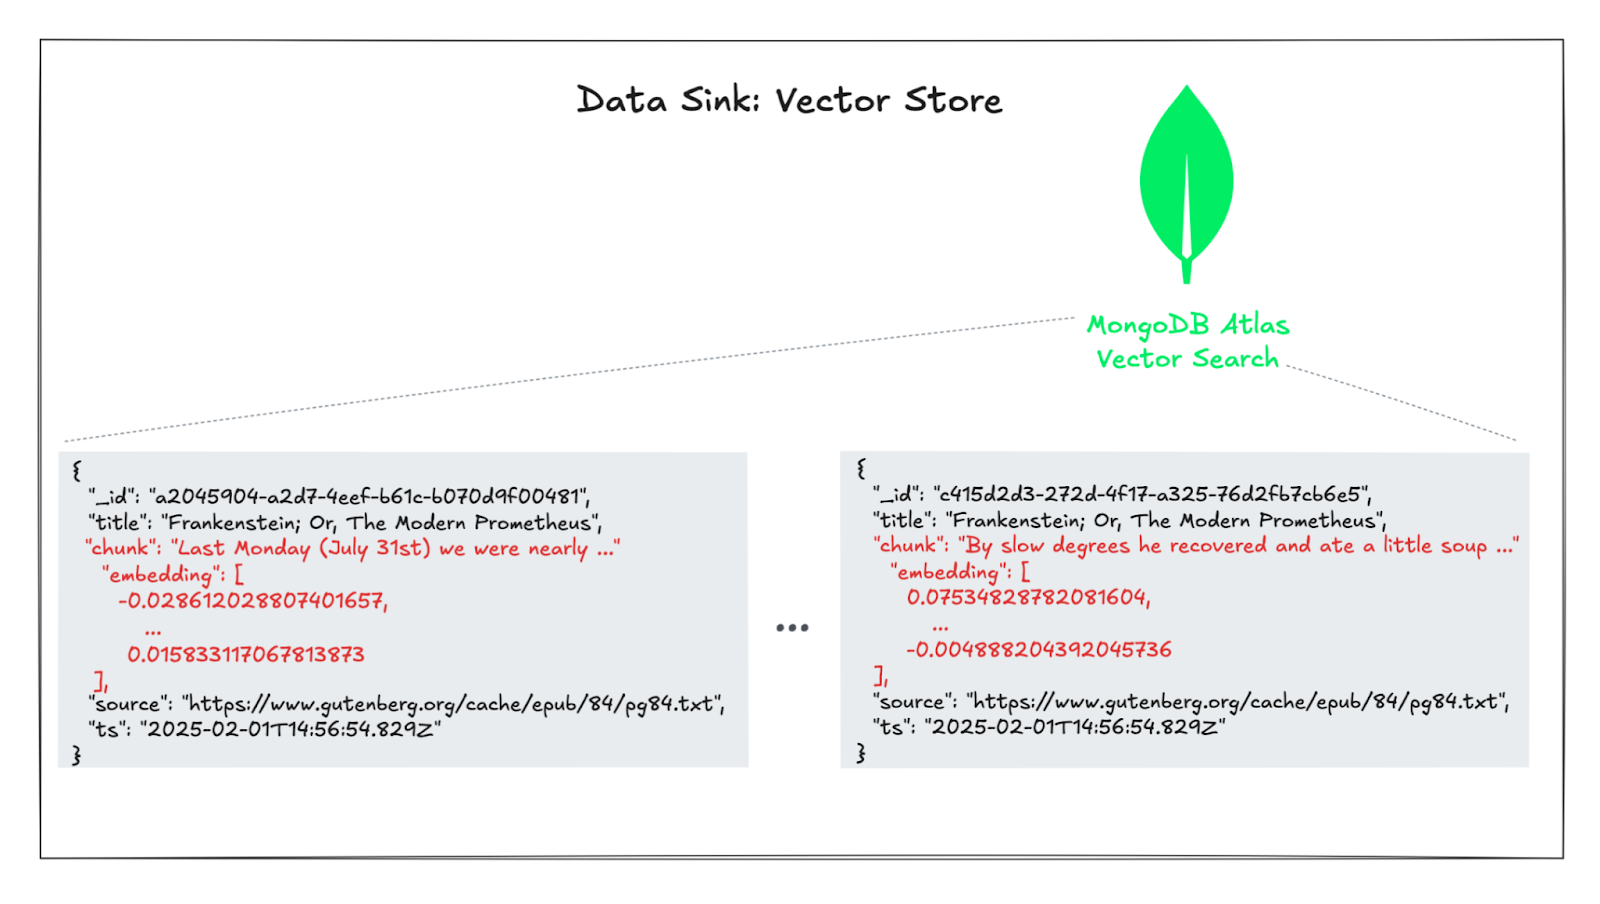
Finally, the resulting vector embeddings for all chunked books are written into MongoDB which acts as the vector store in this example.
Once this real-time pipeline is in place, you can build various use cases around it. Maybe you want to perform a semantic similarity search or do text clustering on the chunked and embedded books contents, or you might want to build more elaborate things on top of it such as RAG-based applications.
Implementation
Setup Table Environment and Add Dependencies
A <span class="inline-code">TableEnvironment</span> is created in streaming mode. The connectivity towards the operational database and the vector store is done using the respective Apache Flink connectors (MySQL CDC source, MongoDB sink).
As discussed earlier, additional job dependencies, such as JARs in this case, have to be included in the job. Here they are expected to be available and referenced directly from a path on the local filesystem.
Write and Register User-Defined Functions (UDFs)
The three custom UDFs which are needed to process the input data captured from MySQL tables are registered as temporary system functions in the <span class="inline-code">TableEnvironment</span> like so:
Note that the actual implementation for these functions is relatively straight-forward as it is based on already existing building blocks from the langchain and HuggingFace projects. See <span class="inline-code">main.py</span> for details.
Define Source and Sink Tables
The source table for this PyFlink job pretty much follows the table schema as found in the MySQL database and is created by means of a DDL statement. The required parameters for the underlying MySQL CDC connector are read from a job configuration file.
Similarly, the sink table structure is defined such that its schema matches the end result of the data processing. The MongoDB connector also gets its parameters from a job configuration file and will write the table rows into a MongoDB collection as documents.
Data Processing with SQL
With all that in place, what’s left is a bit of SQL to define how to process the data, in this case a single <span class="inline-code">INSERT INTO … SELECT … FROM</span> statement as follows:
Note how the three UDFs (<span class="inline-code">LOAD_FROM_URL, SPLIT_TEXT, CALC_EMBEDDING</span>) are called to achieve the custom processing steps outlined further above.
And there you have it, a PyFlink job defining a real-time data pipeline to:
- continuously read data from an operational database (MySQL) using Flink's MySQL CDC connector
- apply custom processing logic by means of user-defined functions (UDFs) which load referenced data from a URL, split it into smaller chunks, and calculate vector embeddings on the fly
- continuously write text chunks together with their vector embeddings into a vector store (MongoDB with Vector Search) using the MongoDB sink connector
Similar to the first PyFlink job you ran earlier, this one can be started from the VS Code GUI or the terminal session that’s attached to the dev container by running:
After a few seconds, the job should be up and starting to ingest into the MongoDB collection <span class="inline-code">vector_demo.book_embeddings</span> which you can verify by running the following on your local machine’s terminal:
You should see a single document representing a text chunk of a book together with its vector embedding.
Tunneling Traffic to Source and Sink Systems
When deploying this job elsewhere, it’s important to keep in mind that the PyFlink job needs to have access to the source and sink systems, here the MySQL and the MongoDB instances. This job expects to read hostnames, credentials, etc., from a configuration on the local filesystem, <span class="inline-code">./secrets/job_config</span>. In order to try this out, there is an <span class="inline-code">ngrok</span> configuration in place which you can use as follows:
- Make sure that you have ngrok installed.
- Log into ngrok and copy your auth token, which you can find here.
- Open the file <span class="inline-code">ngrok.yml</span>, paste your auth token into line 3, and save the updated file.
- Run <span class="inline-code">ngrok start --all --config ngrok.yml</span> in a terminal, which will set up two tunnels to your local machine to MySQL and MongoDB.
- Modify the JSON object’s fields in the configuration file <span class="inline-code">./secrets/job_config</span> as follows:
- <span class="inline-code">mongodb_uri</span>: replace the placeholder with your ngrok hostname and port for the MongoDB TCP tunnel
- <span class="inline-code">mysql_host</span>: replace the placeholder with your proper ngrok hostname from the MySQL TCP tunnel
- <span class="inline-code">mysql_port</span>: replace the placeholder with your proper ngrok port from the MySQL TCP tunnel
Moving Jobs from Development to Production
With your PyFlink job running fine locally, the next step is to think about deploying it to a production Flink cluster. Depending on the Flink cluster runtime available to you, there are different options to do that.
Upstream Apache Flink Deployment
Let’s say you have access to an existing Flink cluster running on Kubernetes that’s ready to deploy Flink jobs using the Flink Kubernetes operator. Then there are two main steps to get your custom PyFlink job deployed:
- Building a container image: using a compatible Flink base image and adding your PyFlink job together with all necessary Python packages and Java dependencies.
- Creating a Kubernetes CRD: writing a custom resource definition (kind: <span class="inline-code">FlinkDeployment</span>) that you can apply to your Kubernetes cluster with tools such as <span class="inline-code">kubectl</span>. The upstream operator project contains several examples like this one.
Check out Getting Started With PyFlink on Kubernetes to learn more about all the related details.
Deploying to Decodable
Another, and certainly much easier, option is to use a fully-managed platform such as Decodable to deploy your PyFlink job using our custom pipelines support for Python. The only artifact you need to provide for this to work is a self-contained ZIP archive. Its contents need to follow some naming conventions and include your own Python code as well as its dependencies.
To make generating this build artifact easier, a <span class="inline-code">Makefile</span> is provided in the example folder. A successful invocation of <span class="inline-code">make build</span> results in a ZIP archive, <span class="inline-code">./target/pyflink-job.zip</span>, that can either be uploaded and started in the Decodable Web UI or used in a declarative resource manifest. One such manifest named <span class="inline-code">decodable-resources.yaml</span> can be found in the source folder. You can apply it using the Decodable CLI by running <span class="inline-code">decodable apply decodable-resources.yaml</span>. As described in the Implementation section above, it’s important that irrespective of the chosen deployment option, the PyFlink job must be configured such that it can successfully communicate to any source and sink systems involved.


