.svg)
.webp)


Rockset
Rockset is a real-time analytics database that is capable of low latency, high concurrency analytical queries. It’s a fully managed database service that supports all the major cloud providers. It uses a storage engine called RocksDB which is an open source key-value data store. RocksDB is used in many high performance storage systems like MySQL, Apache Kafka and CockroachDB. RocksDB is written entirely in C++, for maximum performance. RocksDB is ideal for fast, low latency storage such as flash drives and high-speed disk drives.
In this blog, we will walk you through how to capture IoT data from a MQTT broker. The data will contain metrics from a cell phone. We’ll then transform it and send it to Rockset and visualize it in a real time dashboard.
Building a streaming, real-time ETL with Decodable is super easy and fun (it’s only fun when it’s easy).
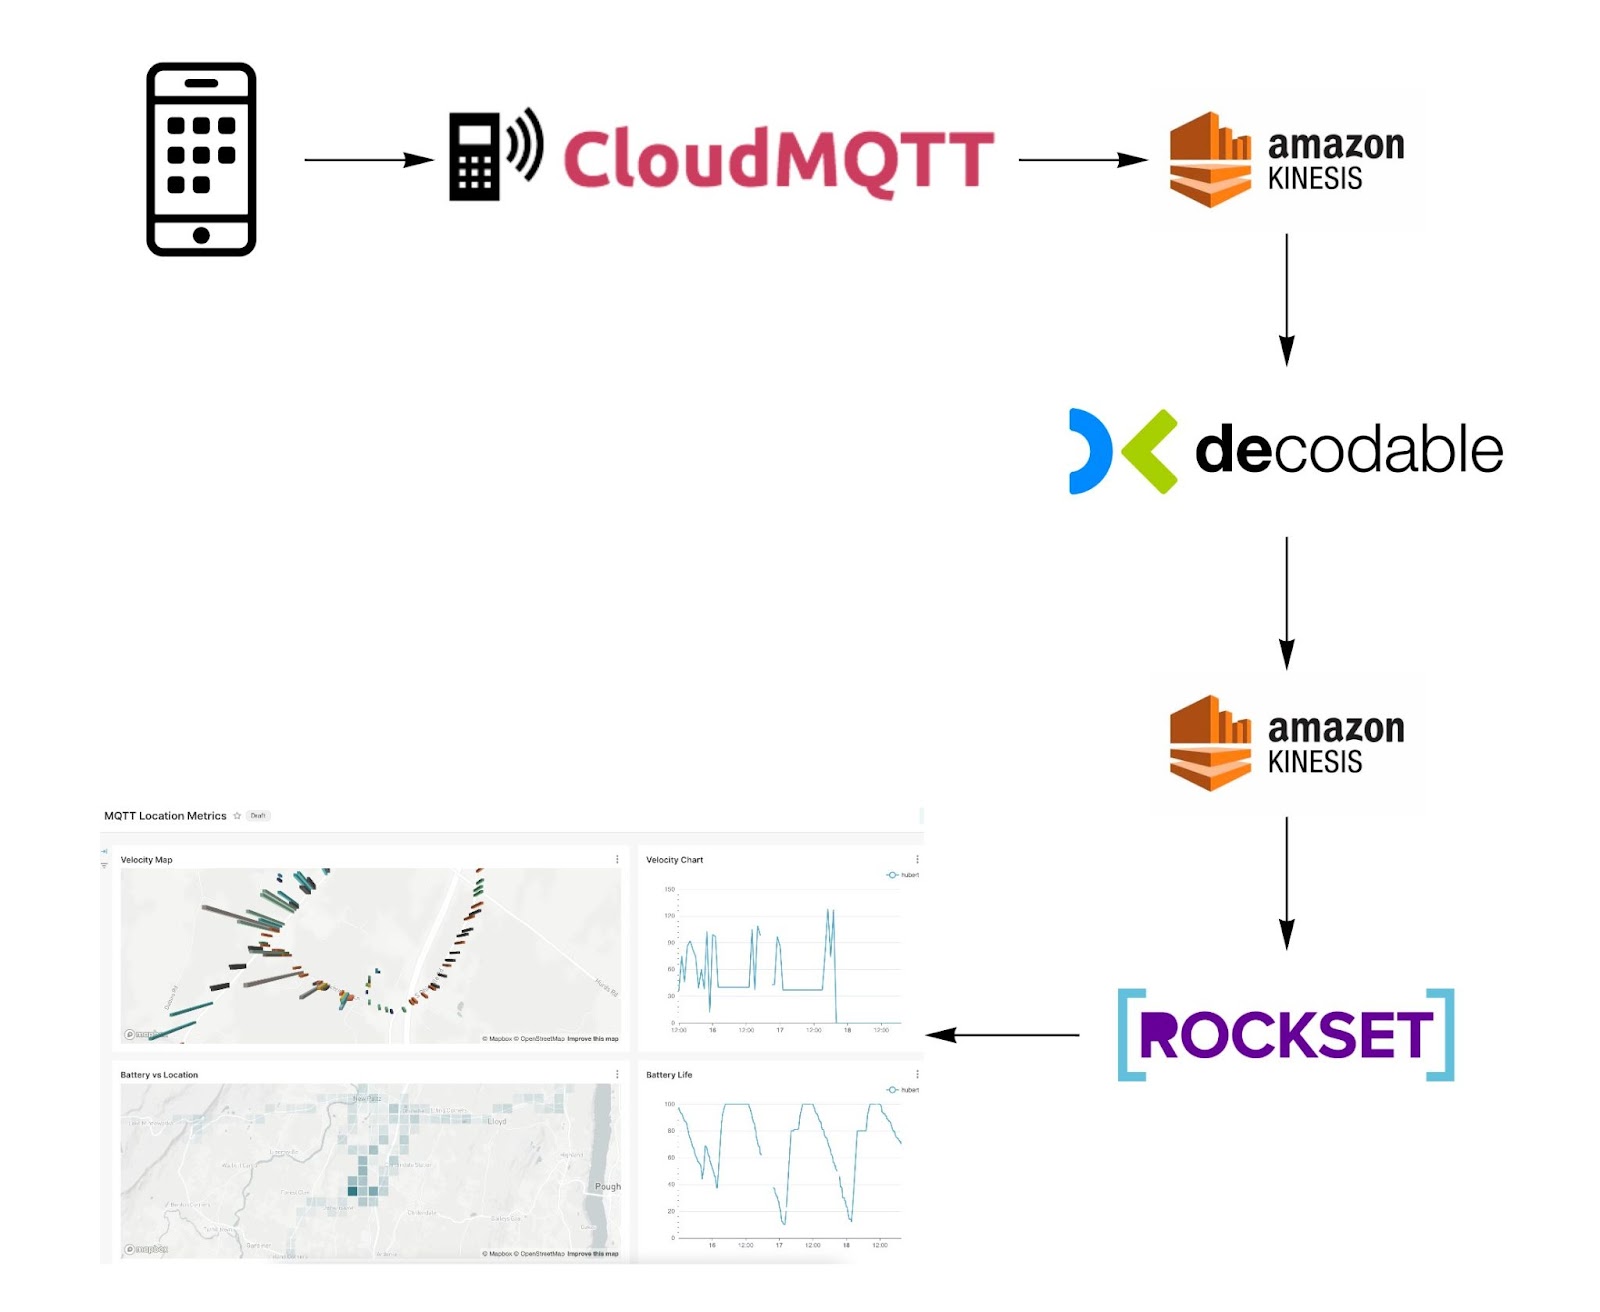
Solution Architecture
Below is the flow of IoT data from the device (cell phone) to the real-time dashboard (superset). We will be utilizing a cloud MQTT broker and AWS Kinesis to capture and stream data. Decodable will be responsible for preparing and aggregating the data prior to reaching the real-time analytical database (Rockset).
Preparing the data early on simplifies the queries executed on Rockset making it run faster, a requirement necessary for real-time reporting.
The hardest part of building this flow is getting all the infrastructure setup. Since we’ll be using fully managed services, it will only take minutes. To get started, proceed to decodable.co to create a free account. Save the name of the account you created so that you can execute the configuration details below.
Owntracks
To start off, we will need to install a phone application called OwnTracks. OwnTracks is an Open Source project for iOS and an Android that records its current location, battery life/level, altitude, etc. You can add friends and family to it as well ( if they are willing 😉).
App Store
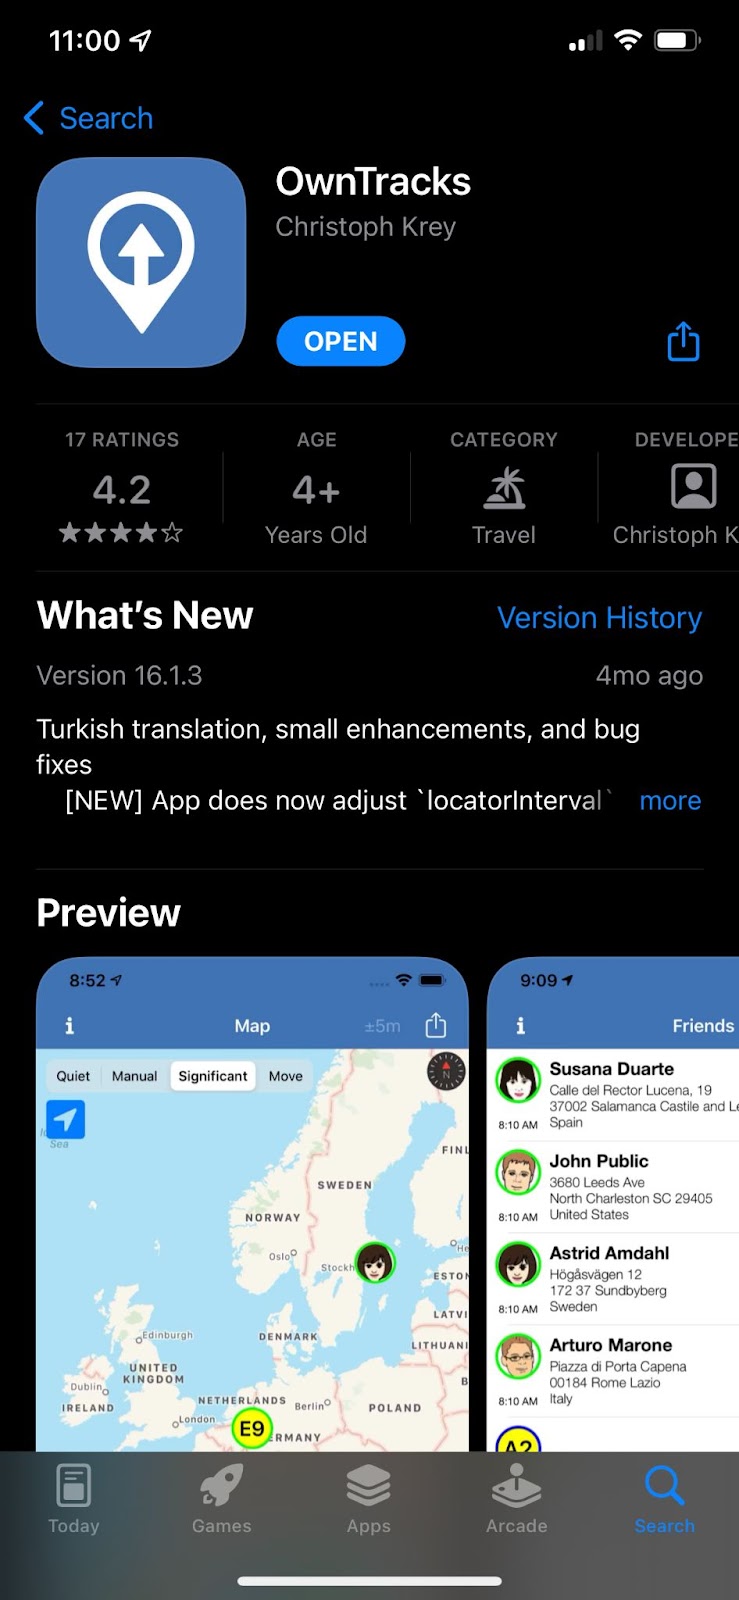
Install this application but we will not configure it until we’ve signed up for a MQTT broker service in the cloud.
MQTT Broker
MQTT is a lightweight, publish-subscribe, machine to machine network protocol. It is designed for connections with remote locations that have devices with resource constraints or limited network bandwidth. (wikipedia)
Since IoT data are mostly being sent from locations like your furnace in your basement, from your car driving in a remote location, or from the sky, the protocol being used needs to support spotty connectivity without issues. This is what MQTT gives us. We should not be sending IoT data to your streaming platform like Apache Kafka directly ( RedPanda enthusiasts, we’ll talk about your use case in a later blog 😀).
The MQTT cloud service we will use in this blog is cloudmqtt.com. There are many alternatives like hivemq.com. Both provide a free tier and are very easy to use. They also support social sign on via google or github so you can set up a free account in minutes.
CloudMQTT Configuration
Once you’ve created an account on CloudMQTT, go to the Details page and grab these properties:
- Server, possibly driver.cloudmqtt.com
- Port
- User
- Password
CloudMQTT’s default configuration will be enough to get you started with their service.
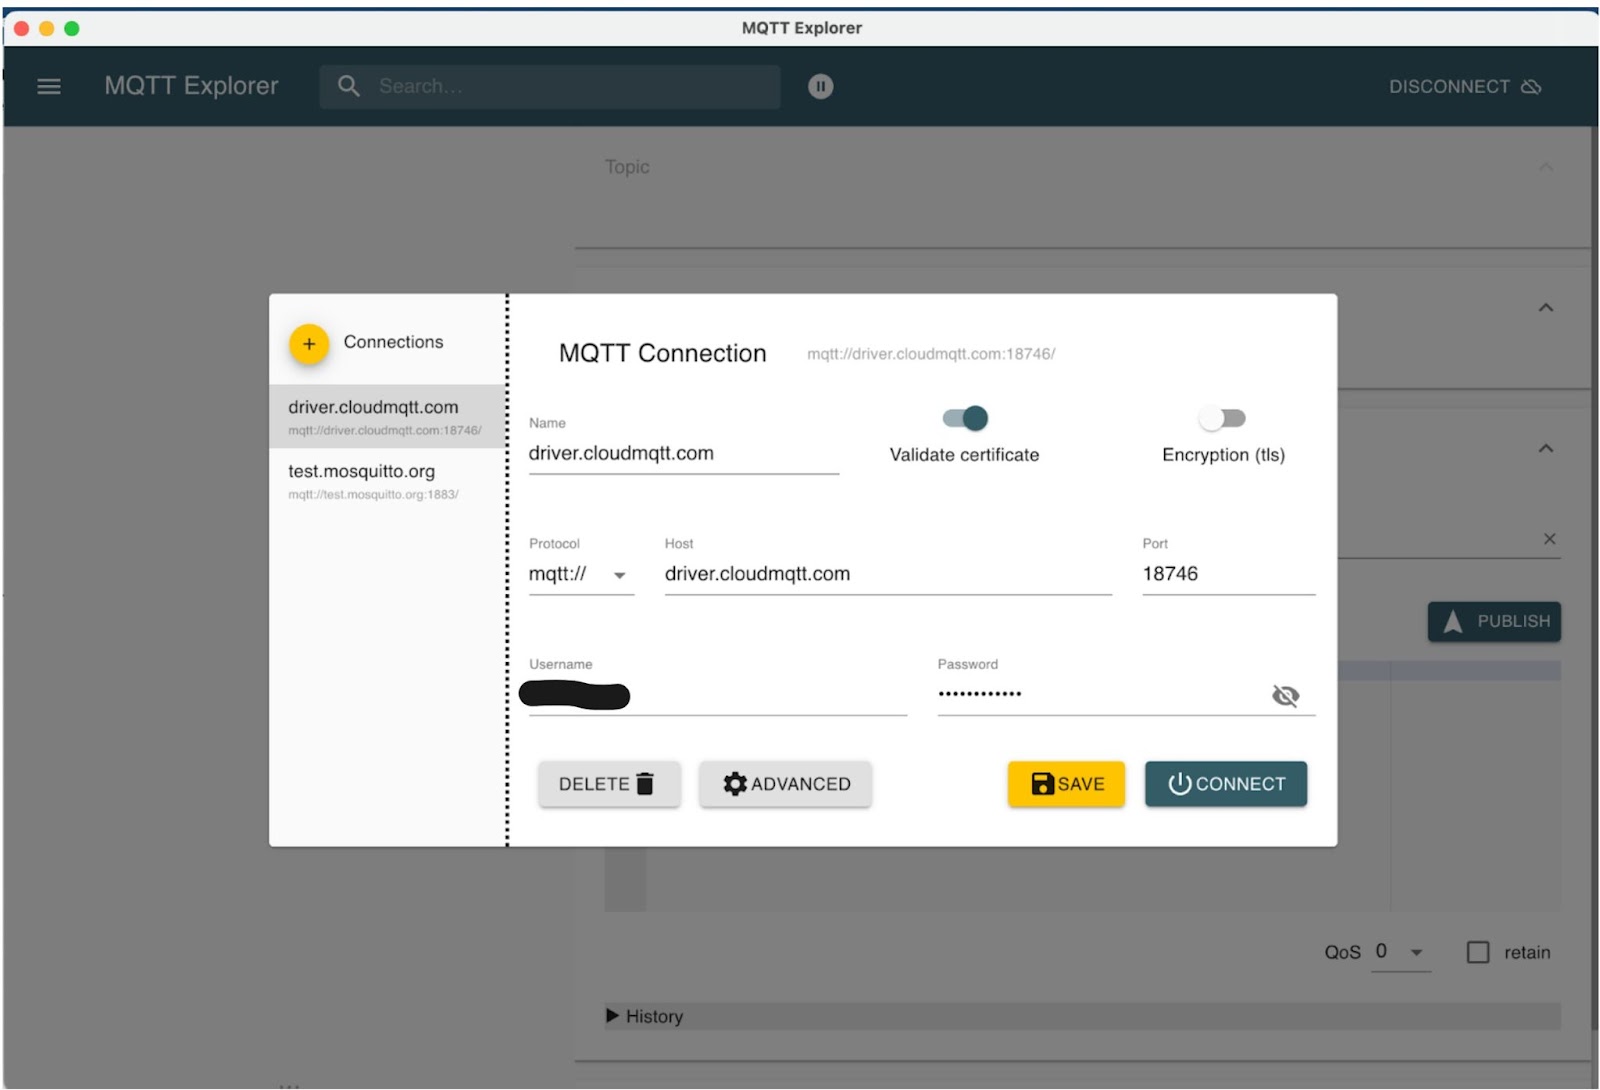
MQTT Explorer
To test your connectivity, you can use MQTT Explorer which is a free tool to explore a MQTT broker. Enter your CloudMQTT configuration details as shown below. Then click on the Advanced button.
In the advanced view, add the topic “owntracks/#”. This will allow you to subscribe to all the users in the owntracks context. The assumption is that all your friends and family members will be using this MQTT broker so that you can visualize them all in MQTT explorer.
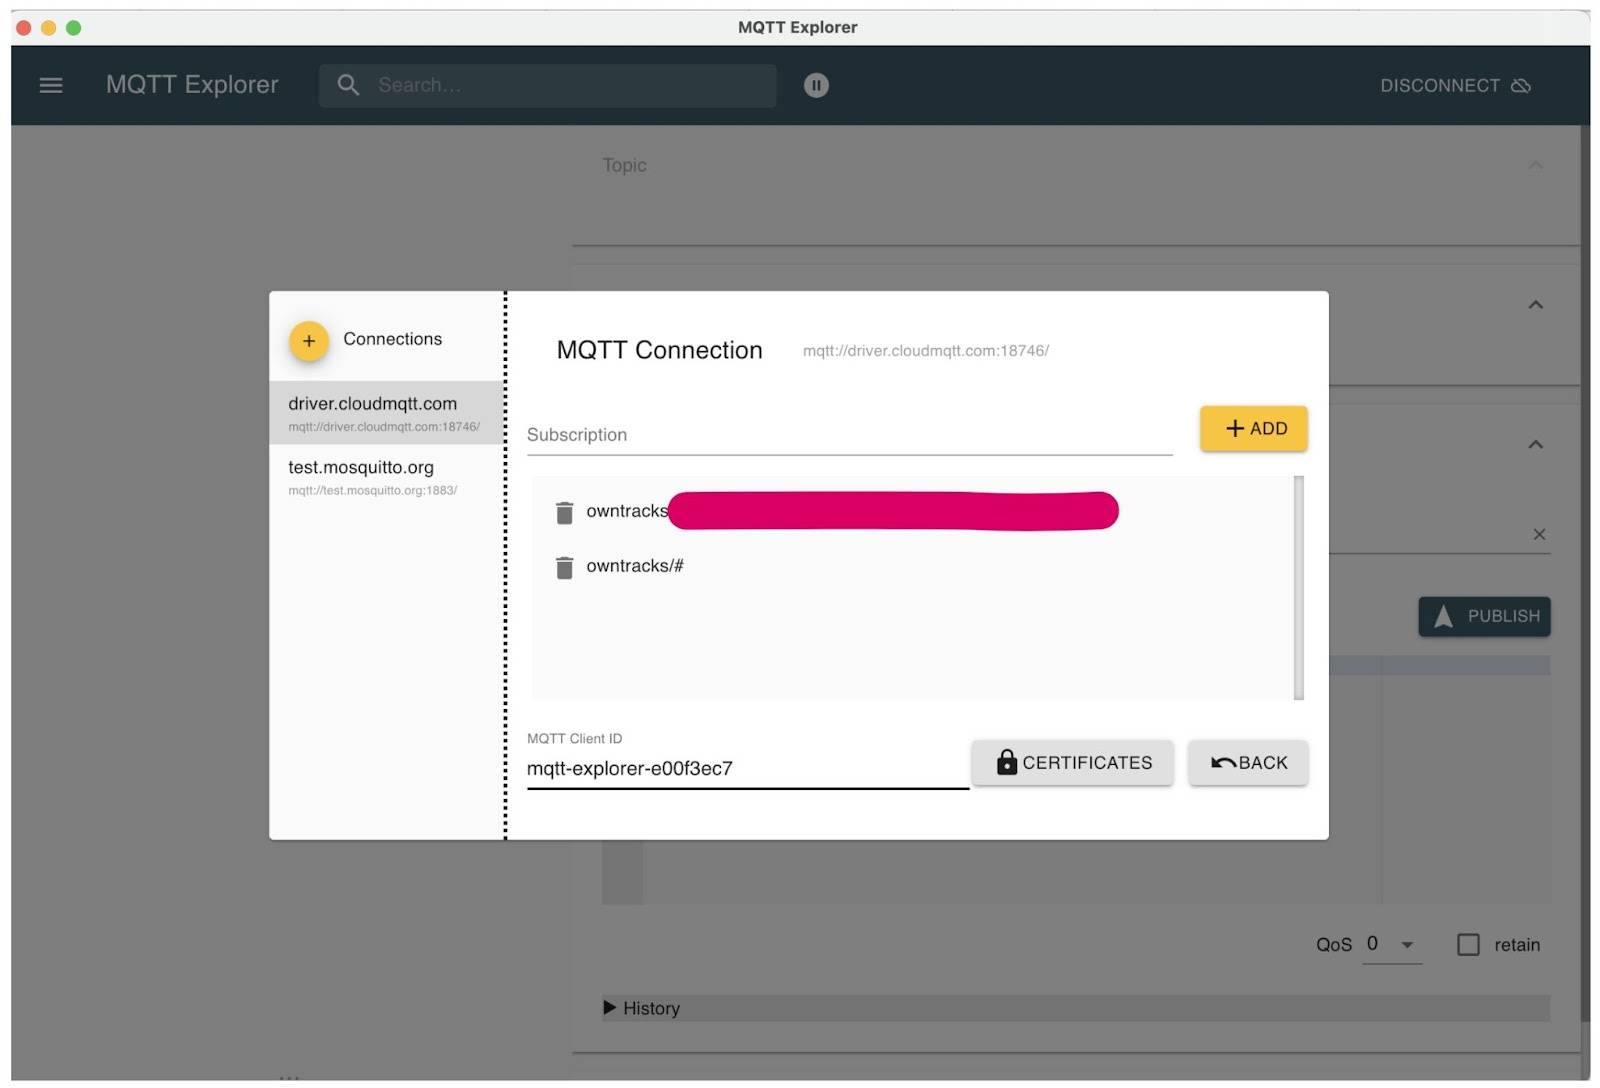
Click on “Back” and then on “Connect” to test connectivity. You will be able to see a navigation tree when you are successful. You will not see any data yet until you configure your OwnTracks application. Let’s do that next.
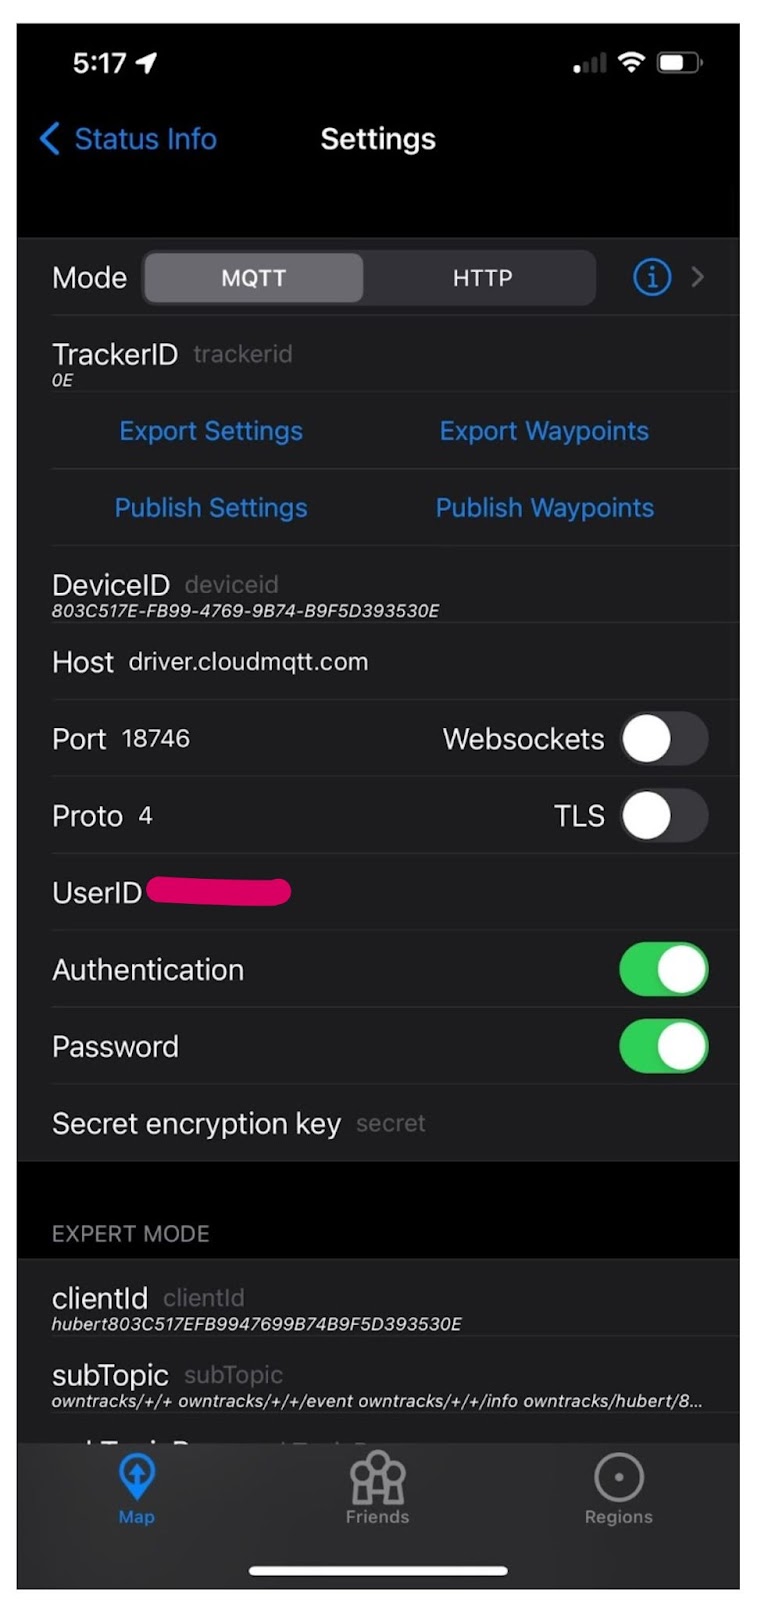
OwnTracks Configuration
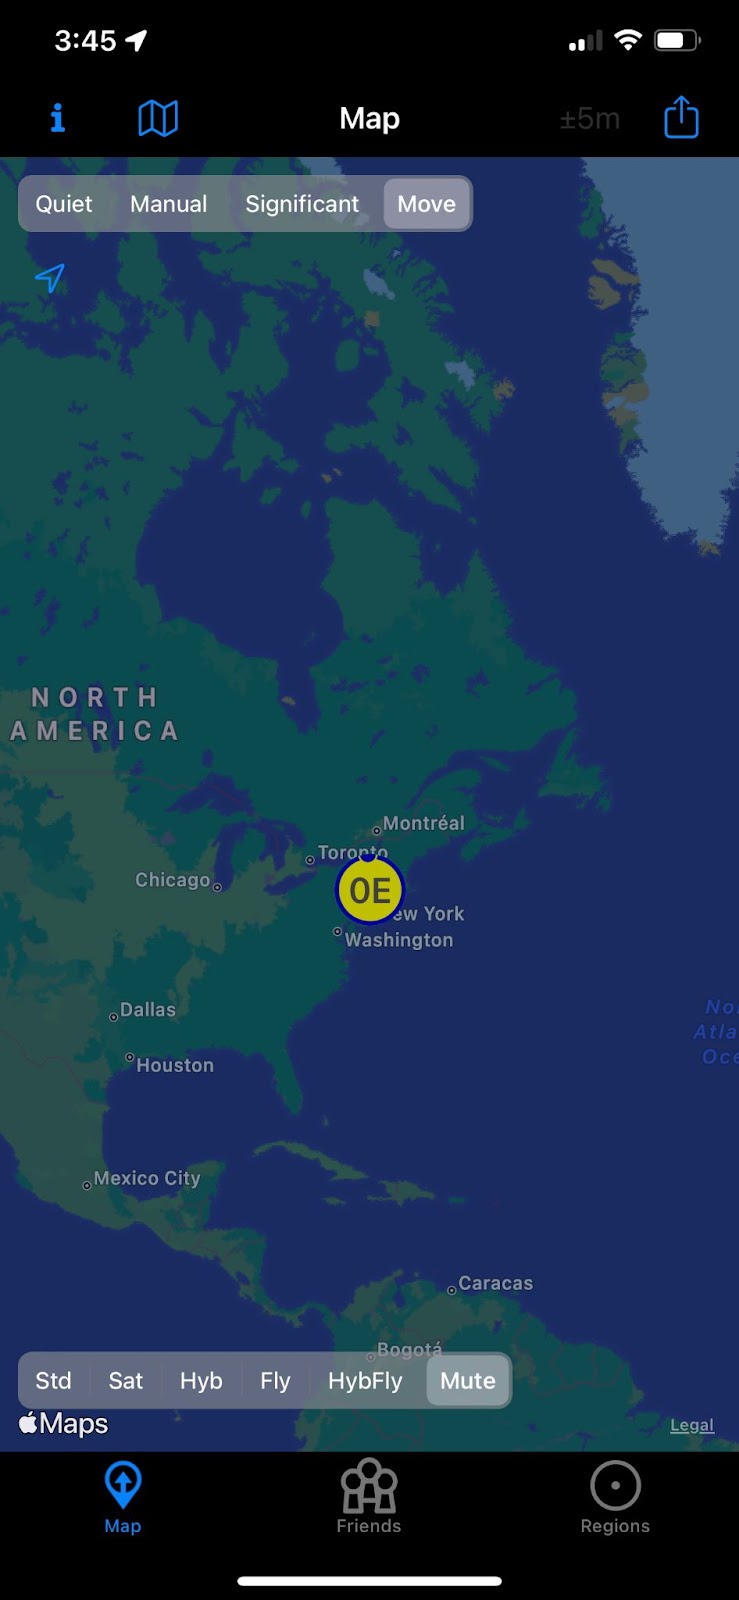
Use the same configuration properties you used to test the MQTT explorer to configure OwnTracks on your phone. You’ll be able to see additional information about what topic your phone will send IoT data to as well as the ID associated with your phone.
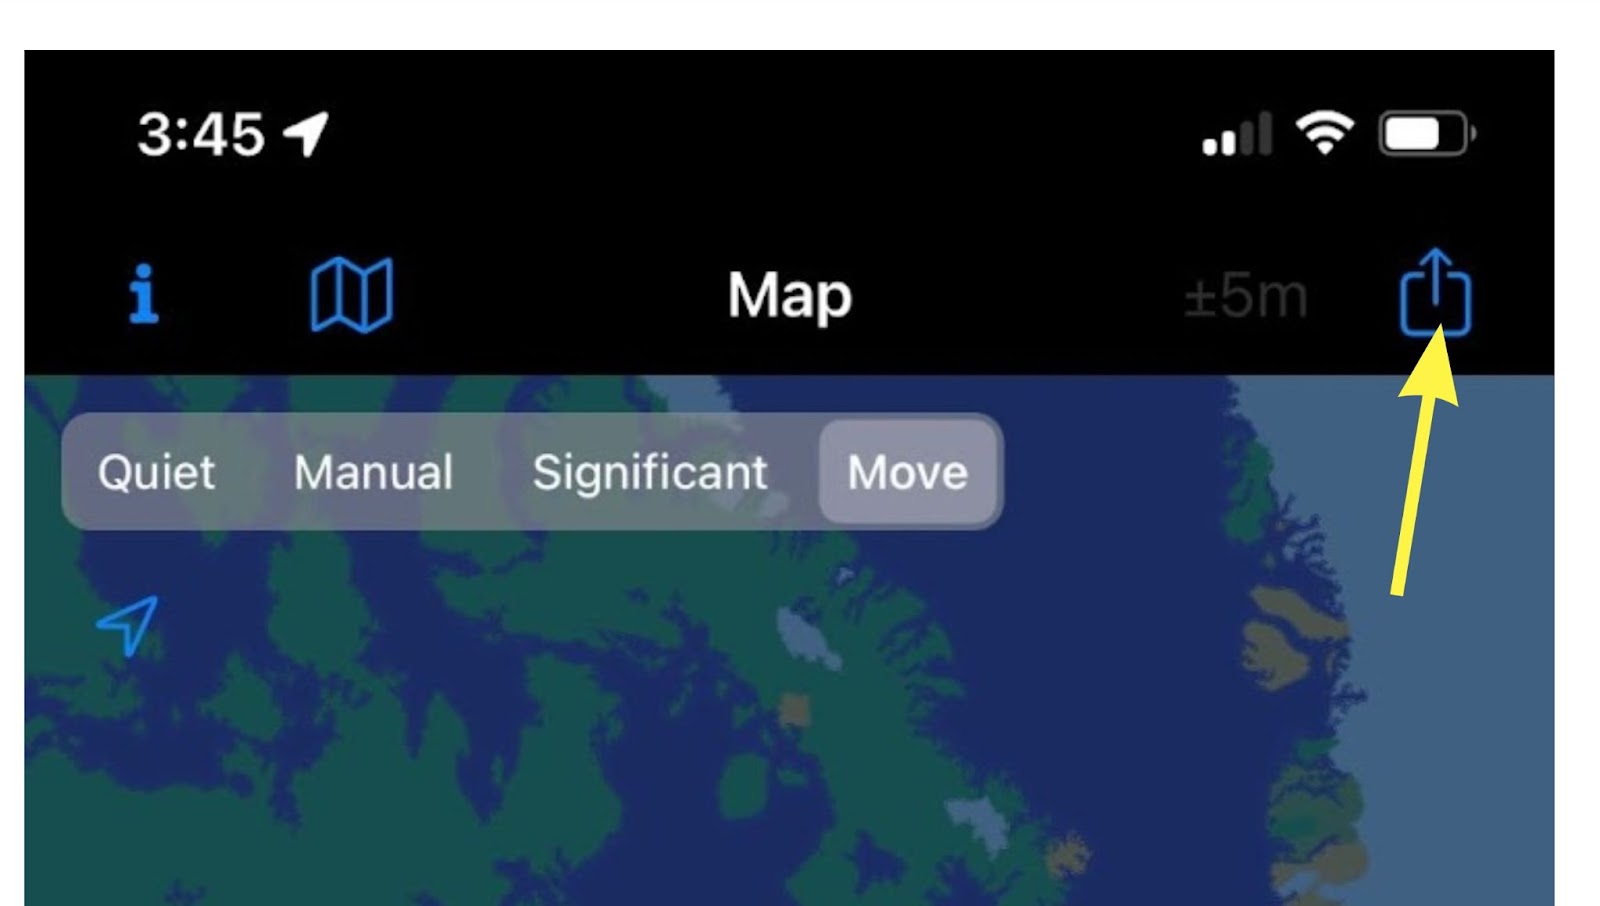
Once completed, click on this button to send your first IoT data to CloudMQTT.
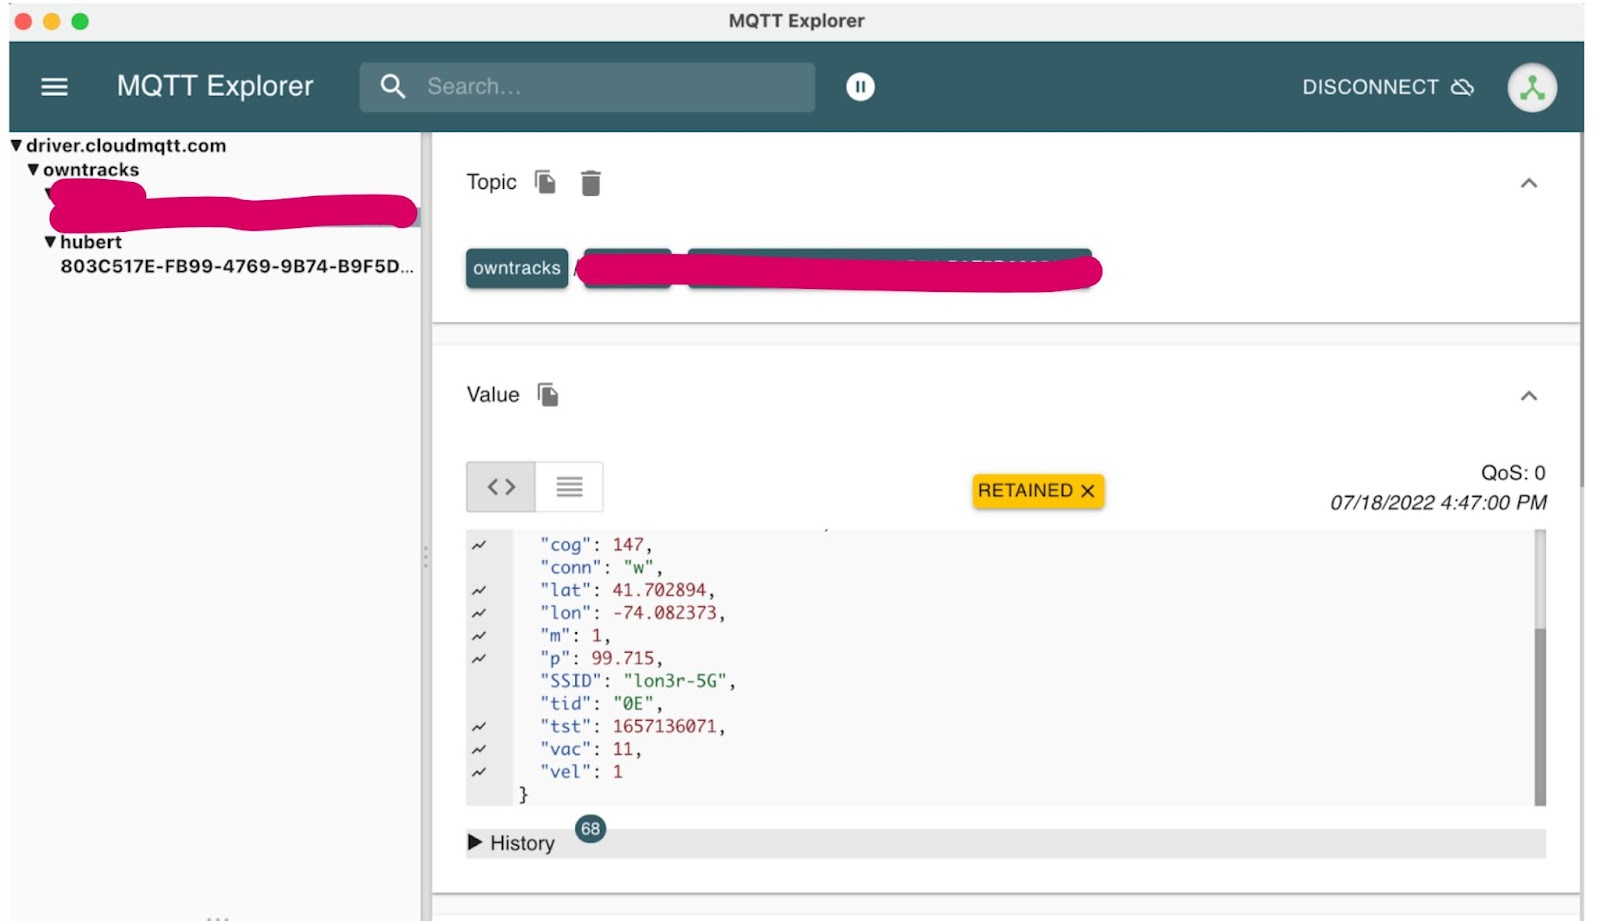
You should be able to see your topic appear as well as your first IoT data containing metrics from your phone in the MQTT explorer similar to the illustration below.
Schema
Details of the IoT data we will be receiving from your phone are covered in this manual page.
The IoT data we will be using are these metrics:
- acc - Accuracy of the reported location in meters without unit (iOS,Android/integer/meters/optional)
- alt - Altitude measured above sea level (iOS,Android/integer/meters/optional)
- batt - Device battery level (iOS,Android/integer/percent/optional)
- bs - Battery Status 0=unknown, 1=unplugged, 2=charging, 3=full (iOS, Android)
- cog - Course over ground (iOS/integer/degree/optional)
- lat - latitude (iOS,Android/float/degree/required)
- lon - longitude (iOS,Android/float/degree/required)
- t - trigger for the location report (iOS,Android/string/optional)
- p - ping issued randomly by background task (iOS,Android)
- c - circular region enter/leave event (iOS,Android)
- b - beacon region enter/leave event (iOS)
- r - response to a reportLocation cmd message (iOS,Android)
- u - manual publish requested by the user (iOS,Android)
- t - timer based publish in move move (iOS)
- v - updated by Settings/Privacy/Locations Services/System Services/Frequent Locations monitoring (iOS)
- tid - Tracker ID used to display the initials of a user (iOS,Android/string/optional) required for http mode
- tst - UNIX epoch timestamp in seconds of the location fix (iOS,Android/integer/epoch/required)
- vac - vertical accuracy of the alt element (iOS/integer/meters/optional)
- vel - velocity (iOS,Android/integer/kmh/optional)
- p - barometric pressure (iOS/float/kPa/optional/extended data)
- conn - Internet connectivity status (route to host) when the message is created (iOS,Android/string/optional/extended data)
- w - phone is connected to a WiFi connection (iOS,Android)
- o - phone is offline (iOS,Android)
- m - mobile data (iOS,Android)
- SSID - is the unique name of the WLAN. (iOS,string/optional)
- BSSID - identifies the access point. (iOS,string/optional)
created_at - identifies the time at which the message is constructed (vs. tst which is the timestamp of the GPS fix) (iOS,Android)
Payload
Raw Message
The data sent to Kinesis actually will be in this raw format:
Notice the IoT JSON data is encoded within the payload property of this envelope JSON. The envelope contains the MQTT topic which has the user information. We will need to use Decodable to extract the JSON payload and extract the user before sending it to Rockset.
Eclipse Mosquitto
Alternatively to MQTT explorer, you can use mosquitto_sub to consume data from the MQTT broker. Likewise mosquitto_pub to send IoT data to the MQTT broker. You can mock your IoT data completely with the mosquitto command line tool.
To consume data from the MQTT broker:
To produce data to the MQTT broker:
AWS2 CLI
You can alternatively send IoT data directly to the Kinesis stream using the AWS2 CLI. The data will need to be base64 encoded before being set as the data argument.
Kinesis
The next step to the flow is to send data from CloudMQTT to Kinesis. CloudMQTT has a direct producer to Kinesis but requires a higher plan. We will instead write our own bridge from CloudMQTT to Kinesis.
The bridge can be found here implemented in python. It uses paho.mqtt.client to read IoT data from CloudMQTT and uses boto3 to write that data to Kinesis. Create a .env file to hold the information needed for the bridge. Populate it with these properties.
Inspect the python bridge to get details of its simple implementation. The python will load this .env file to set its configuration for both CloudMQTT and Kinesis to build the bridge.
Kinesis Configuration
To create a Kinesis configuration, follow these steps documented here. You will need to create a Role and a Policy. When creating a Role, use the “Custom trust policy - Create a custom trust policy to enable others to perform actions in this account”. This will allow you to just paste the JSON configuration below. Decodable's AWS account ID (671293015970) is the principal and “my-decodable-account” is your account name in Decodable.
You will also need to create a Policy and associate it with the Role previously created.
Decodable
Create a Kinesis source connection that uses the ARN for the role you created in AWS. Also provide the stream name, the region, and the format which should be JSON.
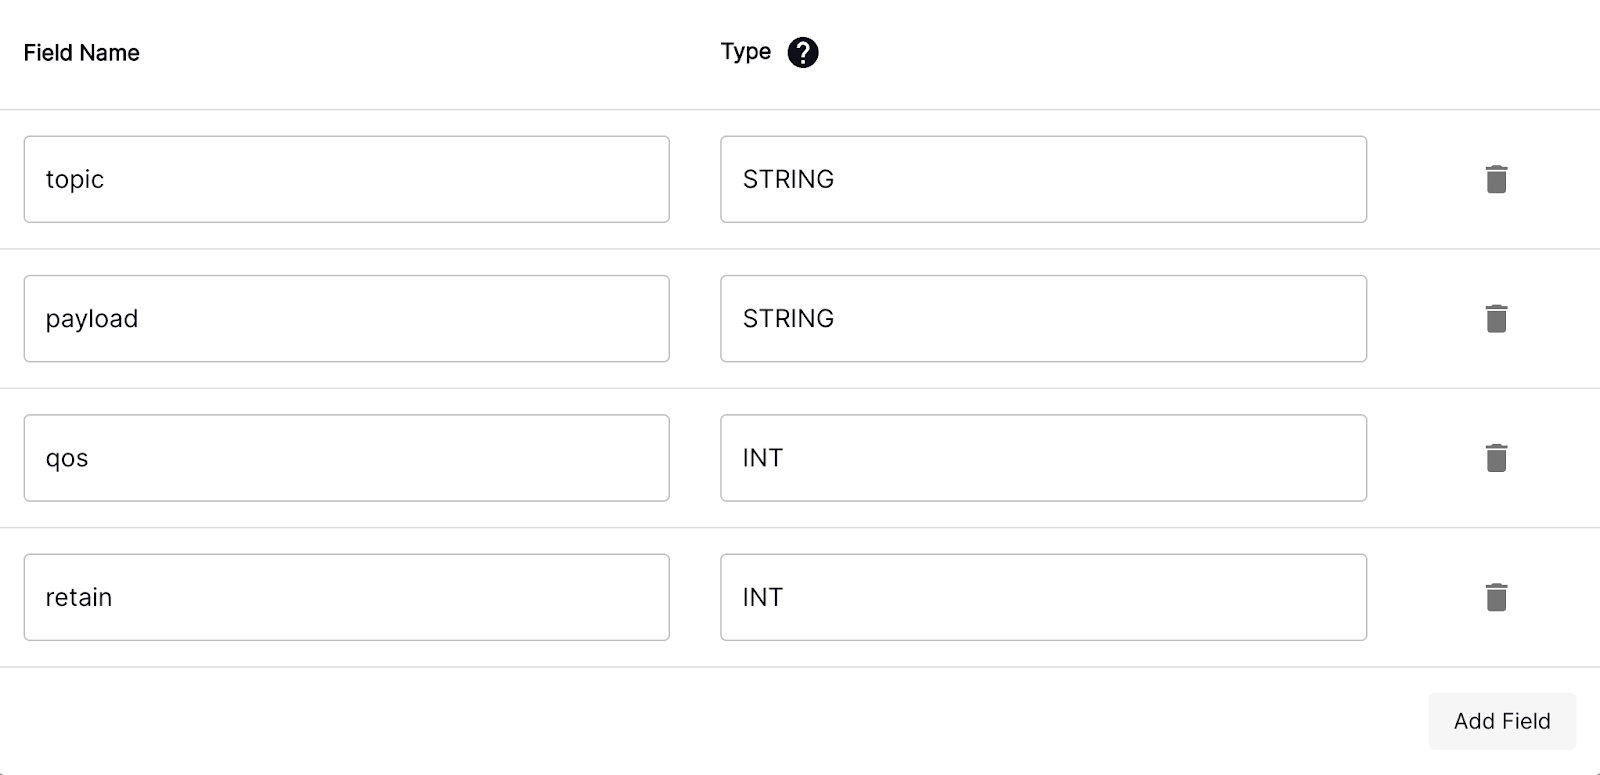
Create a new stream and name it “mqtt_raw”. Set the its schema to this:
Preparing IoT Data
Create a pipeline in Decodable. Pipelines are SQL statements that transform data between streams. Notice how we pull individual values out of the raw JSON from a column and make the column names more descriptive. For example:
CAST(JSON_VALUE(payload, '$.batt') as int) as battery_level
This extracts the batt value from the JSON string and casts it to an integer. Then we rename the column to battery_level.
Rockset Configuration
From rockset.com, signup for a free trial using the social sign on with google or github. Click on “Collections” on the left side and then click on “Create Collection”. Click on Amazon Kinesis and then click on “Create Integration”. Provide a name and description to your integration.
In AWS, create another role but this time for Rockset. Again select “Custom trust policy - Create a custom trust policy to enable others to perform actions in this account”. Use the same JSON format but provide the Rockset Account ID and External ID to their corresponding locations in the JSON below.
Conveniently, you can use the same Kinesis Policy you created for Decodable and assign it to this Role. When finished, copy the ARN for this role and paste it into the “Role ARN” input field in Rockset.
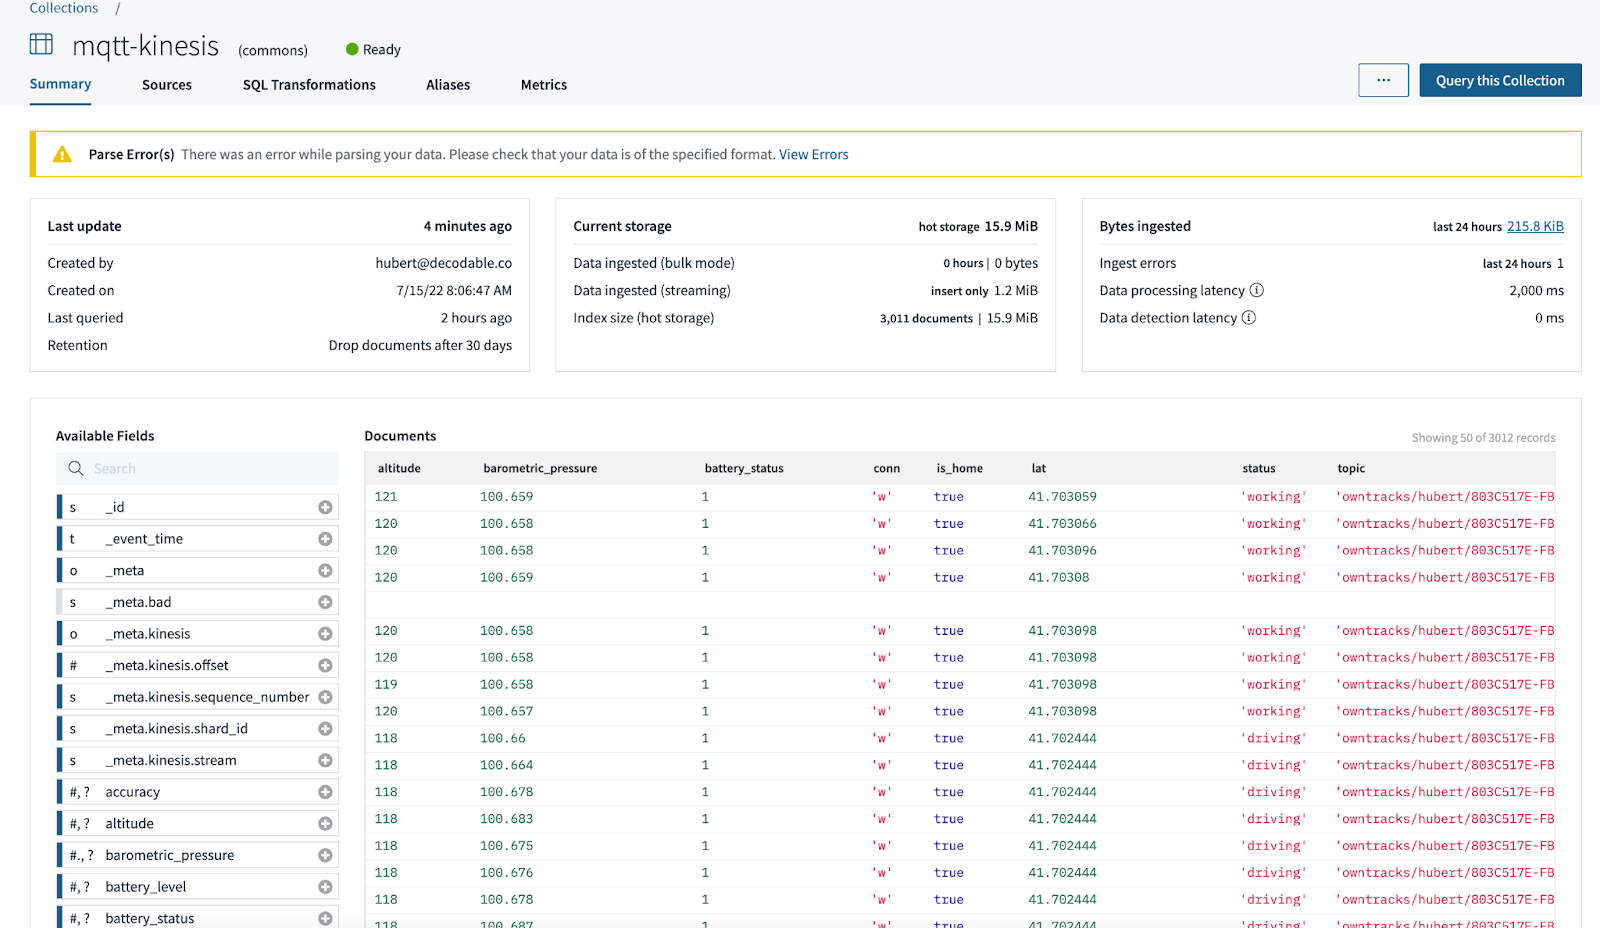
From here, you should be able to see the IoT data reaching Rockset. You can start to build views and aggregations on your new collection.
WARNING: If you send some badly formatted data to the MQTT broker, it will end up in Decodable or Rockset. If Decodable cannot parse your data, any of the components in Decodable will show a parsing error. If somehow it is able to reach Rockset, it too will show a parsing error as seen below. Rockset and Decodable will make best efforts to continue and provide you warnings about the bad data.
Security
Proceed “API Keys” on the left panel. Click “Create API Key” to generate a key. Then click on “View Region Endpoints URLs” to get the endpoint. Construct a SqlAlchemy URI following the format below. We will use this string in the next section when configuring a connection from superset.
rockset://<< ROCKSET_API_KEY >>@<< Region Endpoint URL >>
Superset
Now that we have our IoT data in Rockset, go to preset.io to create an account to create a superset dashboard. Again use social sign on to create a free trial account.
Proceed to Data then Database from the dropdown to create a connection to Rockset. Provide a name and apply the SQLALCHEMY URI from the previous section and test the connection.
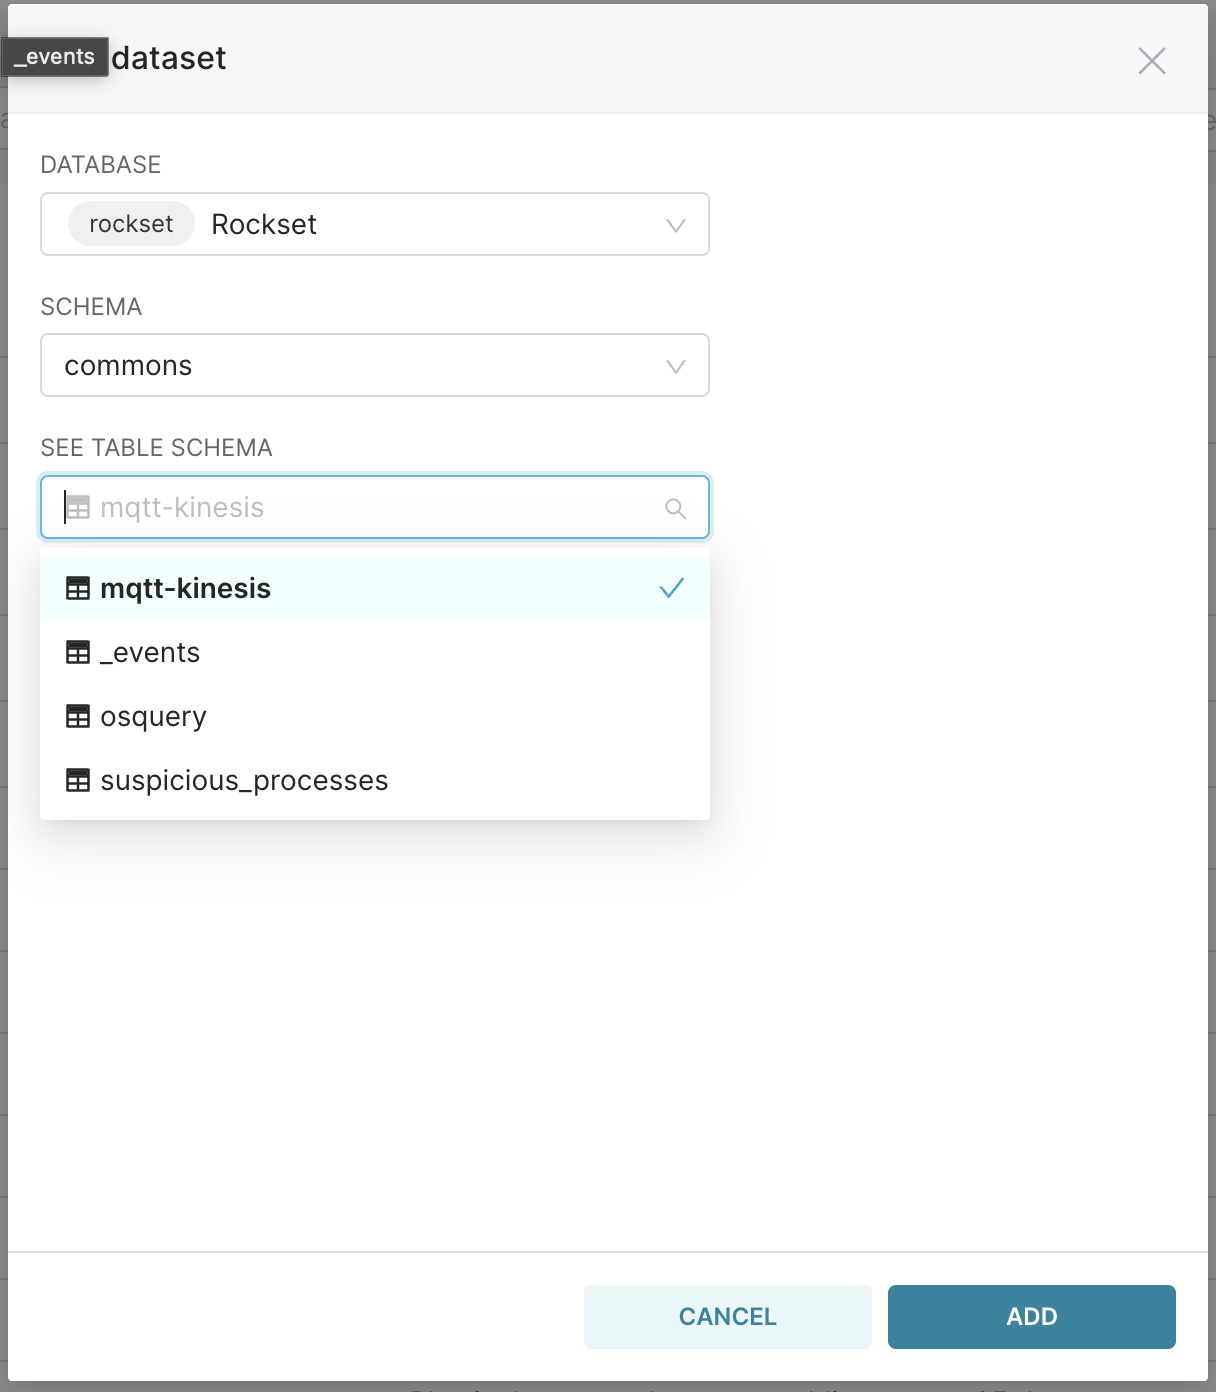
Next proceed to Data then Dataset. Then create a new dataset. Select the Rockset database and the connection from Kinesis. This will create a new dataset from which you will be able to create charts and ultimately a dashboard.
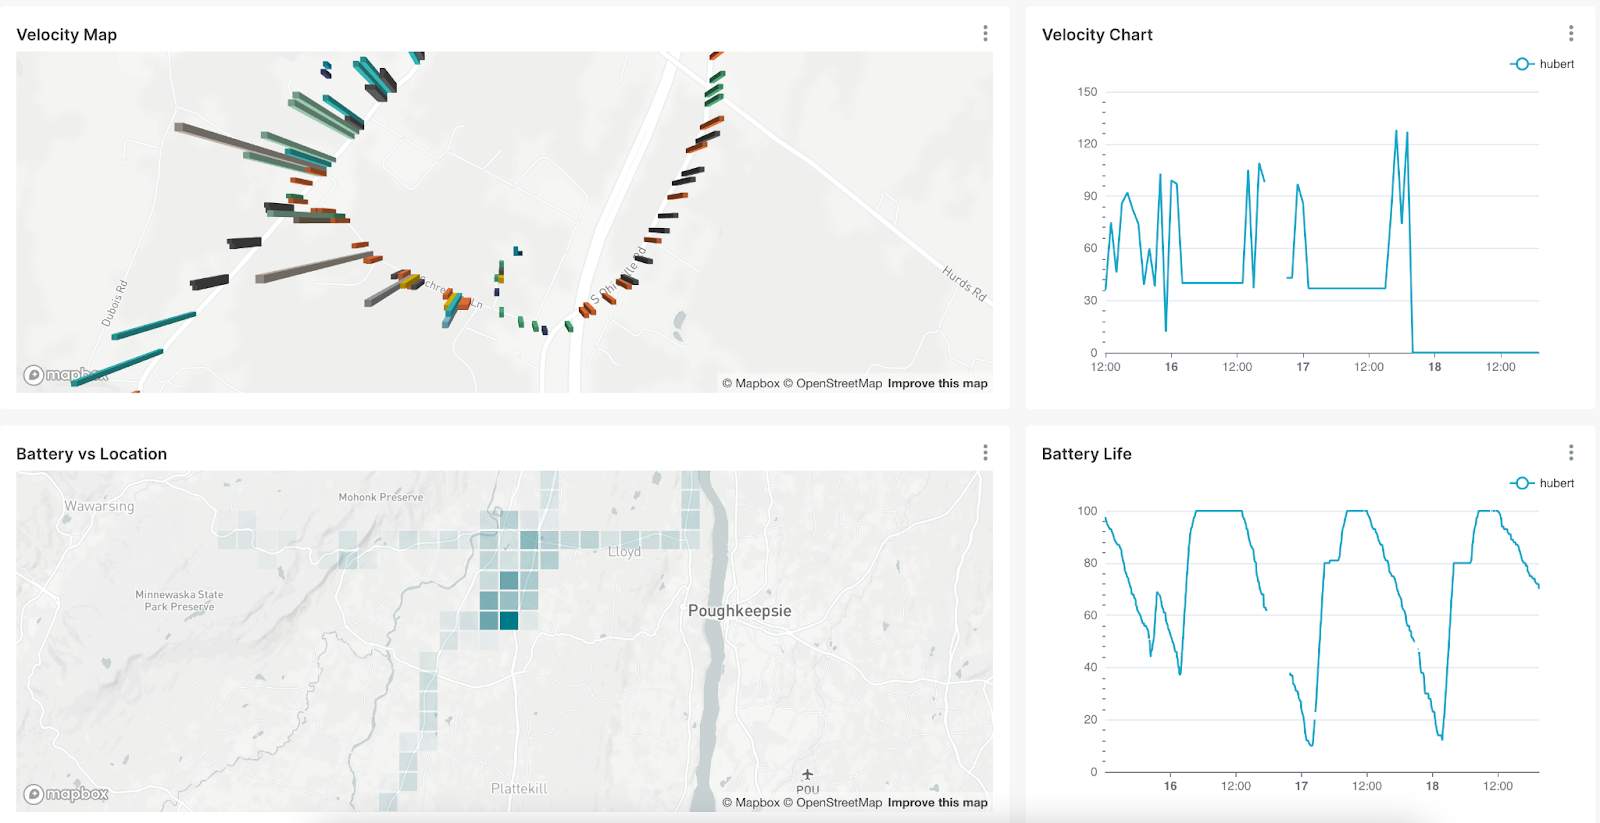
The below dashboard was created from a single dataset but different views. It shows the velocity and battery level of a single user throughout the day.
Summary
In this post, we captured IoT data from a smartphone app. We sent that data to a MQTT Broker in the cloud and bridged it to AWS Kinesis. Decodable pre-processed the data using SQL to a flat format and cleansed them to reduce the workload for Rockset so that it can focus on serving real-time data with low latency. If you would have any questions or would like help in implementing this solution, please contact us at support@decodable.co.
Watch The Video Demo
You can get started with Decodable for free - our developer account includes enough for you to build a useful pipeline and - unlike a trial - it never expires.
Learn more:
- Read the docs
- Check out our other blogs
- Subscribe to our YouTube Channel
Join the community Slack


