.svg)


In this article we want to take a look at how to build a multi-stage, real-time data pipeline on Decodable by combining the flexibility of custom Apache Flink jobs written in Java with the declarative nature of Flink SQL jobs. Before diving into a practical example, let’s briefly revisit the different ways to work with Flink.
Flink APIs and Flink SQL
Flink provides multiple APIs designed to accommodate different user needs. The API choice depends on several factors, most prominently on the actual workload type and the developer expertise of the team building Flink jobs.
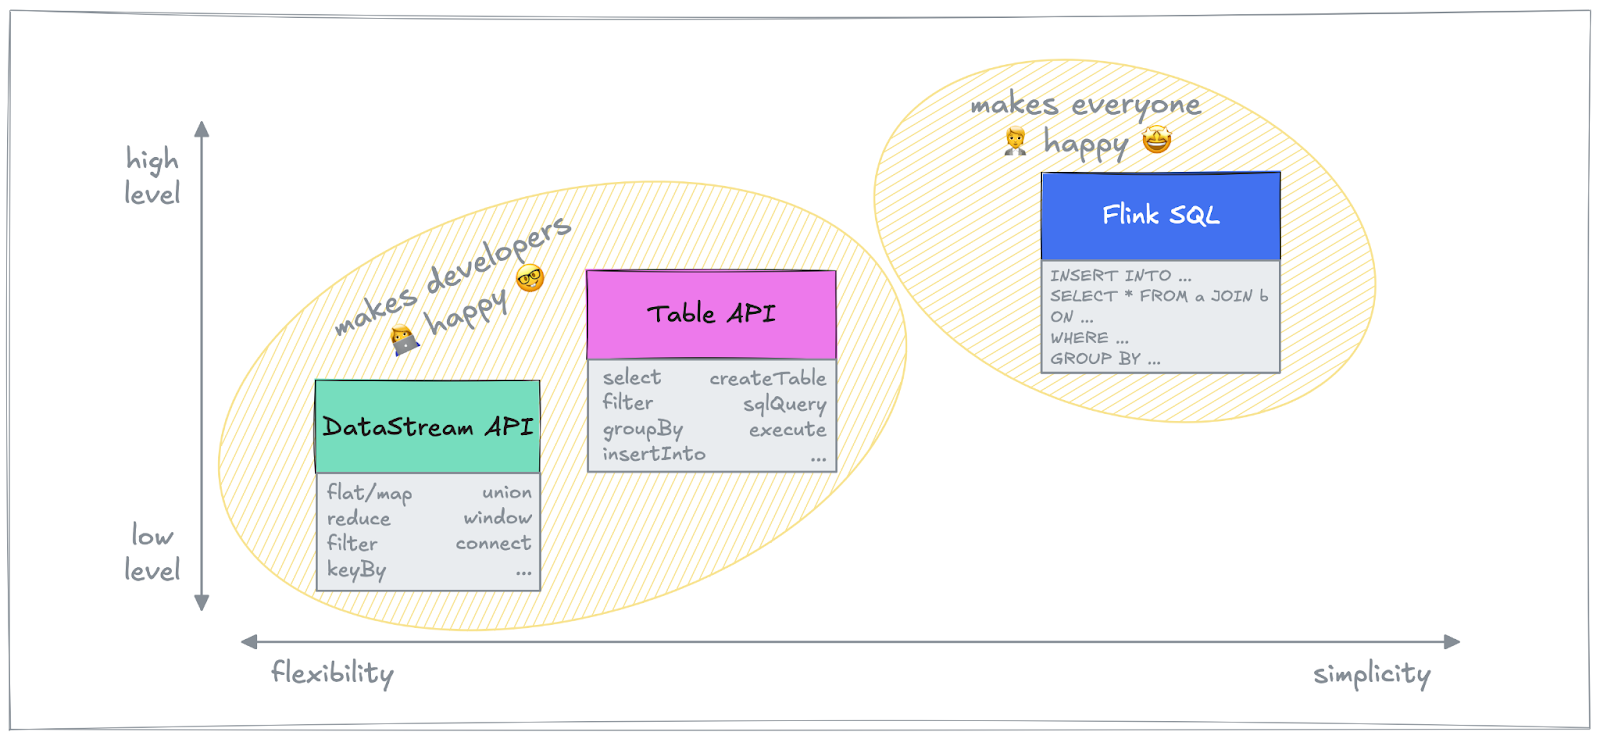
DataStream API
The DataStream API is one of Flink's core APIs, offering access to low-level capabilities with explicit control over various stream processing concepts and aspects such as data transformations, state management, and time handling. It is well-suited for developers who require fine-grained control over data flows by implementing custom partitioning, complex windowing, or custom stateful processing. Written in Java or Python, DataStream API code is a good choice for applications demanding high-performance, event-driven data processing.
Table API
For those who prefer a more structured, relational approach to stream processing, the Table API provides a high-level abstraction that represents data streams as dynamic tables. It enables users to perform common operations like filtering, joining, and aggregating data by means of a domain-specific language (DSL) which resembles the convenience of SQL. The Table API is often used when developers need to process structured data while maintaining the ability to integrate with lower-level APIs when required. It also supports both Java and Python, and bridges the gap between the imperative nature of the DataStream API and the declarative nature of SQL. In fact, SQL can also be used within Table API code for more conciseness whenever reasonable.
Flink SQL
If you are already deeply familiar with SQL and prefer a purely declarative approach, Flink jobs can be expressed in pure SQL using ANSI compliant syntax which makes it very approachable to work with both real-time streaming data and historical batch data in the same way. Under the covers, Apache Calcite is used for query planning and optimization. Flink SQL is particularly beneficial for data engineers and analysts alike who want to interact with streaming data without the need for writing a single line of Java or Python code and can therefore be considered an excellent choice for building streaming or batch-based ETL pipelines.
These APIs represent a comprehensive offering that enables developers to build stream processing applications at varying levels of abstraction and ease of use. Whether you need fine-grained control, structured transformations, SQL-based analytics, or stateful event-driven applications, Flink has got you covered. Ultimately, the API choice depends on the specific use case, the complexity of the application, and the developer’s familiarity with stream processing concepts and languages.
With that, let’s shift gears and switch to a tangible example to understand how to combine the strengths of Flink’s DataStream API and Flink SQL to create a multi-stage, real-time data pipeline.
Real-Time Data Pipeline Example
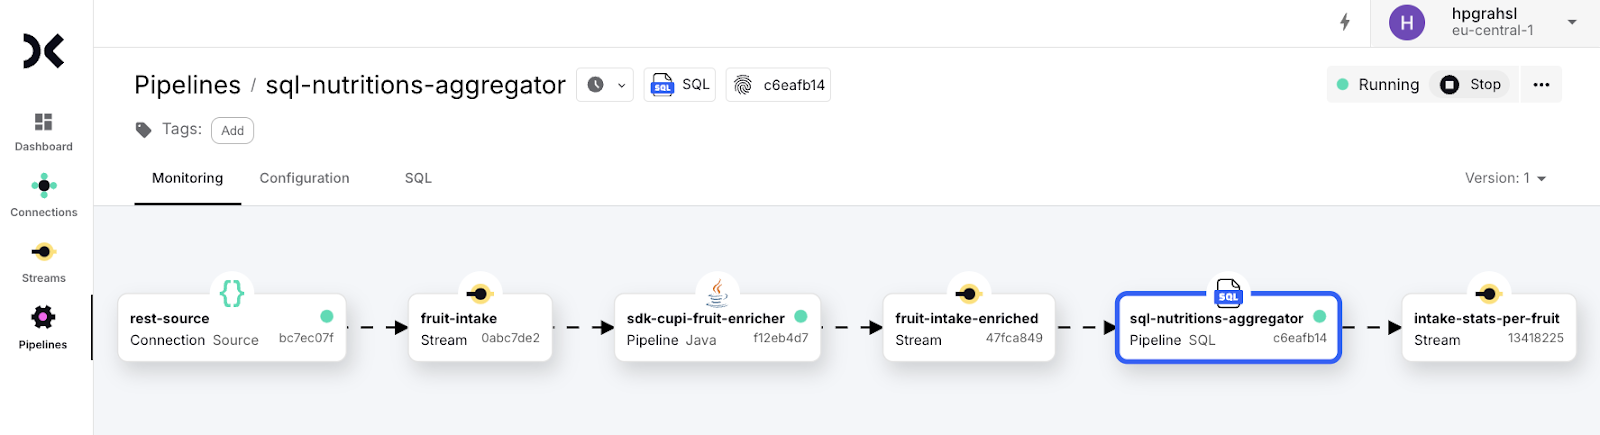
During the rest of this article, we explore how to build an end-to-end data flow which is composed of two separate processing stages: a custom Java pipeline and a SQL pipeline, both running on Decodable. Here is a high-level illustration of the use case:
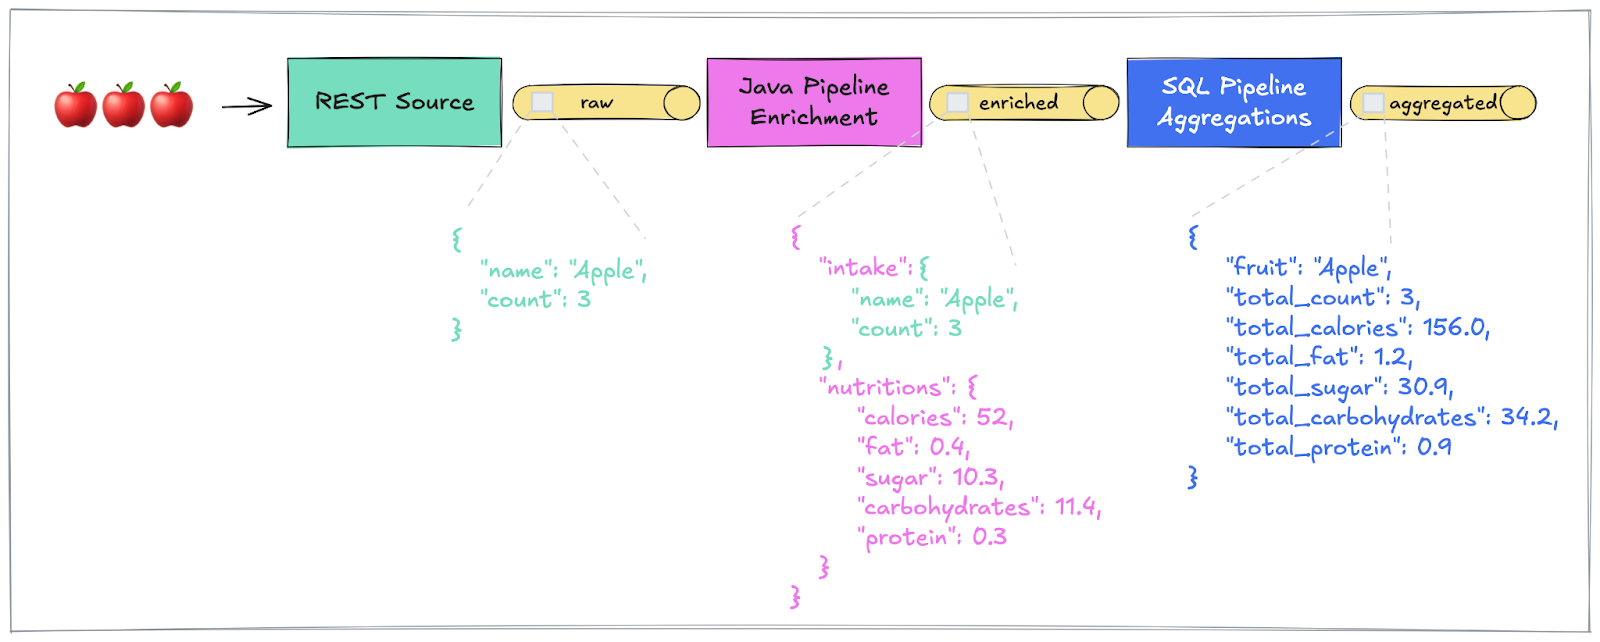
We want to ingest fruit intake events as JSON payloads which look as follows:
These events need to be enriched with the respective nutrition values of the various fruits which are retrieved from a 3rd party service. The resulting payload is expected to have this structure:
Based on these enriched fruit intake events, basic aggregations (e.g., total count, total calories, total fat, …) per fruit should be continuously calculated as new fruit intake events get ingested.
Define Data Source and Input Stream
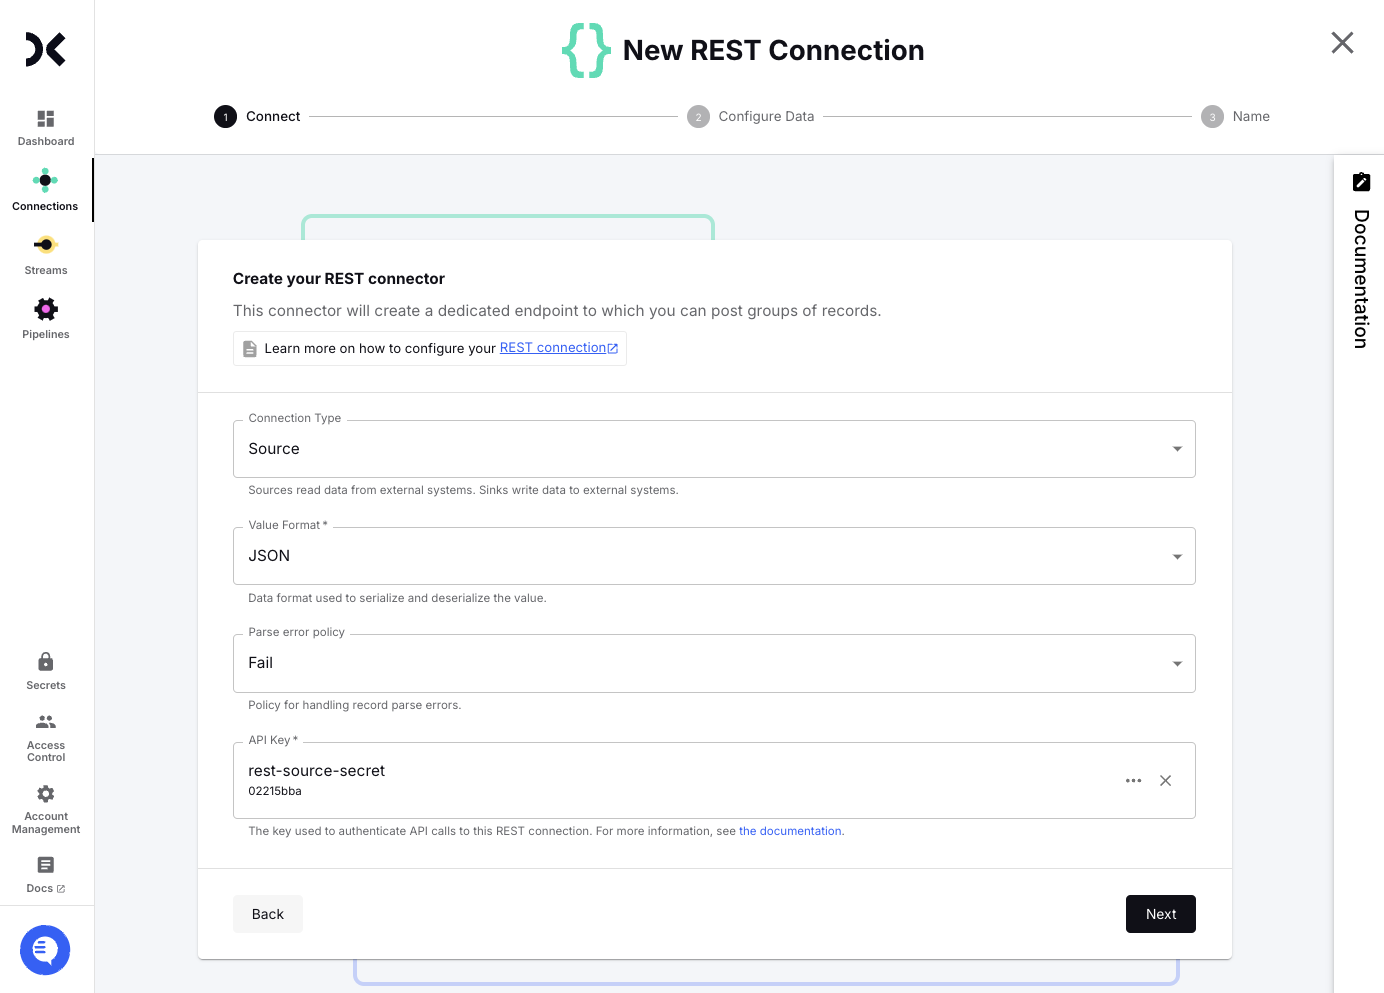
A REST source connector is used to get raw fruit intake events into Decodable. You can create a connection in the Web UI by choosing Connections from the left menu and then click New Connection. Search for “rest” in the catalog and click on Connect for the found item.

The preset defaults in the opened dialog are fine. You only need to set an API Key—by adding a Decodable Secret with the value <span class="inline-code">$e(reT</span>—which is used to authenticate the HTTPs calls against this to-be-created REST endpoint.
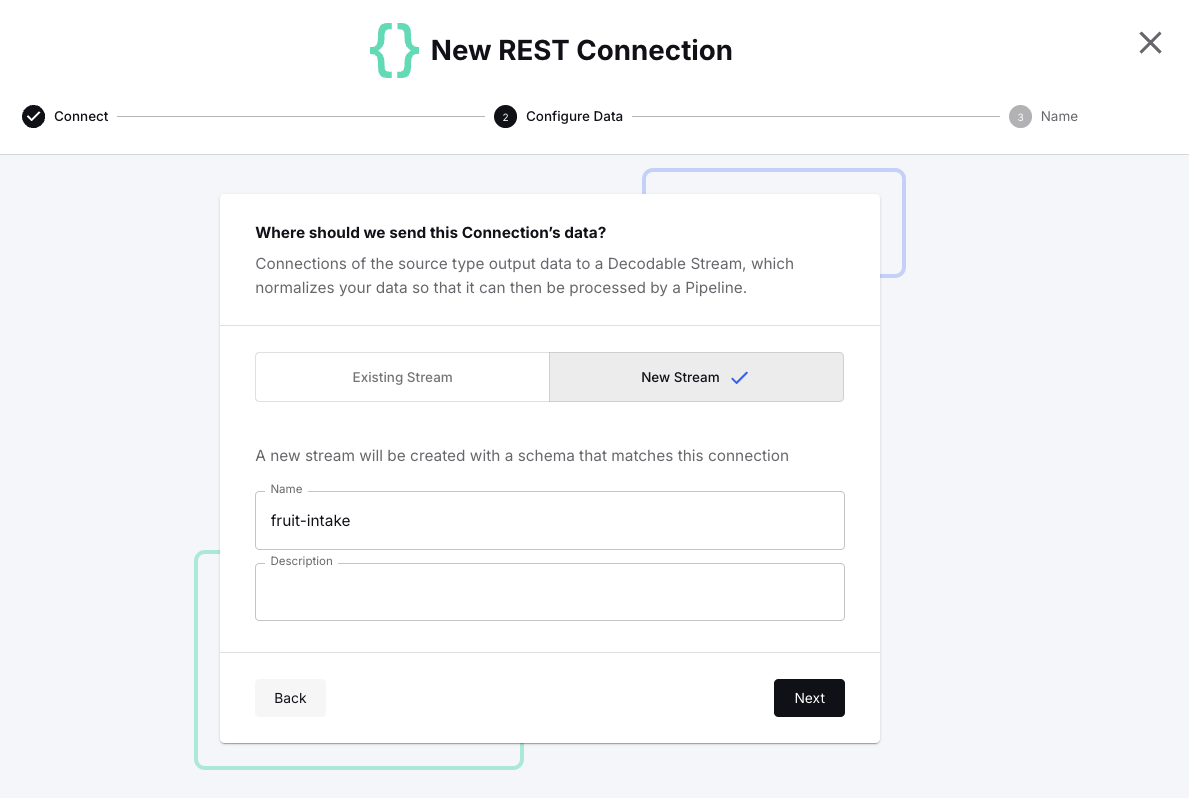
Click Next, then choose New Stream and specify <span class="inline-code">fruit-intake</span> as the name before confirming with Next again.
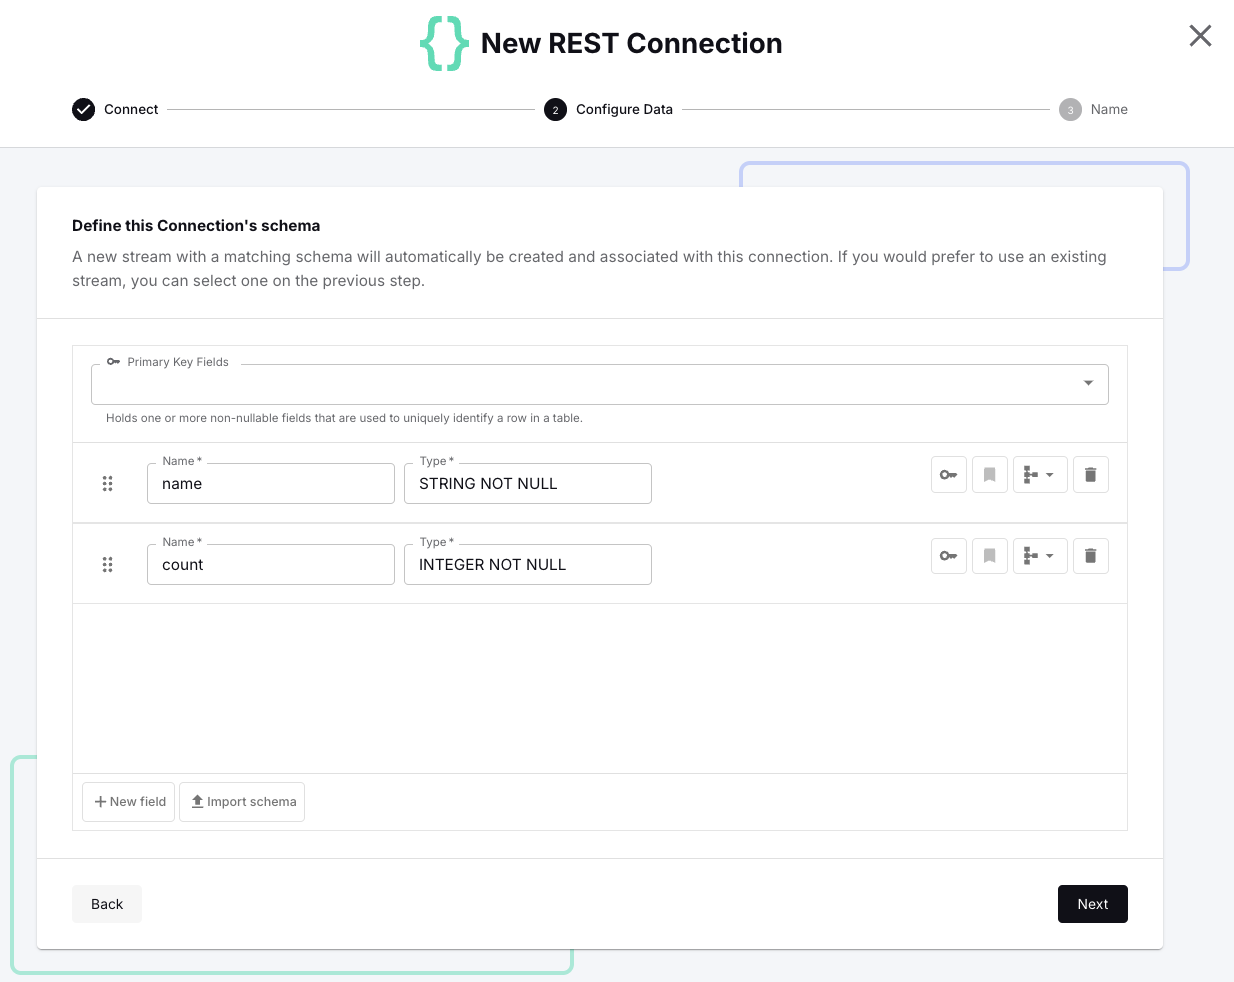
Define the schema for this input stream according to the expected JSON payload like so:
- Name: <span class="inline-code">name</span>
- Type: <span class="inline-code">STRING NOT NULL</span>
- Name: <span class="inline-code">count</span>
- Type: <span class="inline-code">INTEGER NOT NULL</span>
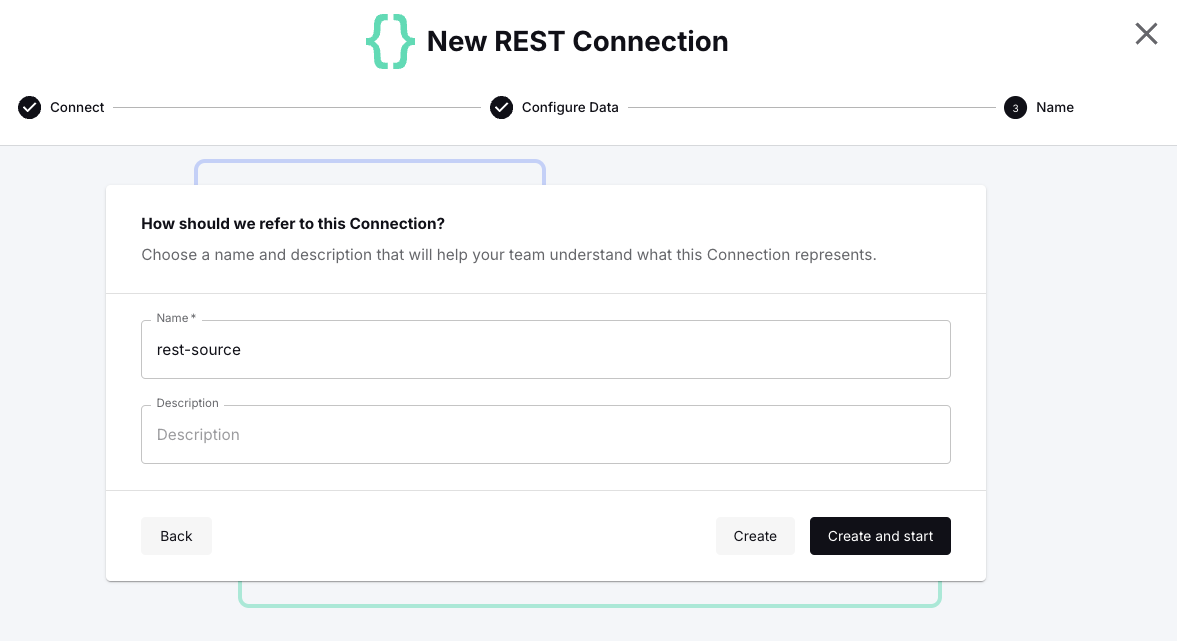
Finally, specify <span class="inline-code">rest-source</span> as the name for this REST connection and hit Create and start to bring it to life.
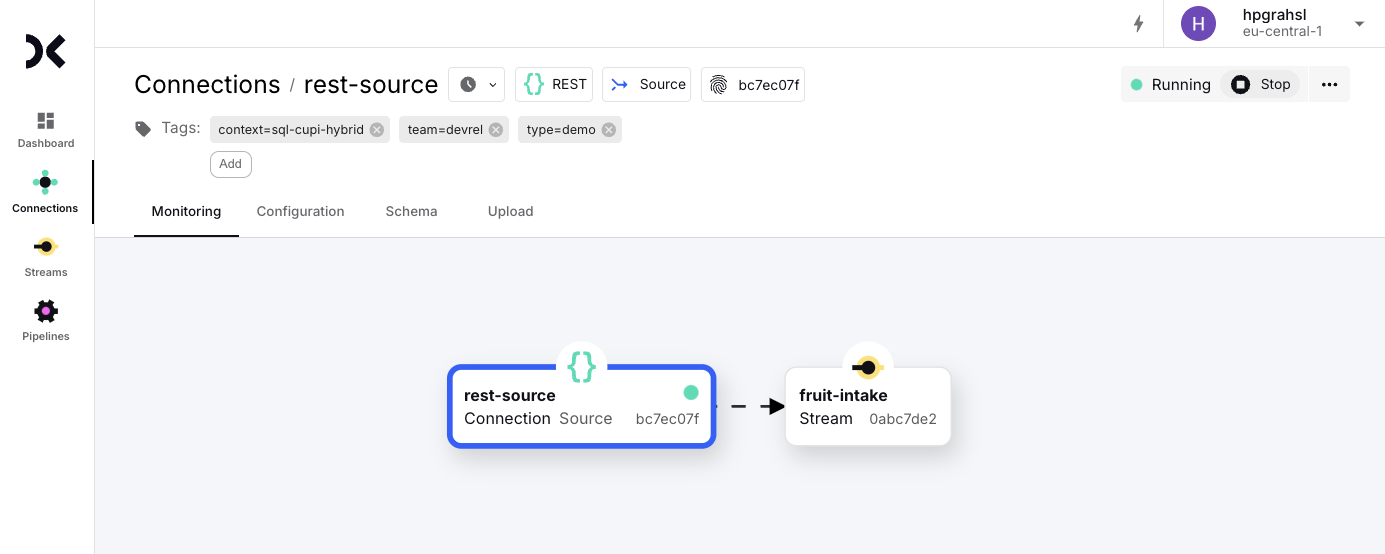
Once the connection is running, you can test the endpoint by sending a few fruit intake events against the API endpoint, e.g., with cURL or a similar HTTP tool of your choice.
Note that the API expects this specific payload format wrapping the actual fruit intake events themselves.
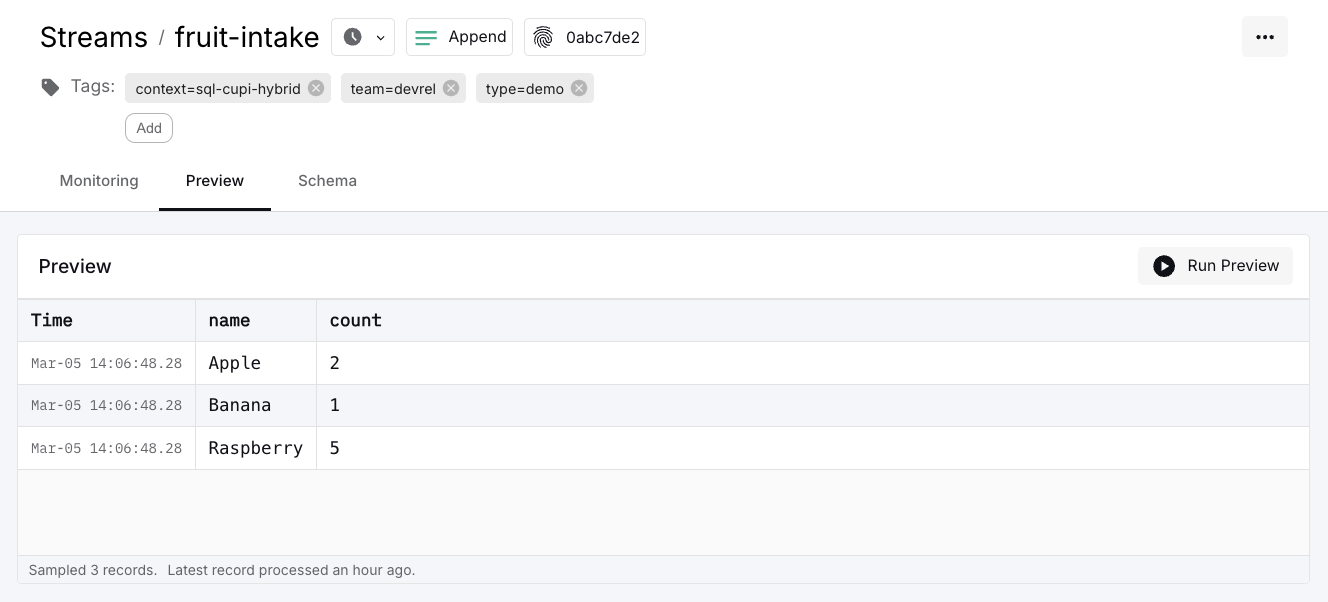
If the call is successful, you should get a JSON response with the number of events written into the stream, e.g., <span class="inline-code">{"count":3}</span>. To verify that the events have been ingested, choose Streams in the Web UI from the left menu, click on the <span class="inline-code">fruit-intake</span> stream and select the Preview tab. This should show you the three ingested events.
Create Custom Java Pipeline
The next step is to perform the data processing on top of this input stream to enrich fruit intake events with nutritional information. We are doing this enrichment with a custom Java pipeline that uses the Decodable SDK. Let’s take a brief look at the most important code sections.
FruitEnricherJob
The custom Flink job reads the input events originating from the <span class="inline-code">fruit-intake</span> stream, processes each event by calling out to the REST API of the 3rd party service to enrich the payload, and writes the results into the <span class="inline-code">fruit-intake-enriched</span> stream. Note how the SDK provides annotations and convenient wrappers to access Decodable Streams from Java code.
HttpServiceEnricher
The actual event enrichment happens in a custom MapFunction. What it does is make an HTTP call and merge the JSON response with the original fruit intake events to create enriched output events. Doing this within a standard Flink SQL job is not directly possible and would require you to first write a custom user-defined function (UDF) and then register it in your Flink cluster to make it available to a Flink SQL job at runtime. Also, depending on your Flink cluster environment the registration of custom UDFs might not be allowed or come with restrictions (e.g. no outgoing HTTP calls) such that you can’t fulfill your specific requirements.
The full source code for this custom Java pipeline together with a basic integration test can be found here.
Build Project
Open a terminal window, make sure you are in this example’s root folder, then change into the <span class="inline-code">cupi</span> subfolder, and execute <span class="inline-code">./mvnw clean package</span> to build a self-contained JAR file for this custom Java pipeline which is written to <span class="inline-code">./target/fruit-enricher-cupi-1.0.0-SNAPSHOT.jar</span>. Note that Docker is required for running the integration tests which you might want to purposefully skip by adding the <span class="inline-code">-DskipTests</span> flag to the Maven command.
Before deploying this as a Flink job on Decodable, the stream <span class="inline-code">fruit-intake-enriched</span>, which this job writes to, must be created first.
Create Intermediary Stream
In the Decodable Web UI, choose Streams from the left menu and click New Stream. Define the two fields as follows:
- Name: <span class="inline-code">intake</span>
- Type: <span class="inline-code">ROW<`name` STRING NOT NULL, `count` INT NOT NULL> NOT NULL</span>
- Name: <span class="inline-code">nutritions</span>
- Type: <span class="inline-code">ROW<`calories` DOUBLE, `fat` DOUBLE, `sugar` DOUBLE, `carbohydrates` DOUBLE, `protein` DOUBLE></span>
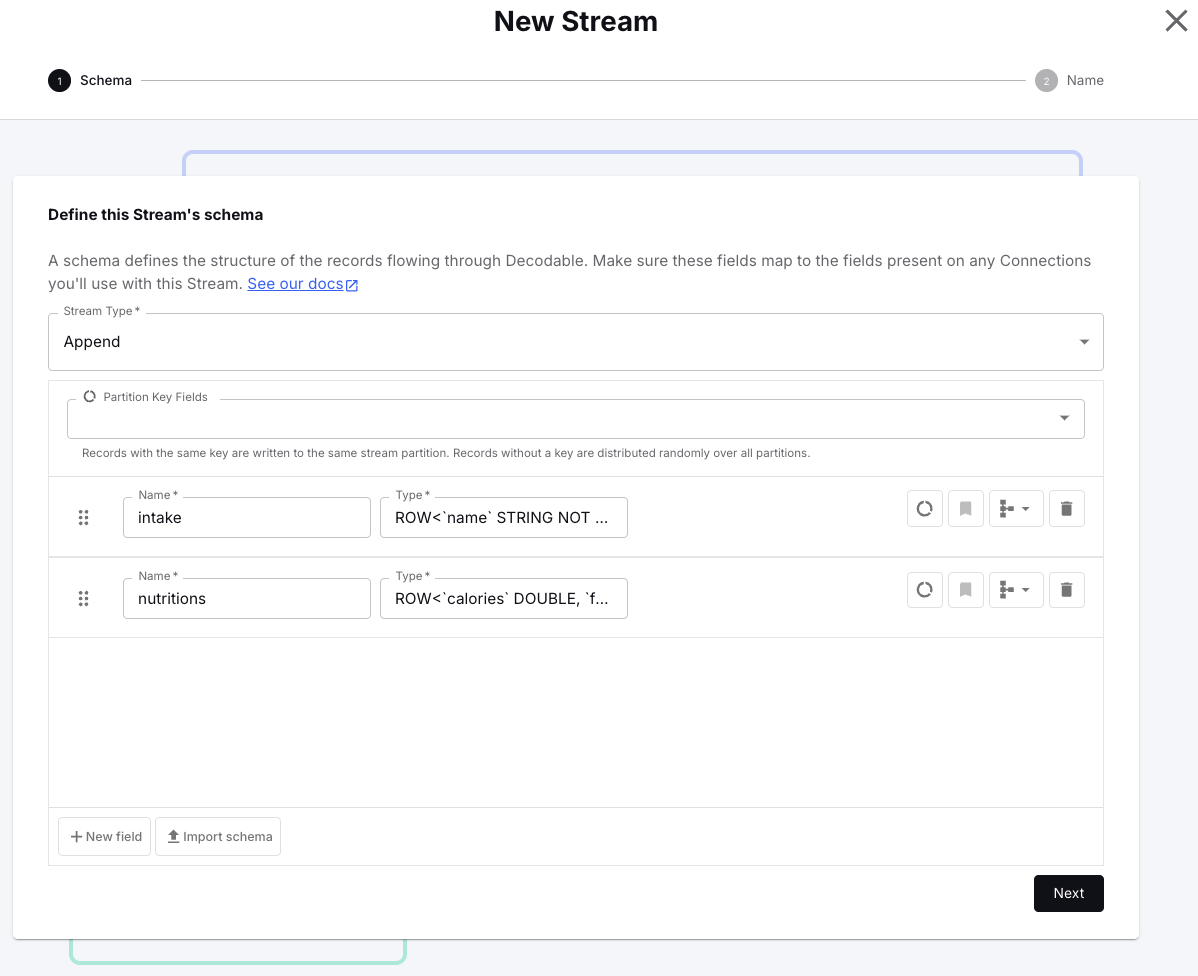
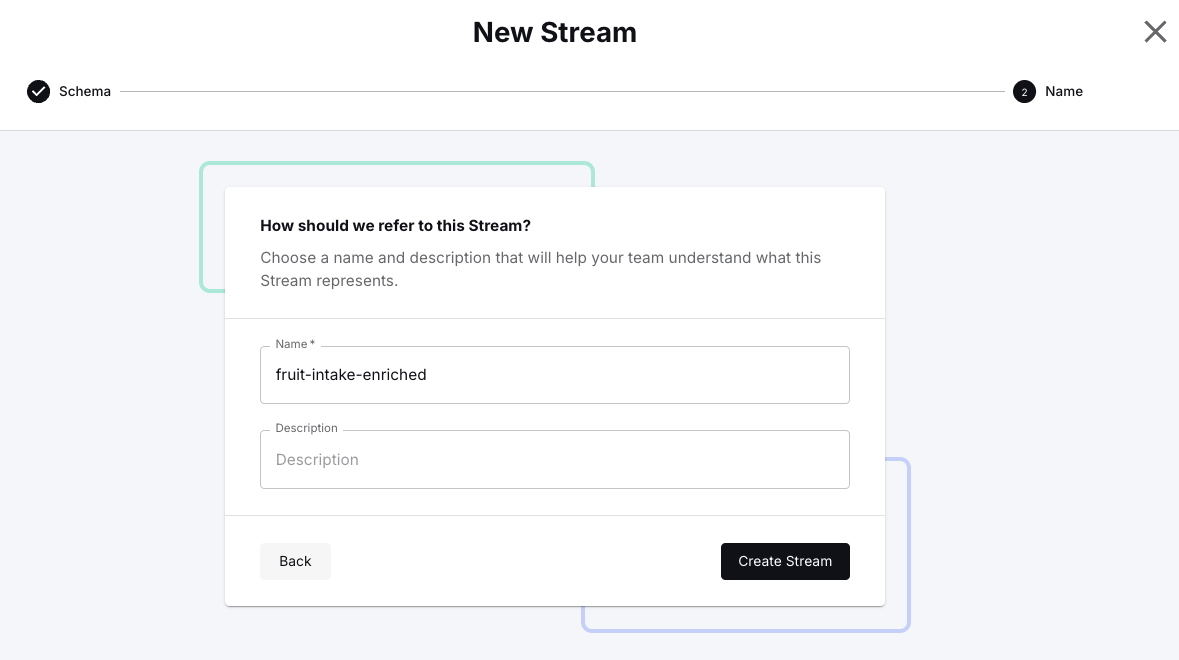
Click Next, then specify <span class="inline-code">fruit-intake-enriched</span> as the name for this stream and confirm with Create Stream.
Deploy Custom Java Pipeline
With source and sink streams created, the custom Java pipeline can be deployed to Decodable. Choose Pipelines from the left menu in the Web UI, then open the New Pipeline drop down and click Upload Flink Job.

<div class="side-note">NOTE: Custom Pipeline access needs to be explicitly enabled per account. Please either reach out to <a href="mailto:support@decodable.co">Decodable support</a> or request access in the Web UI on the Pipelines page.</div>
This opens the custom pipeline dialog.
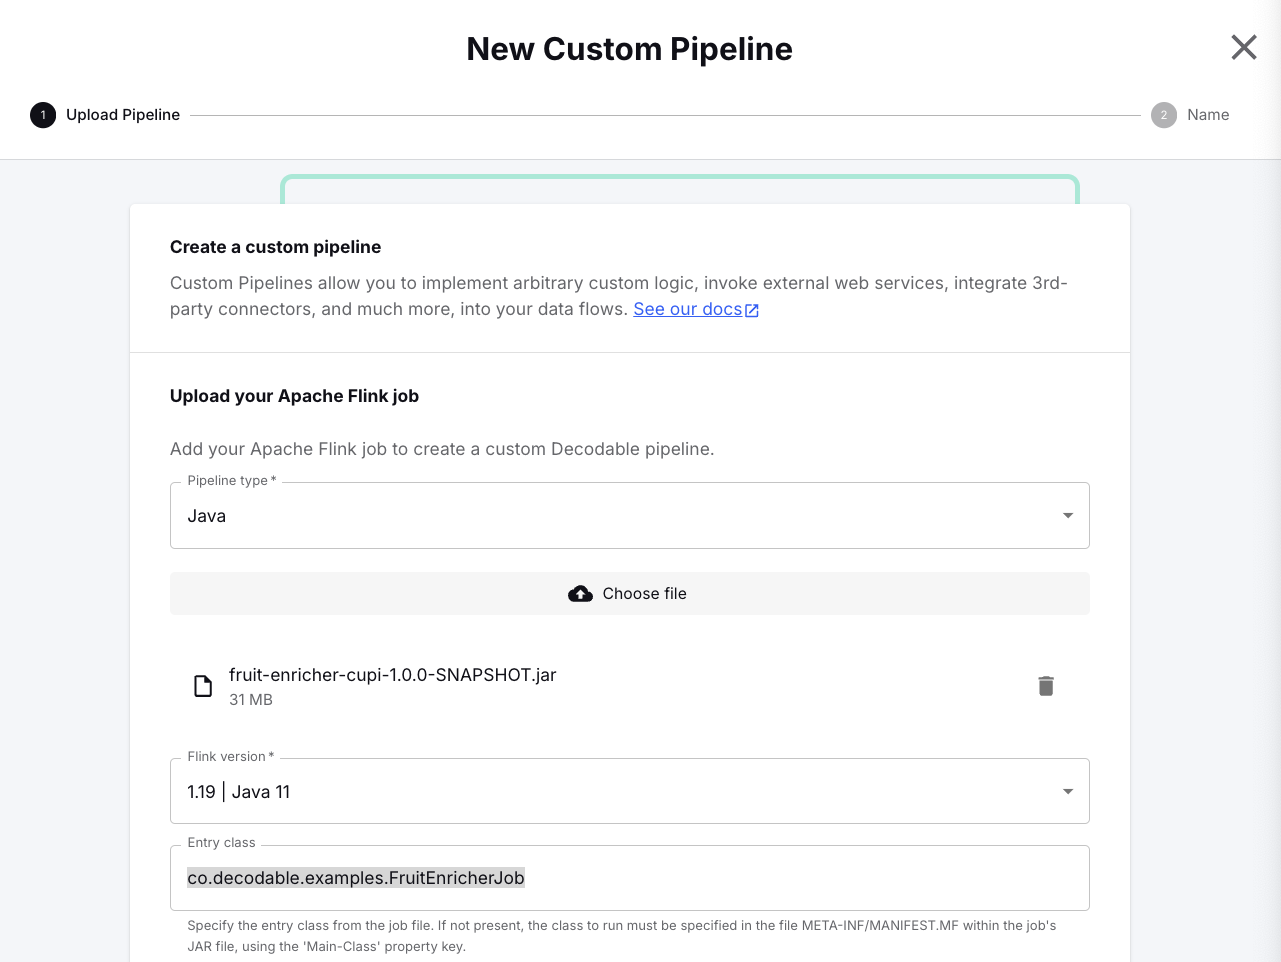
- You can leave the preset defaults, Pipeline type: Java and Flink version: 1.19 | Java 11.
- Next click Choose file and browse to the build artifact created earlier which is found in <span class="inline-code">./target/fruit-enricher-cupi-1.0.0-SNAPSHOT.jar</span> of the <span class="inline-code">cupi</span> subfolder to select the JAR to upload.
- Then specify <span class="inline-code">co.decodable.examples.FruitEnricherJob</span> for the Entry class setting.
Finally, scroll down to the bottom and click Next to specify <span class="inline-code">sdk-cupi-fruit-enricher</span> as the name for this custom pipeline.
Confirm with Create and start. Be patient as this may take a while because the JAR gets uploaded now in the background. Once that’s done the start options dialog is shown where you switch the Starting State to <span class="inline-code">earliest</span>.
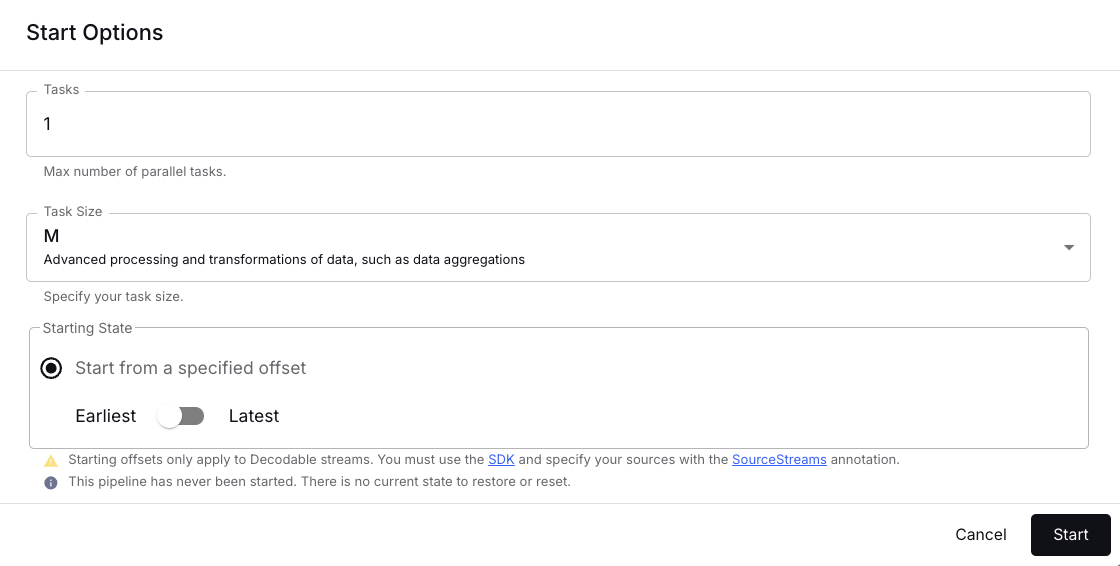
After a minute or two this custom Java pipeline is up and running and will process the three test events ingested when testing the REST source connection earlier.

Click on the pipelines output stream <span class="inline-code">fruit-intake-enriched</span>, then select the Preview tab to inspect the enriched records.
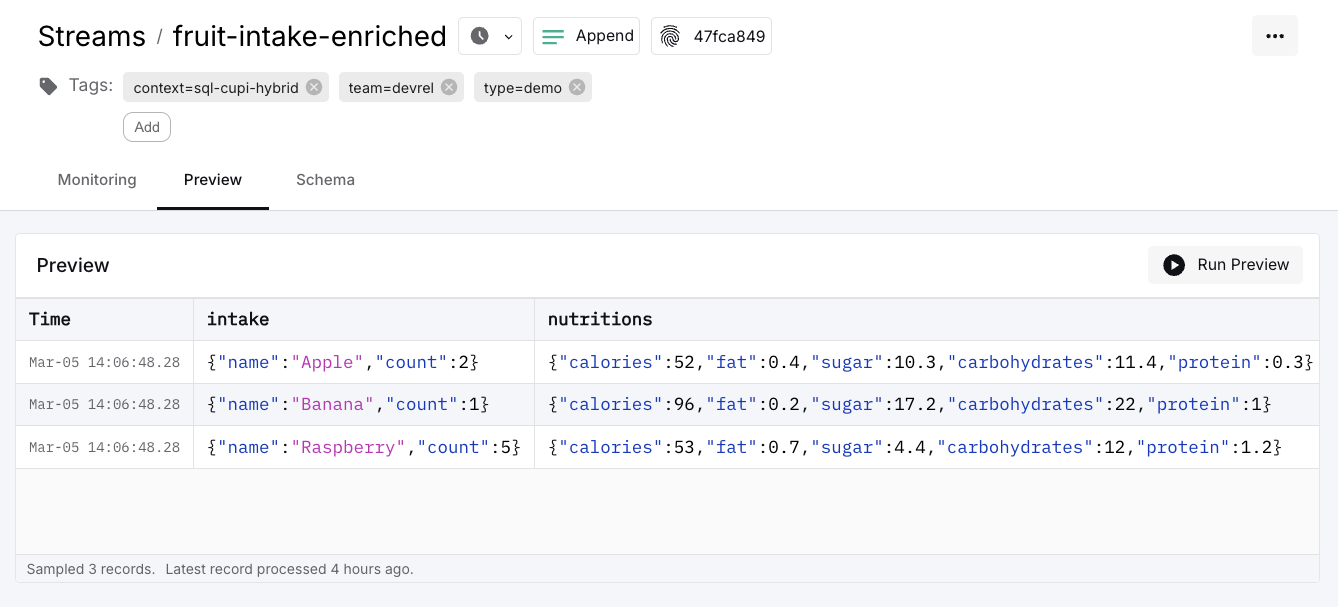
Next we will take this enriched stream and process it further—but this time using SQL.
Create SQL Pipeline
Choose Pipelines from the left menu in the Web UI, then click New Pipeline which brings up the SQL pipeline view. The task for this pipeline is to calculate aggregations per fruit based on the nutrition information available in the enriched stream.
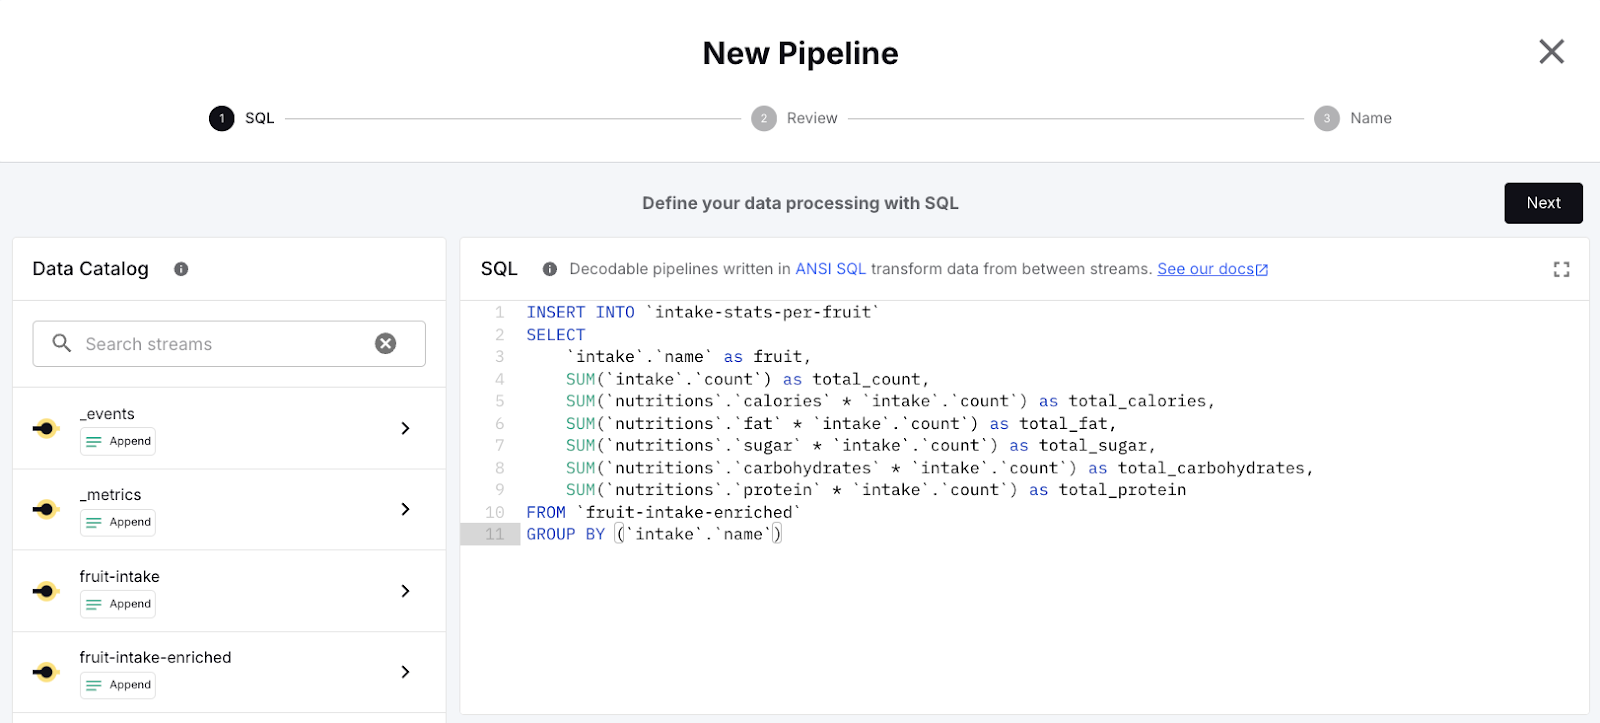
This SQL statement can be pasted as is into the editor:
The SQL statement reads all records from the <span class="inline-code">fruit-intake-enriched</span> stream, groups them by fruit name and uses the <span class="inline-code">SUM</span> aggregation function several times to calculate the total values for each of the nutrition attributes, and writes the results into the output stream <span class="inline-code">intake-stats-per-fruit</span>.
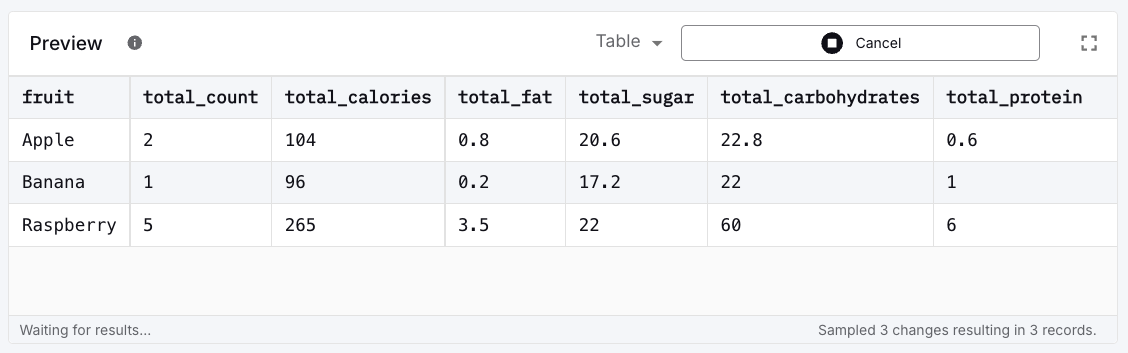
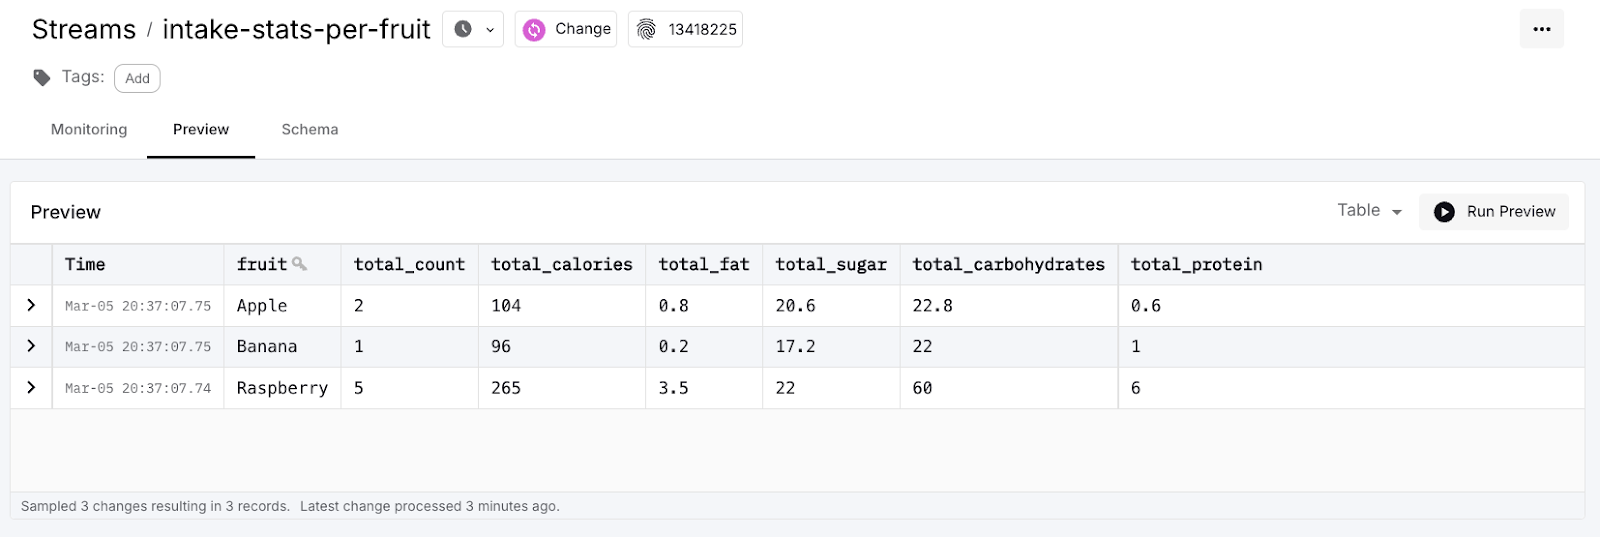
At the bottom you see a preview pane which allows you to quickly run the SQL and inspect the results. Click on Start from earliest to process the already existing data from the <span class="inline-code">fruit-intake-enriched</span> stream. This should give you the following results based on the three events ingested and enriched previously:
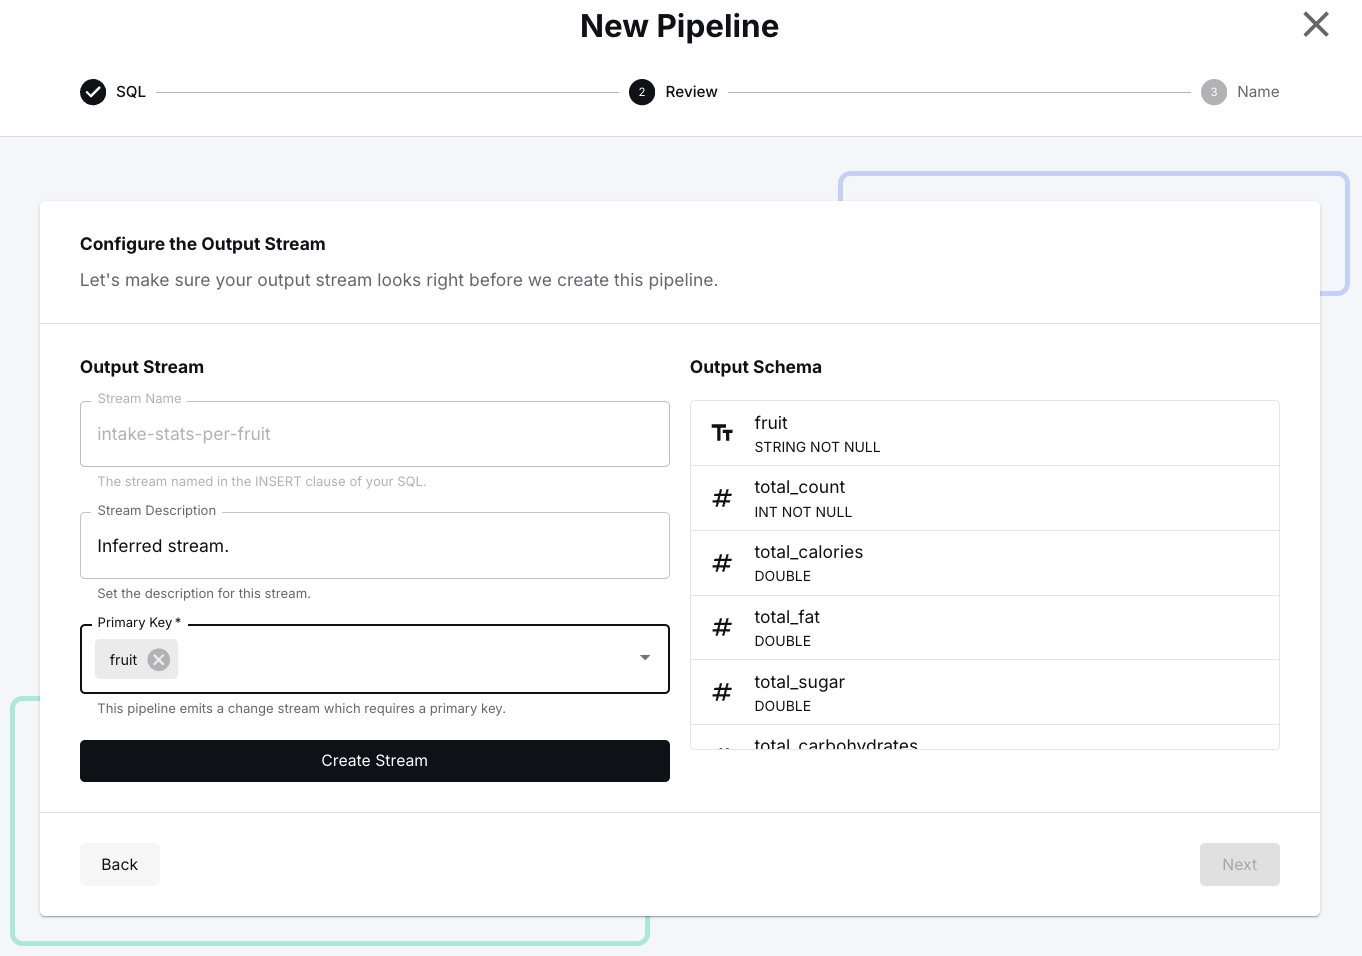
Click Next which shows the output stream configuration. Since this pipeline emits a change stream, it requires the definition of a primary key. In the dialog, open the drop down and select <span class="inline-code">fruit</span> as the primary key, then click on Create Stream and confirm with Next.
Finally, specify <span class="inline-code">sql-nutritions-aggregator</span> as the name for this pipeline and confirm with Create and start, which opens the start options dialog where you select <span class="inline-code">earliest</span> and click Start.

After a minute or two this SQL pipeline is up and running and will process the three test events accordingly. You can inspect the results by inspecting the preview for the output stream.
And there you have it! A real-time data flow built on top of the powerful and seamless combination of custom Java and SQL pipelines.
Bonus: Declarative Resource Management
Working in Decodable’s Web UI to build out data flows like this is very approachable, but you might prefer an automated, versionable (and hence reproducible) way to set up your real-time data pipelines. This is where declarative resource management and the Decodable CLI shine.
The complete data flow for this example is defined in a single YAML manifest. It contains all seven resource specifications, namely:
- the REST source connection and the necessary secret holding the API key
- three stream definitions for the input, the intermediary, and the output stream
- two pipeline definitions for the custom Java pipeline and the SQL pipeline
If you have the CLI installed and are authenticated to your free Decodable account, you can deploy everything running this single command from the example’s root folder:
After a minute or two, everything should be up and running and be ready to process events. The repository contains a basic bash script to simulate fruit intake events. Feel free to configure it to your needs and run it to test-drive your real-time data pipeline.
Happy streaming!


