A very common data movement use case we’re seeing at Decodable is taking data from operational databases (Postgres, MySQL, etc.) to dedicated stores for full-text search and analytics, such as Elasticsearch or OpenSearch. These systems are highly optimized for running query workloads against massive amounts of data by scaling out to multiple compute nodes in a cluster. Unlike common OLTP data stores, document stores such as the aforementioned ones only support limited means of query time joins, if at all. This means that data needs to be denormalized at ingestion time, nesting joined data into parent documents. This allows to serve queries solely from one given data collection at a time, for instance an index in OpenSearch.
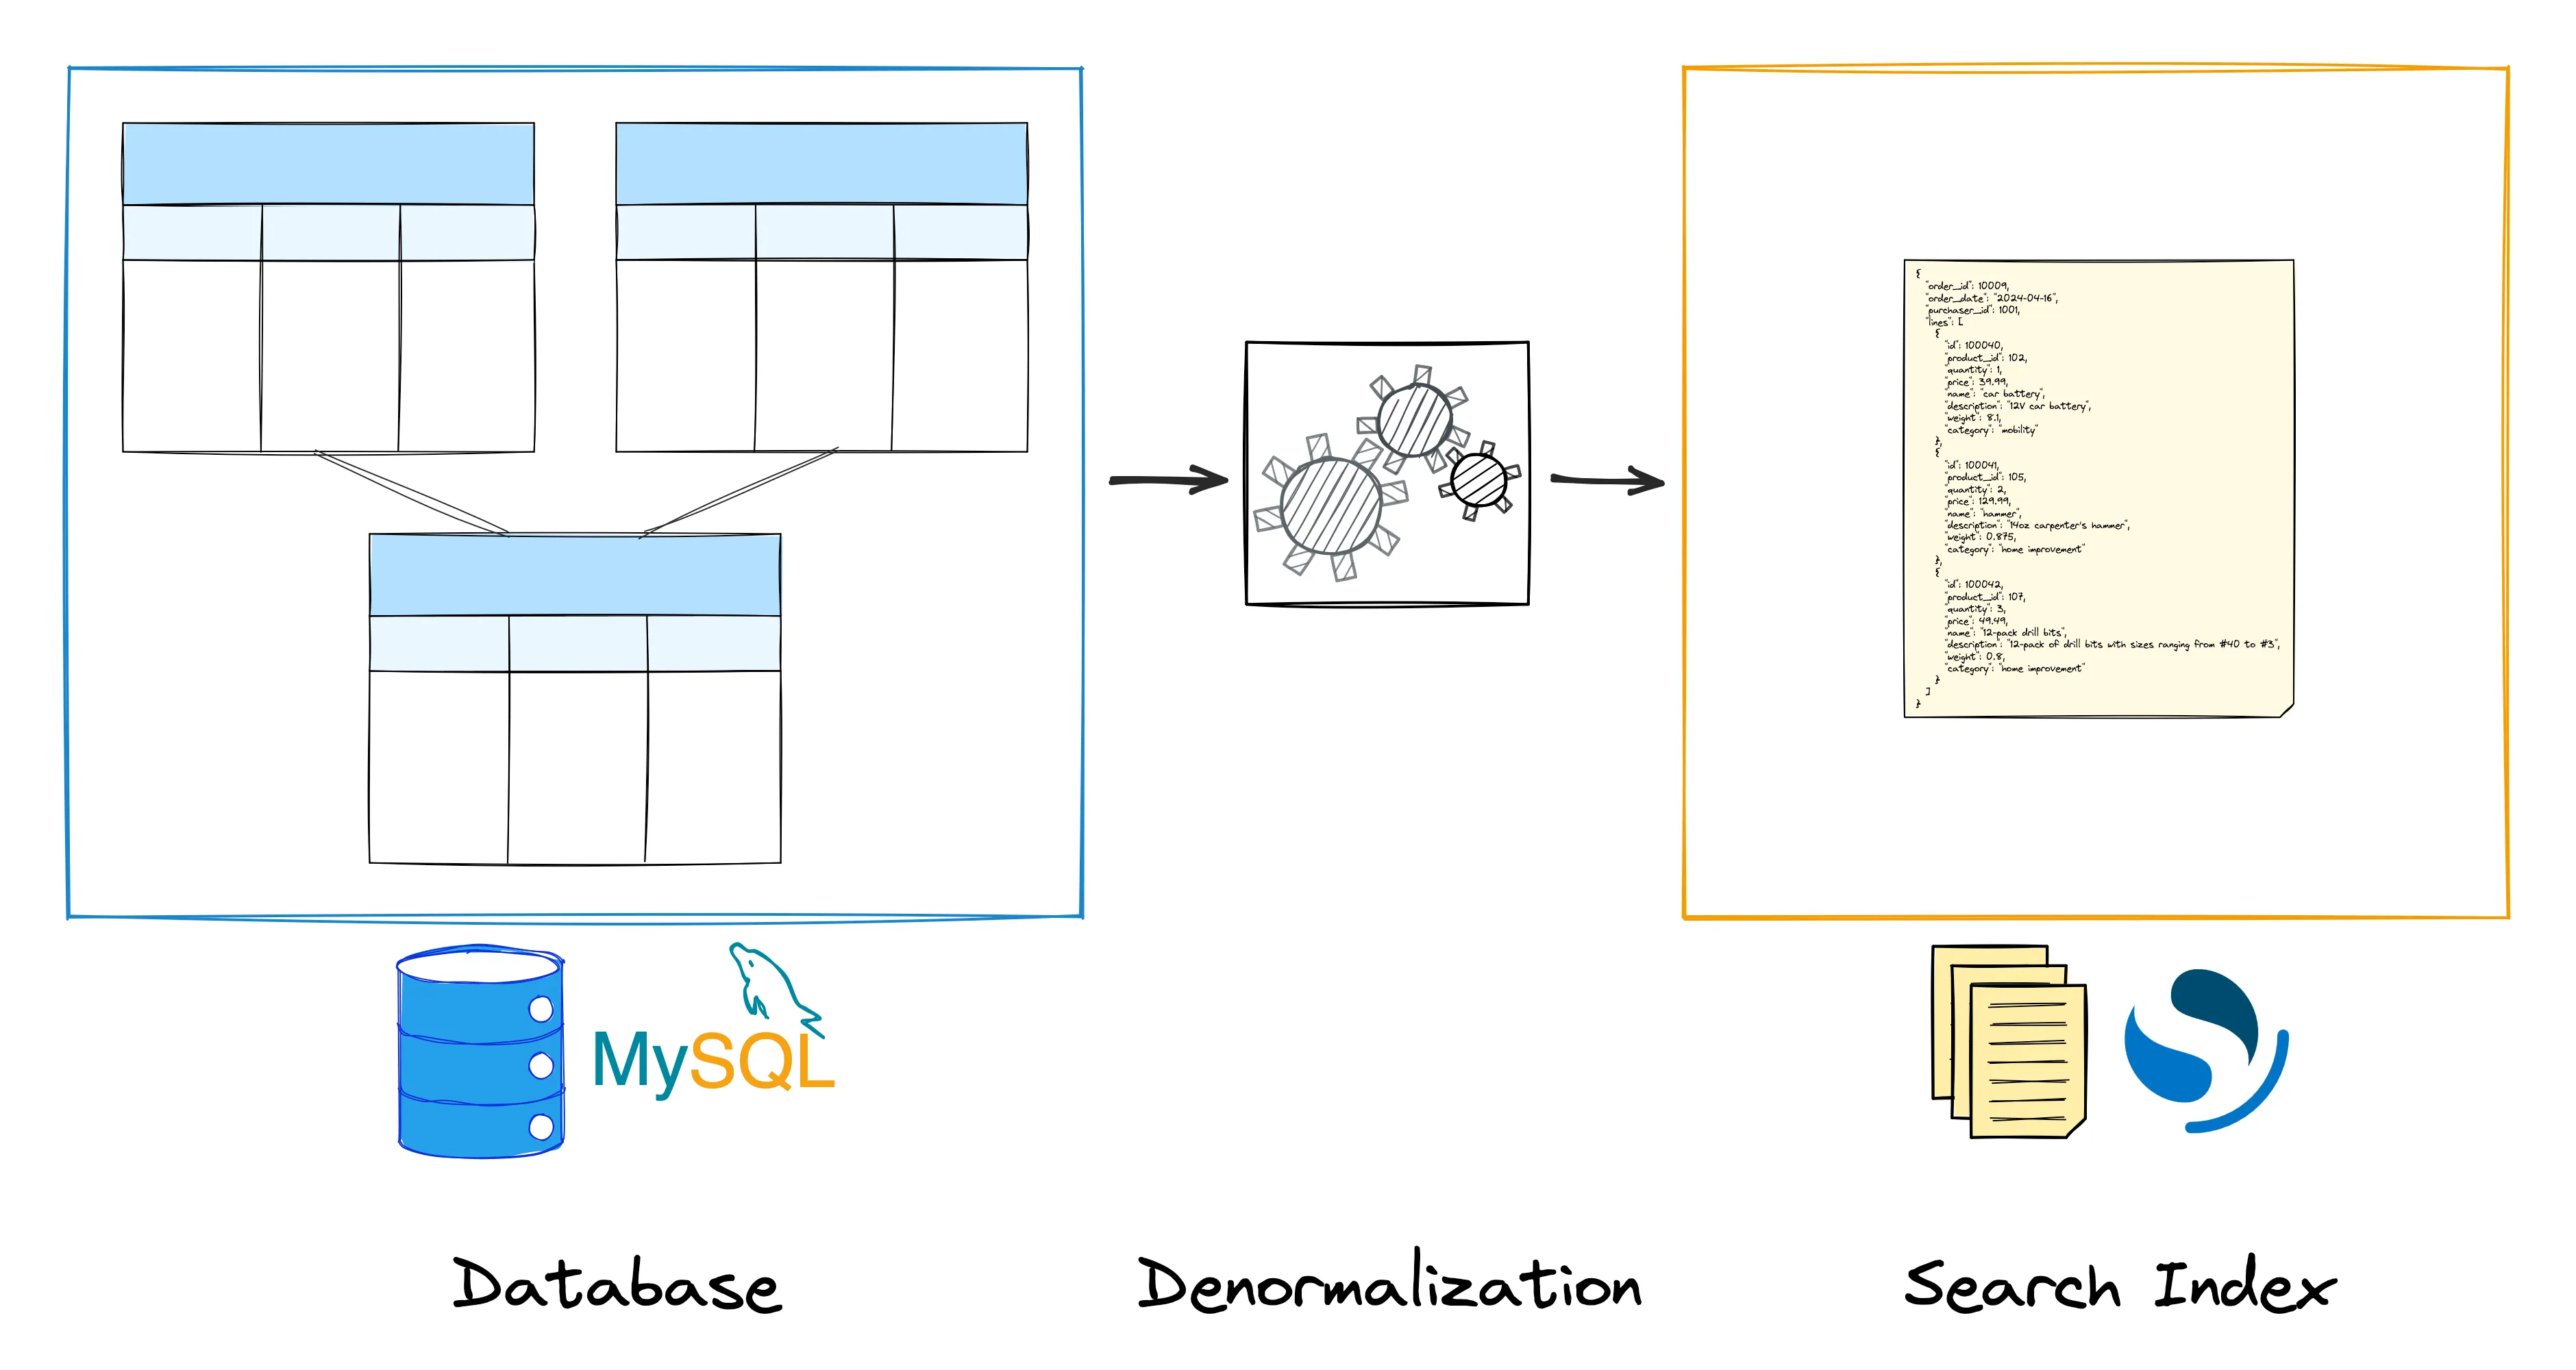
In a Data Streaming Quick Tips episode a few months ago, I showed how to implement a user-defined function (UDF) for Apache Flink for exactly this purpose: it takes a list of values and emits them as a strongly-typed array. That way, you can join two or more data streams and create nested data structures from that. In scenarios like above, this function allows you to take the change event streams from multiple tables of your source database and create a denormalized representation of the same data in a single index in a document store.
Inspired by the same function in data stores such as Postgres and Snowflake, I recently added the <span class="inline-code">ARRAY_AGG()</span> UDF to Decodable, where you can use it now in your SQL-based stream processing pipelines. This makes it easier than ever to keep a search index in sync with your operational data in a relational database such as MySQL or Postgres, with Decodable updating the nested documents in the index as the upstream data changes, allowing for fast and efficient queries of the data, without the need for expensive application-side joins at query time.
Let’s Build a Data Streaming Pipeline!
In this blog post I’m going to show you how to set up such a real-time streaming pipeline between MySQL as a system of record and OpenSearch as a derived data store, enabling use cases such as full-text search and dashboarding. To follow along, make sure you’ve downloaded and installed the following things on your machine:
- Docker, for running MySQL and OpenSearch
- ngrok, for accessing the database and OpenSearch cluster running on your machine
You’ll also need a free account for ngrok as well as a Decodable account. If you don’t have one yet you can sign up here; the free tier provides all the resources you’ll need for this pipeline.
The data model is similar to the one from the original quick tip video—there are three tables in MySQL, <span class="inline-code">purchase_orders</span> , <span class="inline-code">order_lines</span> , and<span class="inline-code">products</span>. There’s a many-to-one relationship between purchase orders and order lines, as well as a many-to-one relationship between order lines and products.
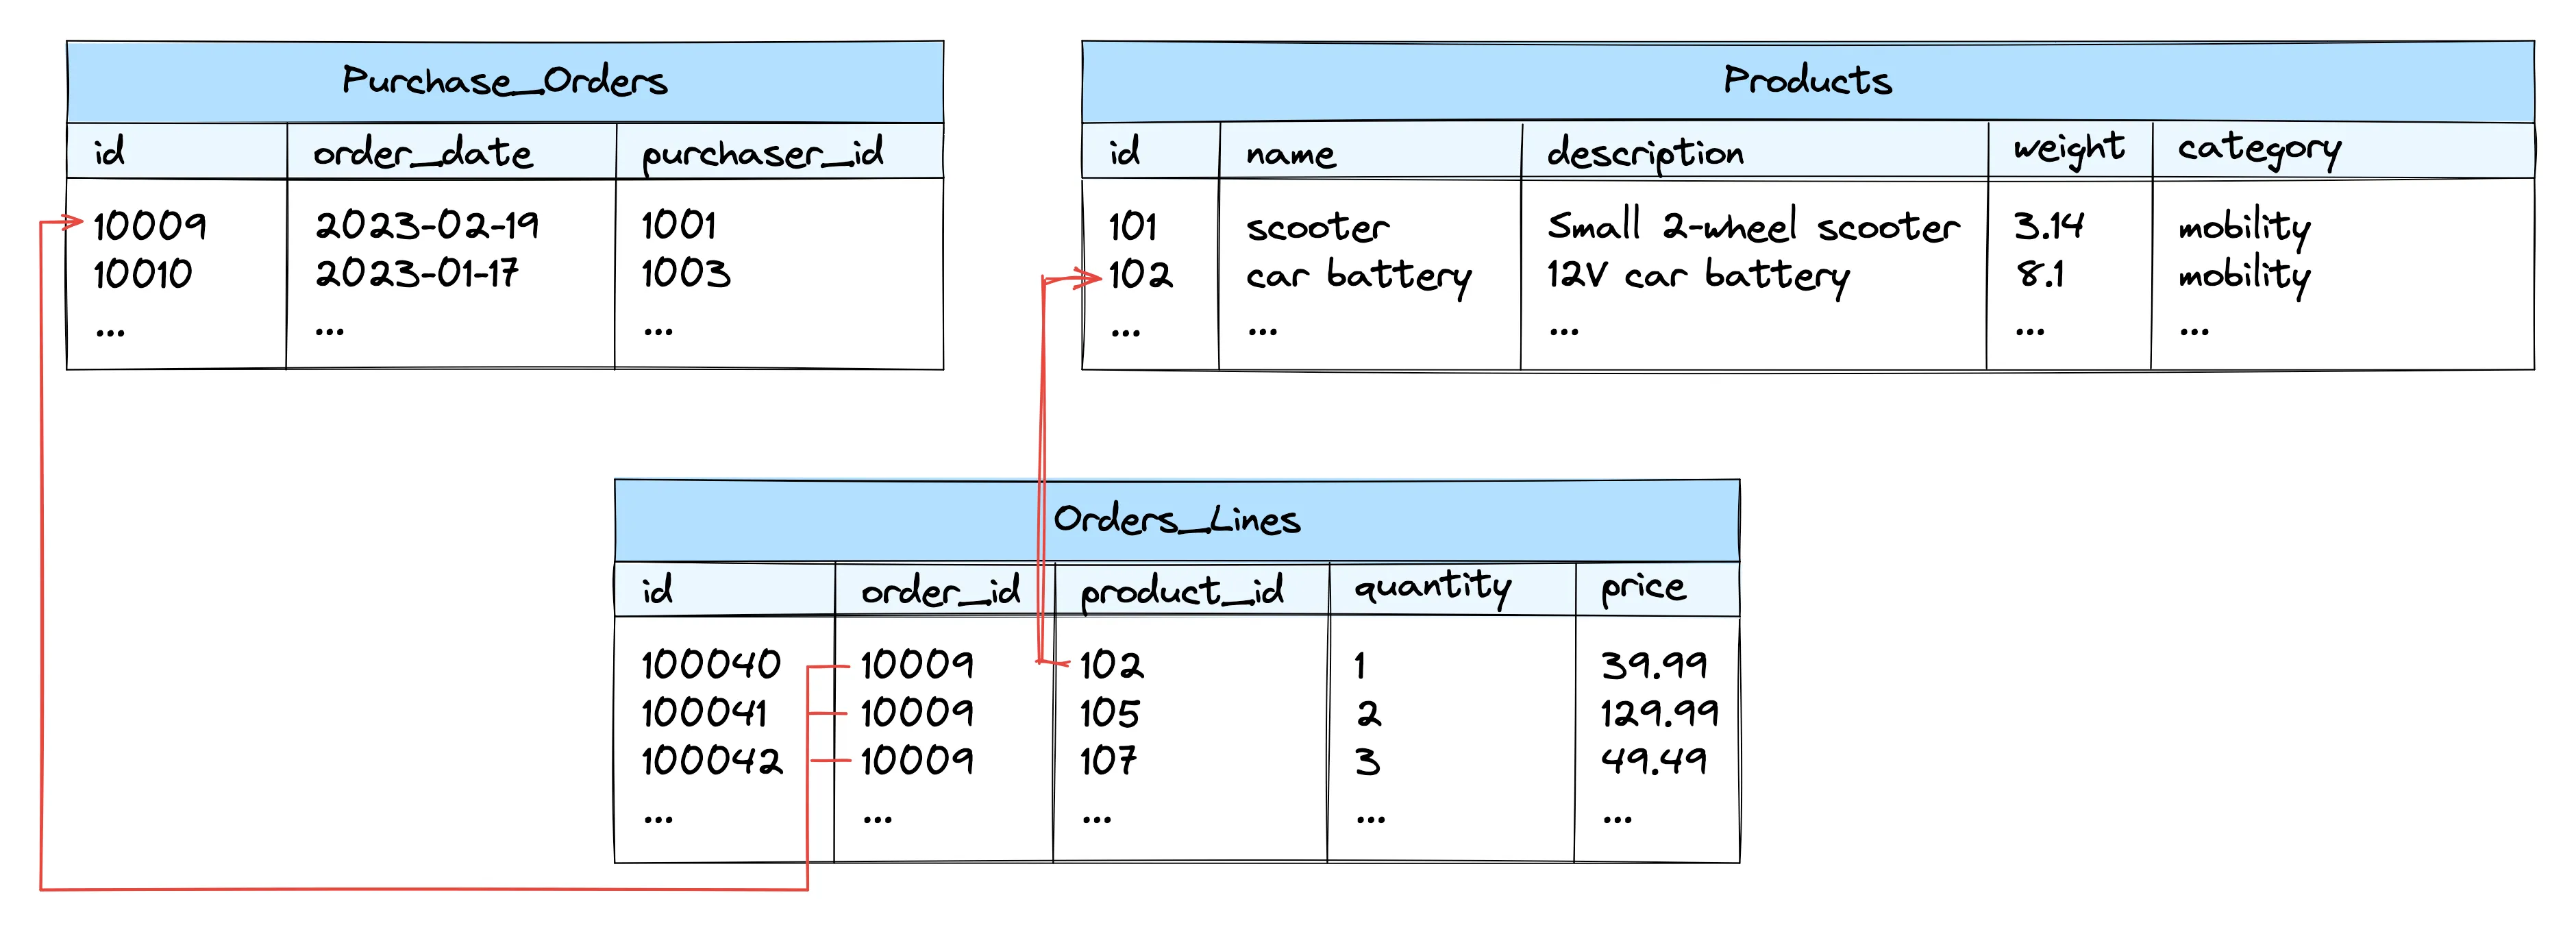
The change streams for the three tables will be ingested into Decodable, where we’ll join them with a simple SQL pipeline, using the <span class="inline-code">ARRAY_AGG()</span> function for emitting a single document for each purchase order, with all its lines and their product data as elements of an embedded array. The OpenSearch sink connector will be used for updating (or removing) the data in the corresponding index in OpenSearch, whenever there’s a change to a record in any of the source tables. The denormalized data in the index will look like this:
Alright then, let’s get started! Check out the Decodable examples repository from GitHub and start the source and sink systems of the pipeline:
This launches a MySQL database and an OpenSearch cluster on your local machine. In order to make these resources available to Decodable running in the cloud, we are going to expose them via ngrok. This tool creates tunnels for the two resources, making them publicly accessible (our resources are password protected, which is good enough for the purposes of this example; needless to say that you should put strong security into place for a production deployment). Here is an overview of all the components involved:
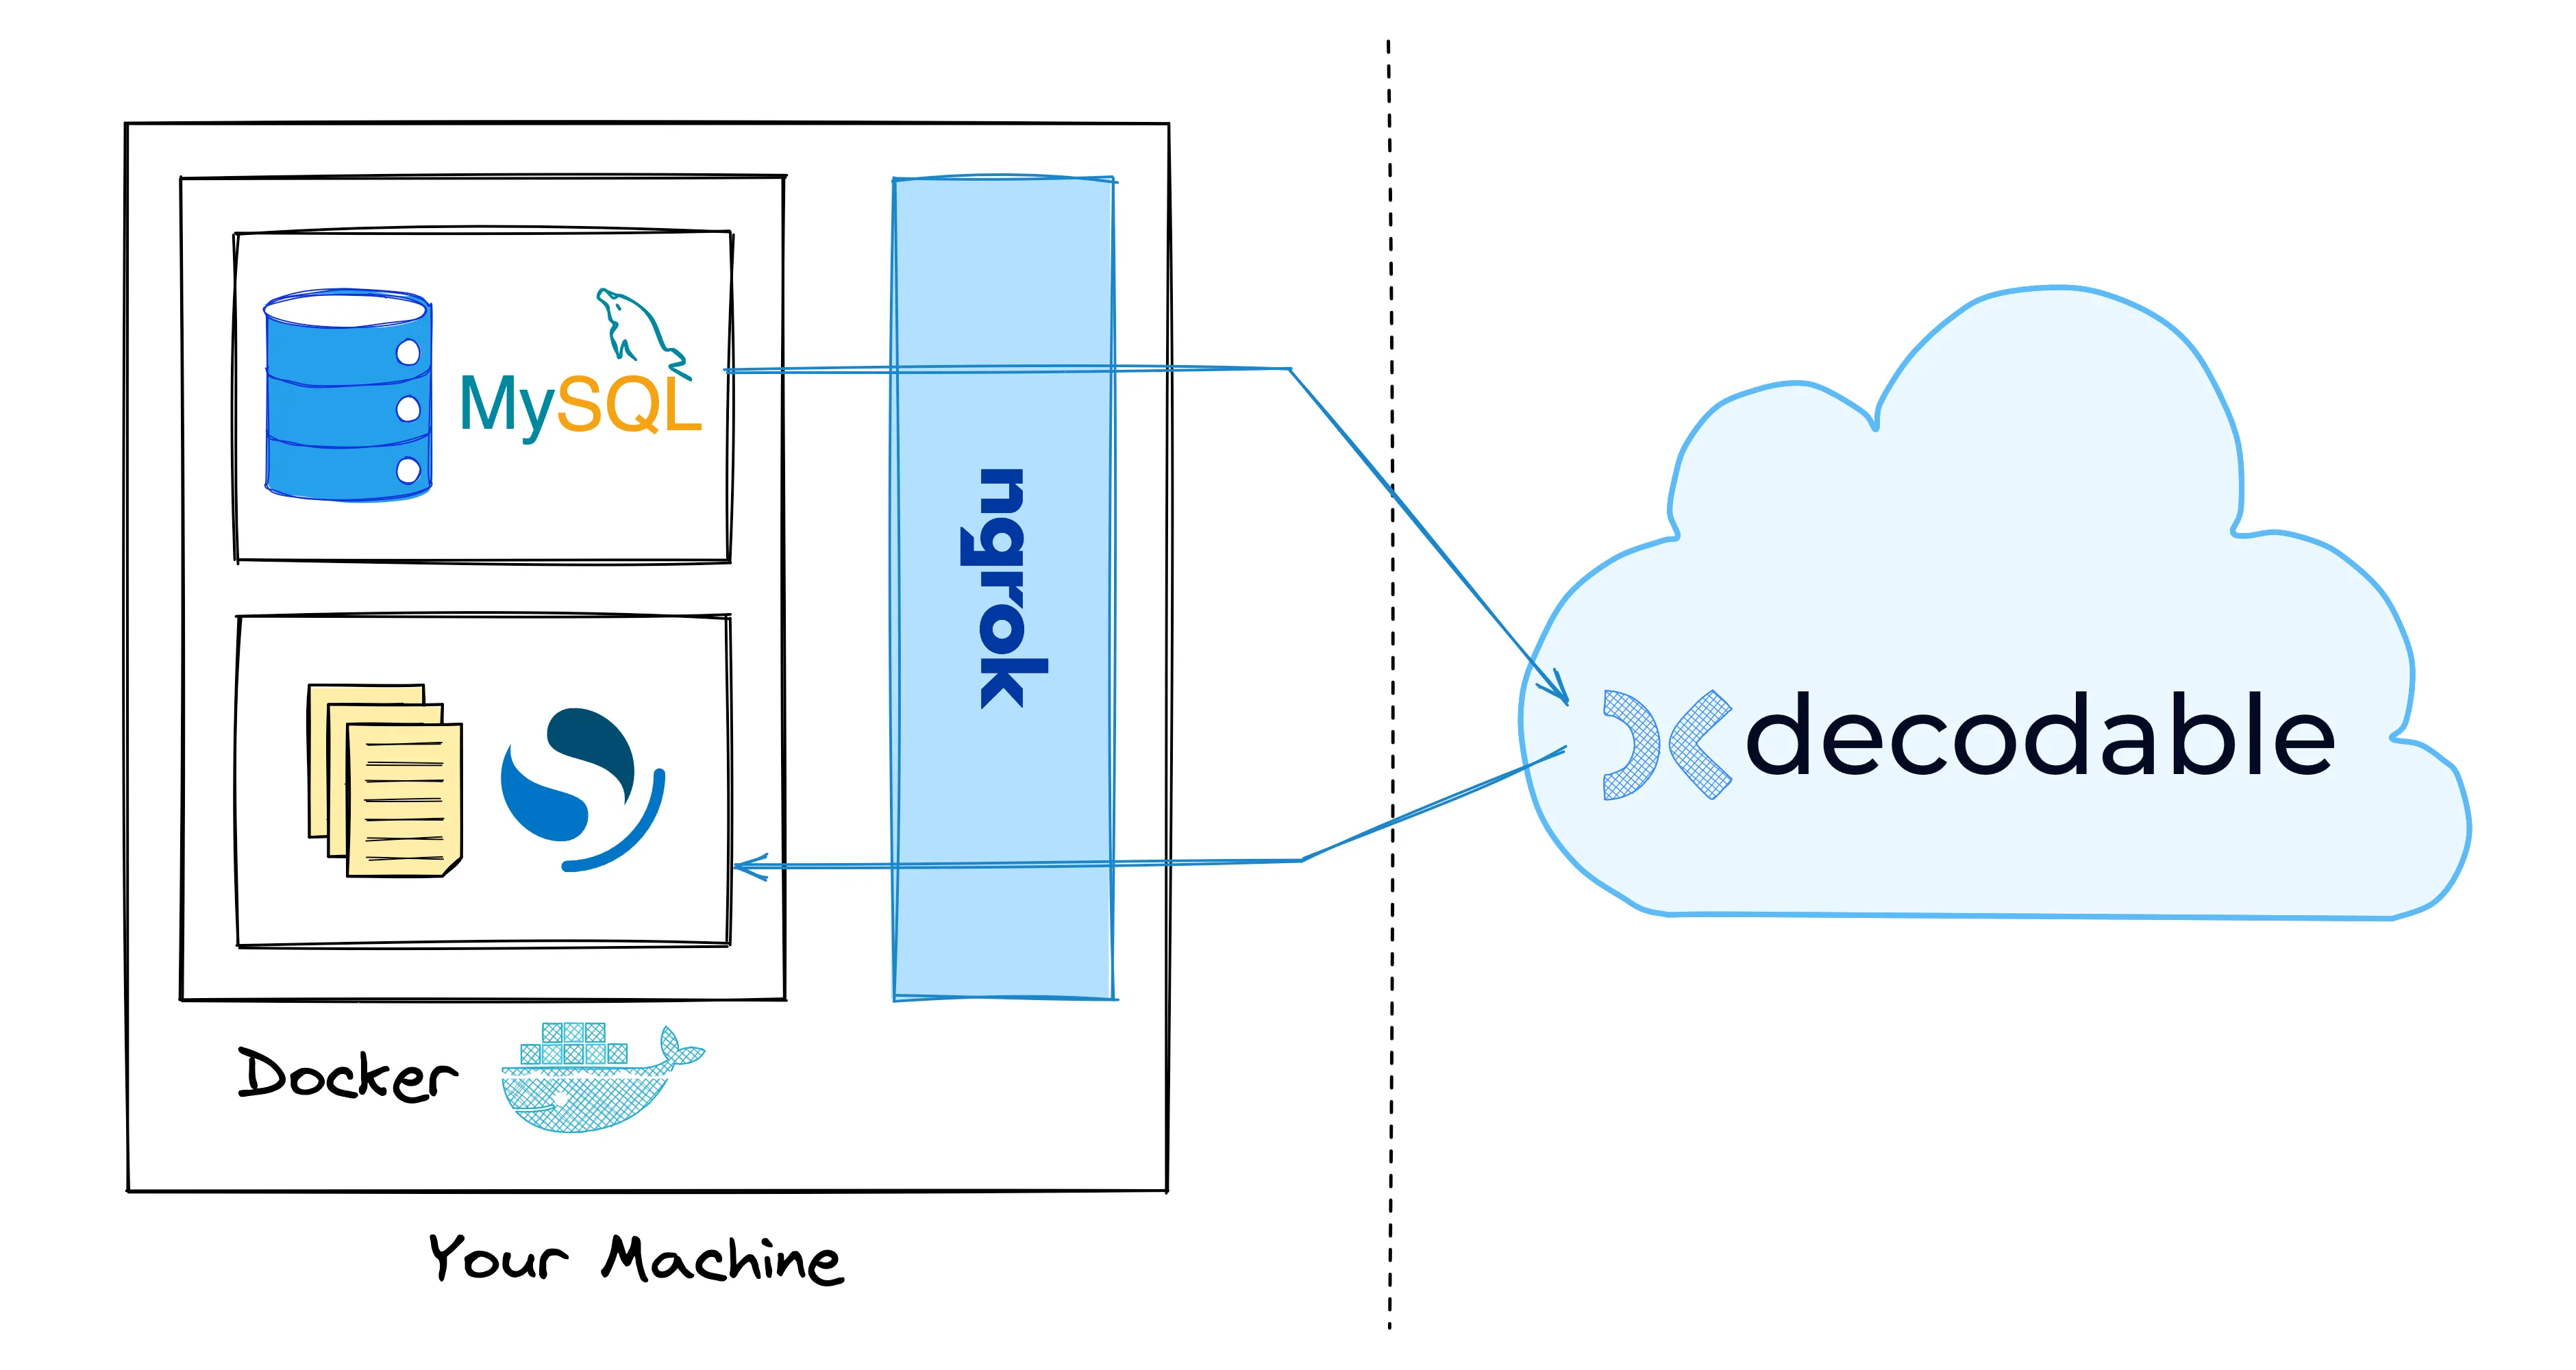
Now grab your auth token from the ngrok dashboard. Open up the ngrok.yml file which is in the same folder as the Docker Compose file and add your auth token on line 2 where indicated.
Then start the tunnels like so:
Take note of the public addresses for MySQL (the one for localhost:3306) and OpenSearch (the one for https://localhost:9200). We’ll need them later on when setting up the connectors in Decodable.
<div class="side-note">In a production environment, Decodable would typically connect to source and sink resources running in the cloud. It is also possible to run the Decodable data plane in your own AWS virtual private cloud (VPC), thus making sure your data never leaves your security perimeter.</div>
Creating the Source Connection
At this point, both MySQL and OpenSearch are up and running, accessible from the internet via ngrok. Next, let’s set up the source connection for ingesting change events from the three tables into Decodable. Note that while the following describes the required steps when using the Decodable web UI, you could alternatively use the REST API or the command line interface, which for instance comes in handy when configuring data pipelines via CI/CD.
If you haven’t done so yet, log into your Decodable account. Select “Connections” in the pane on the left-hand side and click “New Connection”. Choose “MySQL CDC” as the connector type. This connector is based on the Debezium and Flink CDC open-source projects and retrieves change events from a database’s transaction log using Change Data Capture (CDC). Specify the following information in the dialog which opens up:
- Host: the address ngrok displays in the shell for the MySQL tunnel, for instance <span class="inline-code">2.tcp.eu.ngrok.io</span>
- Port: the port which ngrok displays, for instance <span class="inline-code">31811</span>
- Database: <span class="inline-code">ecom</span>
- Username: <span class="inline-code">debezium</span>
- Password: in the drop-down, click “Add a new secret…”, then specify a name of your choosing and <span class="inline-code">dbz</span> as the value
- Scan Startup Mode: leave this blank to keep the default of taking an initial snapshot of the captured database tables
Click “Next” and the connector will automatically scan the source database for its tables. After a little while, you should see the tables from the <span class="inline-code">ecom</span> database. If you like, you can take a look at the schema of the tables by clicking on “View Schema”. Each table will be ingested into a corresponding stream within Decodable. As the name suggests, this is a logical stream of messages, essentially like a Kafka topic.
Select “Sync” for the tables<span class="inline-code">ecom.purchase_orders, ecom.order_lines</span> and<span class="inline-code">ecom.products</span>, then click “Next”.
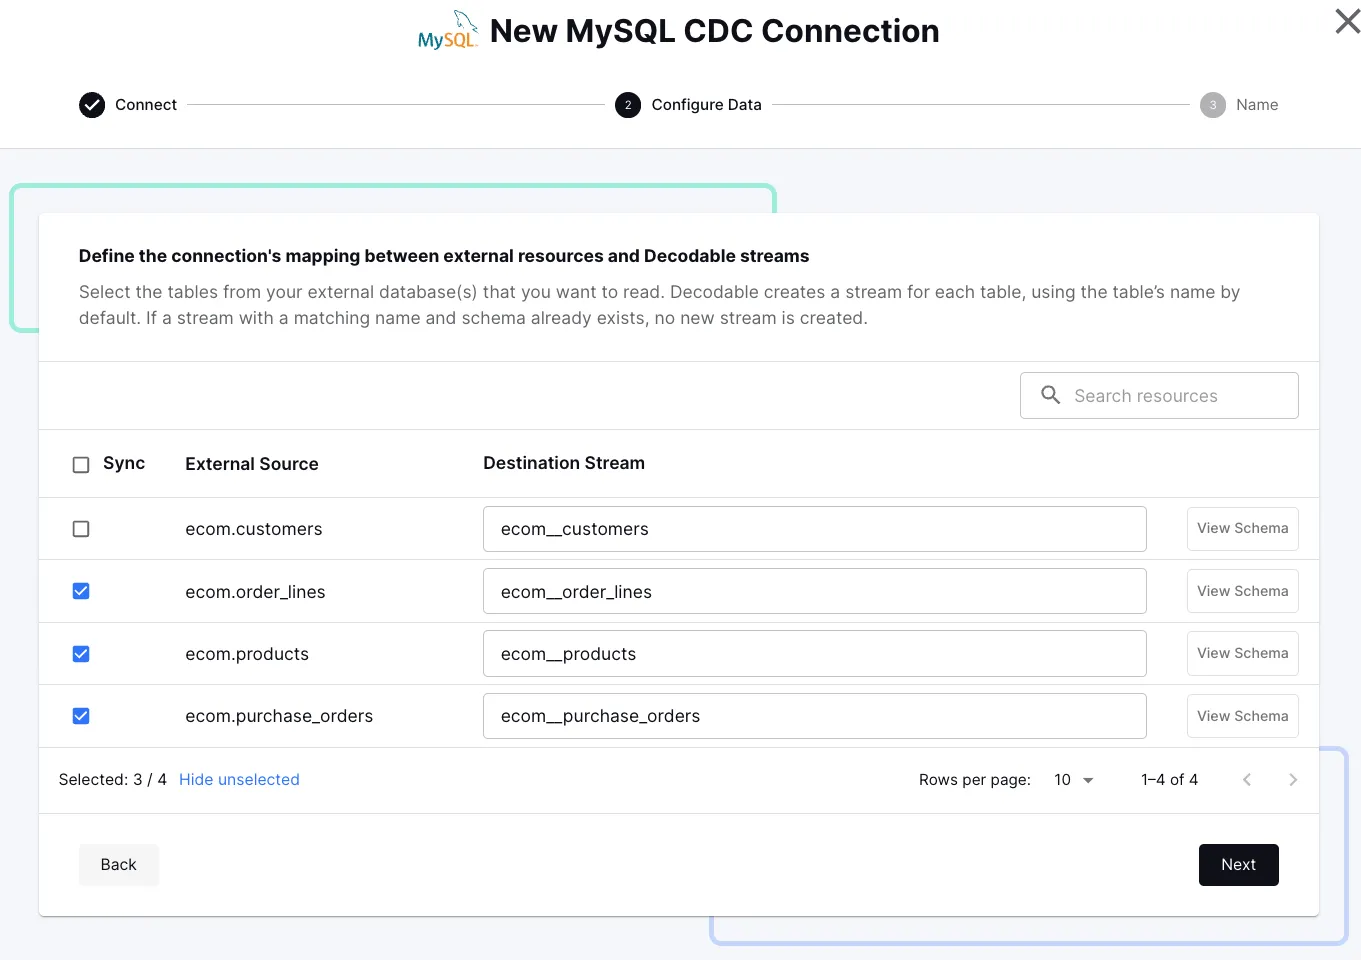
Specify a name for the new connection, for instance<span class="inline-code">ecom_source</span>, then click “Create Connection”. This connection will now subscribe to the transaction log of the source database and ingest any change events from the three tables.
Click “Start” to fire up the connector and “Start” again on the next dialog (the defaults are fine). After a few moments you’ll see the connector switch to “Running” and the metrics show data is being fetched successfully:
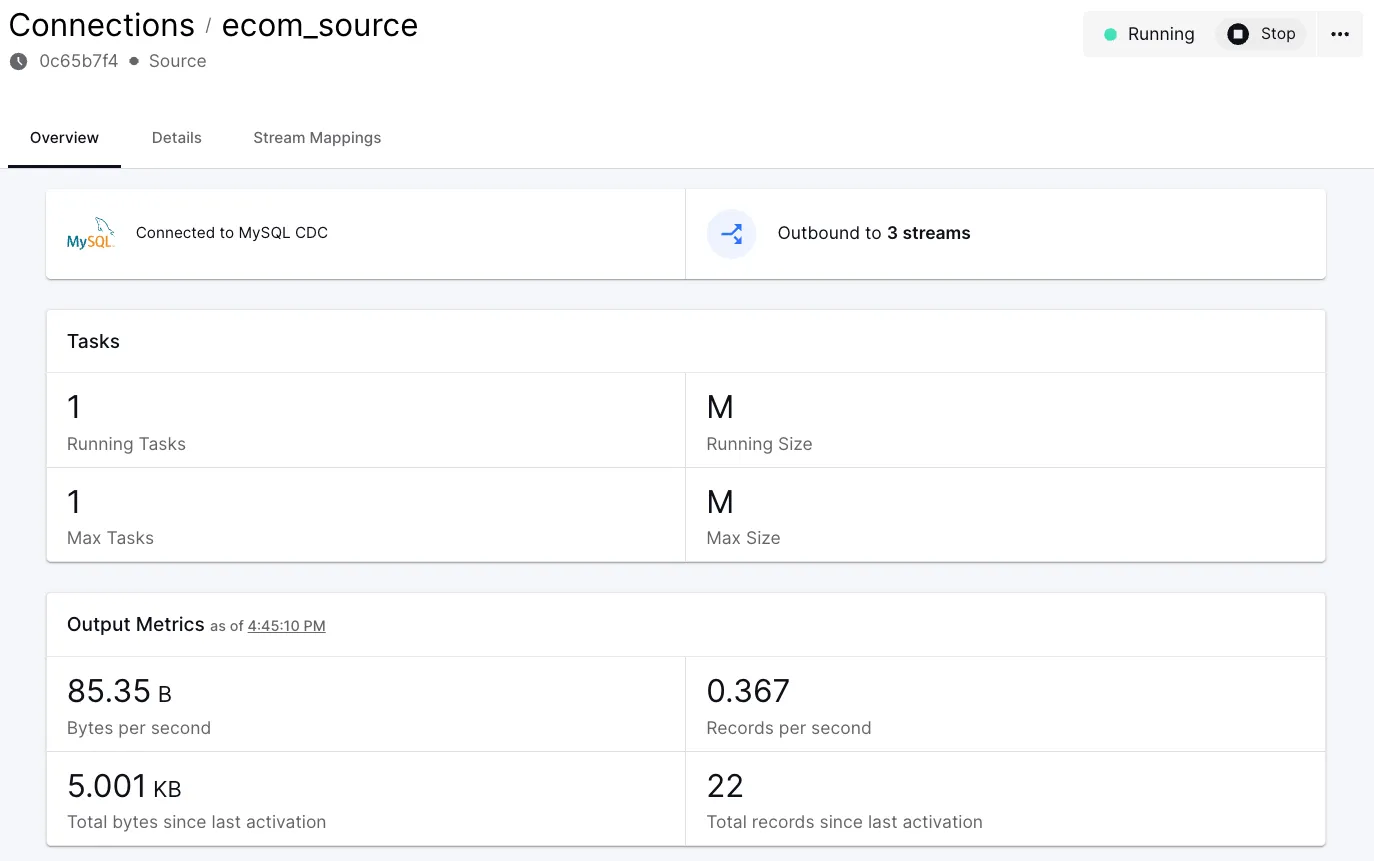
To examine the incoming data, click on “Outbound to 3 streams”, select any one of the streams and click “Run Preview”:
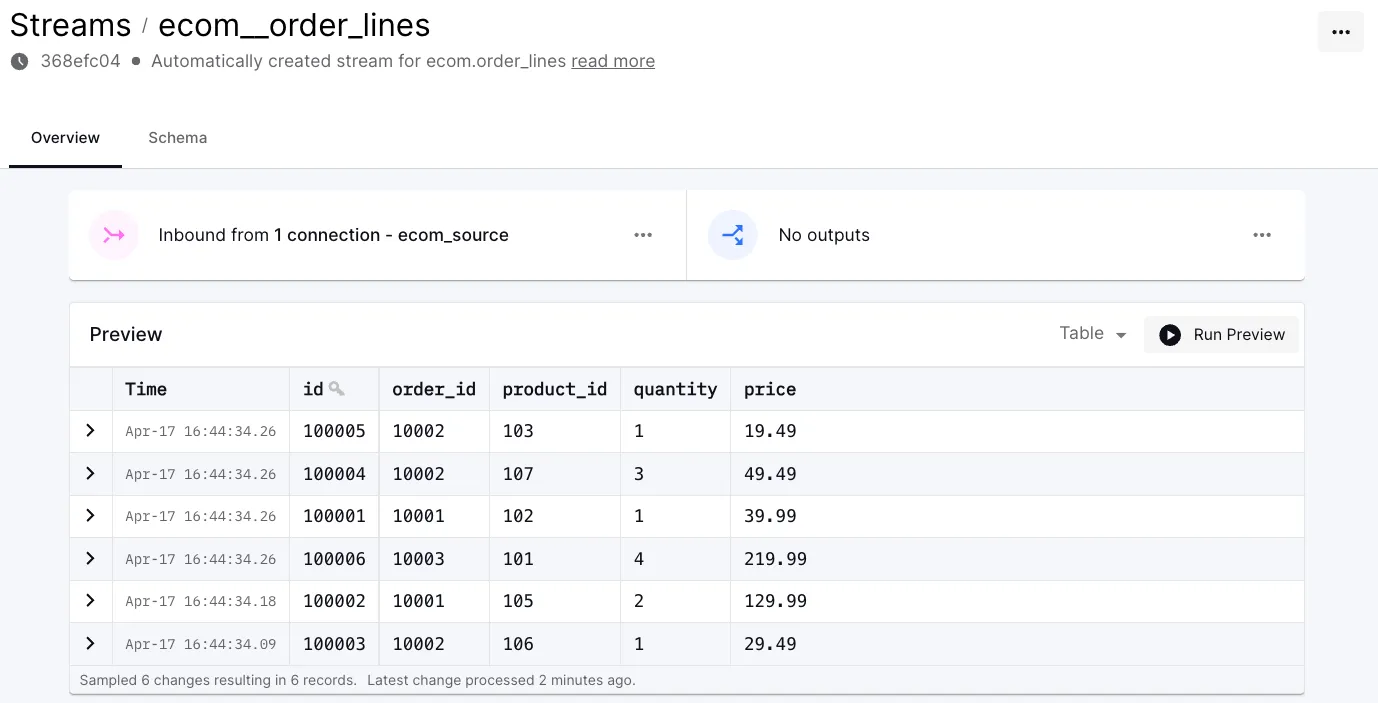
When starting up, the connector automatically took an initial snapshot of the data at this point in time. If you now were to do any changes, for instance an update to an existing purchase order record, the state in the corresponding stream would reflect this shortly thereafter.
Joining the Change Event Streams
Let’s now create a SQL pipeline for joining the three streams, emitting nested documents for each purchase order and its lines and product details. In the Decodable web UI, go to “Pipelines” → “New Pipeline”, then select one of the <span class="inline-code">ecom*</span> streams as the input stream. Replace the SQL in the editor which opens up with the following:
This does a left join between the <span class="inline-code">ecom__purchase_orders</span> stream, the <span class="inline-code">ecom__order_lines</span> stream, and the <span class="inline-code">ecom__order_products</span> stream. The left joins mean that if there’s a purchase order without any order lines, only the order’s attributes would be emitted. The results are grouped by the purchase order attributes, so as to emit one result row per order. For each order line, a SQL <span class="inline-code">ROW</span> is created with the line and product attributes, and all the lines of one purchase order are emitted as an array by calling the <span class="inline-code">ARRAY_AGG()</span> function.
You can take a look at the results of this query by clicking on the “Run Preview” button. Click on the triangle to the right of the button and choose “Earliest” as the starting position in the drop-down, as otherwise you wouldn’t see any results until there are any actual data changes in the source MySQL database.
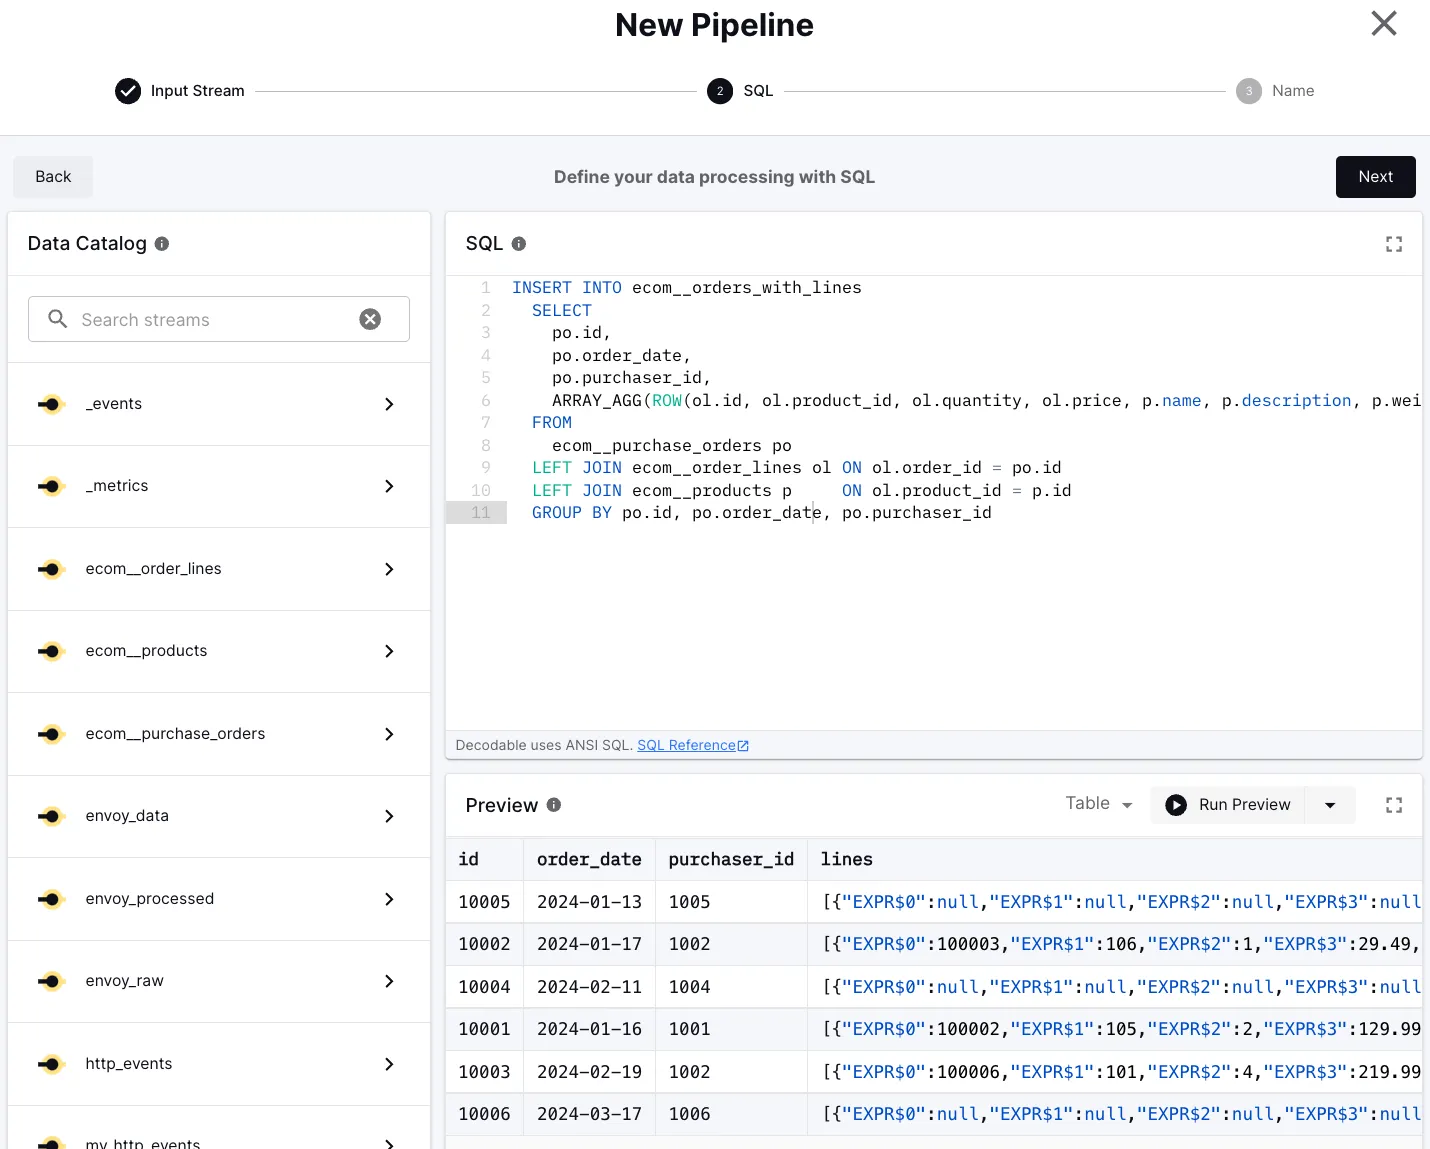
Note that the fields of the array elements still use default names like <span class="inline-code">EXPR$0</span>. This is because Flink SQL currently does not allow for the specification of aliases within <span class="inline-code">ROW</span> constructor calls. We’ll take care of this in a second.
The <span class="inline-code">ARRAY_AGG()</span> function will return an array with a single <span class="inline-code">NULL</span> row (i.e. a <span class="inline-code">ROW</span> expression whose attributes are all<span class="inline-code">NULL</span> ) for purchase orders without any lines. This is because<span class="inline-code">ARRAY_AGG()</span>, unlike other aggregation functions, doesn’t filter out null values by default. If this is not what you want, you can use the <span class="inline-code">FILTER</span> clause for emitting <span class="inline-code">NULL</span> in this case:
Once you’re done with the query, click “Next”.
Now we need to set up the output stream that we’re writing to from the query. Choose the <span class="inline-code">id</span> field as the primary key for the stream, then click “Create Stream”.
Click “Next”, specify a name for the pipeline, for instance <span class="inline-code">ecom_order_joiner</span>, and click “Create Pipeline”.
At this point, the SQL pipeline has been created, but it is not running yet. Before starting it up, let’s adjust the field names in the lines array of our output stream. Click on “Outbound to 1 stream…” and select the “Schema” tab from the stream view. Replace the schema for the <span class="inline-code">lines</span> field with the following:
Note how <span class="inline-code">ARRAY_AGG()</span> emits a strongly typed data representation, unlike alternatives such as Flink’s <span class="inline-code">JSON_ARRAYAGG()</span> function. This means that any downstream processors and consumers can operate on the data in a type-safe way. For instance, the schema mapping for the search index in OpenSearch can be created leveraging the full type information.
Click “Save” and go back to your newly created pipeline. Make sure to set the start position to “Earliest”, and then click Start. After a few moments, the pipeline will be in state “Running” and you’ll see the metrics update on the Pipeline:
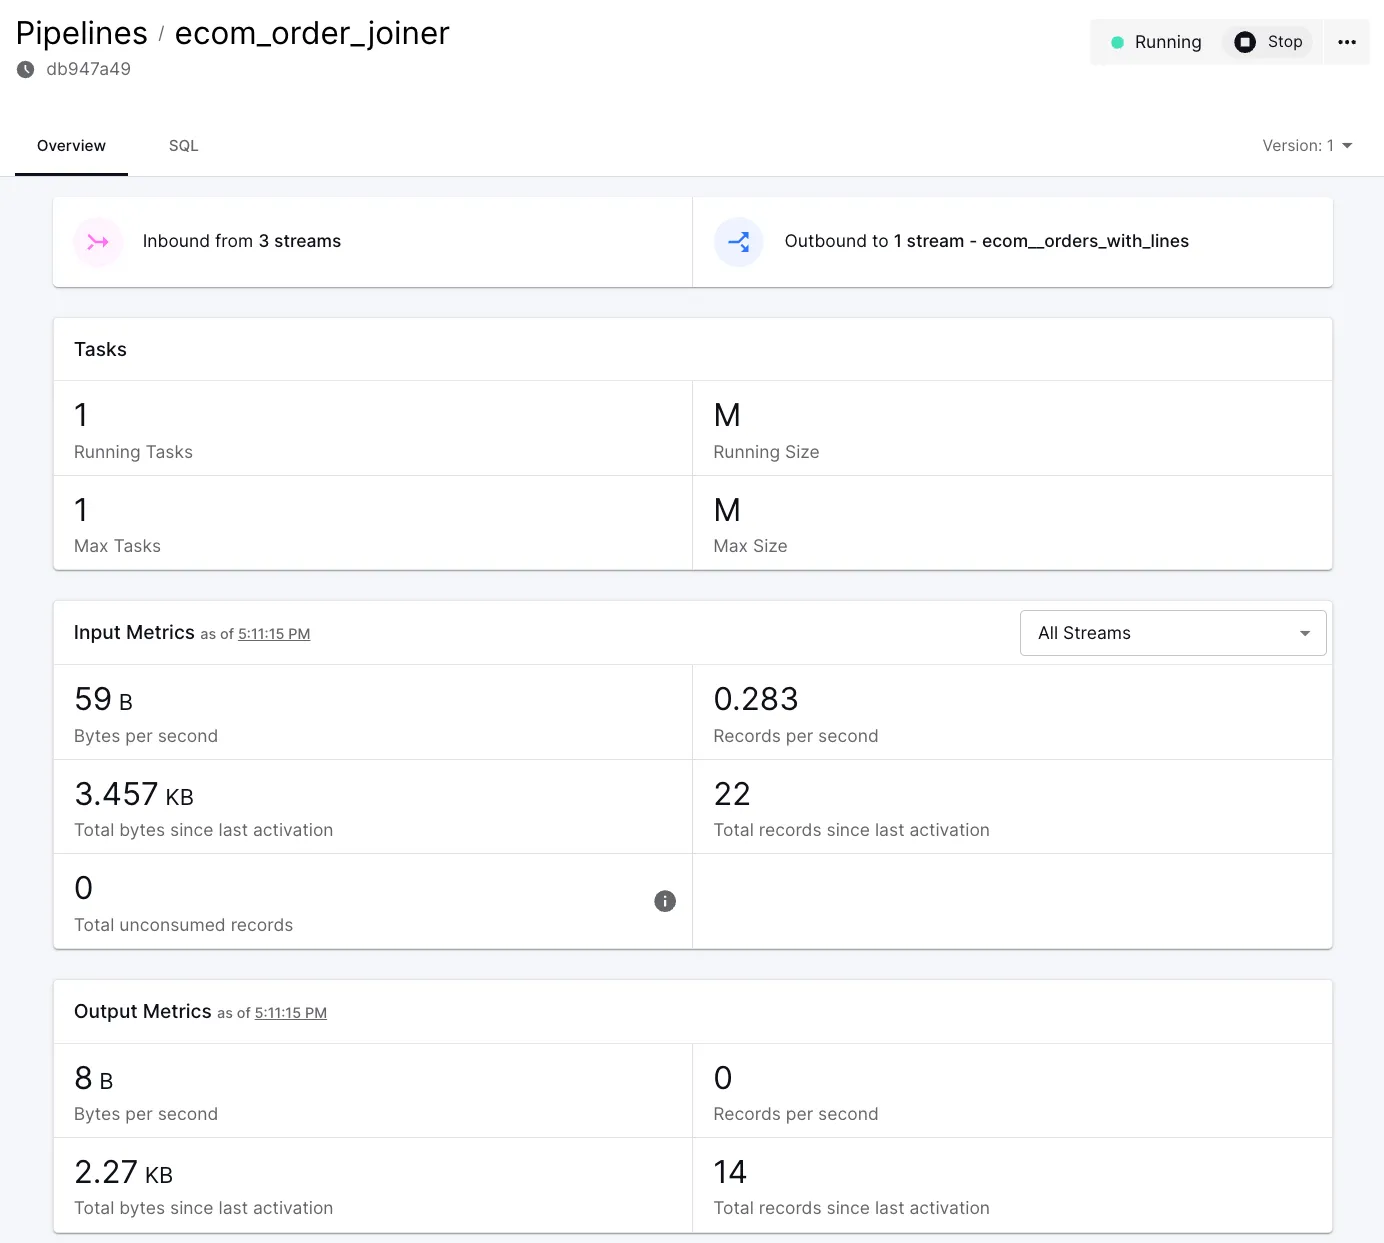
You can also take a look at the joined records in the <span class="inline-code">ecom__orders_with_lines</span> stream.
Creating the Sink Connection
The last step is to set up a sink connector which takes the data from the new stream of joined records and sends it to OpenSearch. To do so, go to “Connections” -> “New Connection” and select the “OpenSearch” tile. Specify the connection details:
- Hosts: the forwarded URL displayed by ngrok; make sure to add 443 as the port, for instance <span class="inline-code">https://bb14-2a01-c23-9413-c800-b004-d5f0-d6fb-dcbf.ngrok-free.app:443</span>
- Index: <span class="inline-code">purchase-orders</span>
- User name: <span class="inline-code">admin</span>
- Password: <span class="inline-code">admin</span> (as with the source connection password, create a Decodable secret for this)
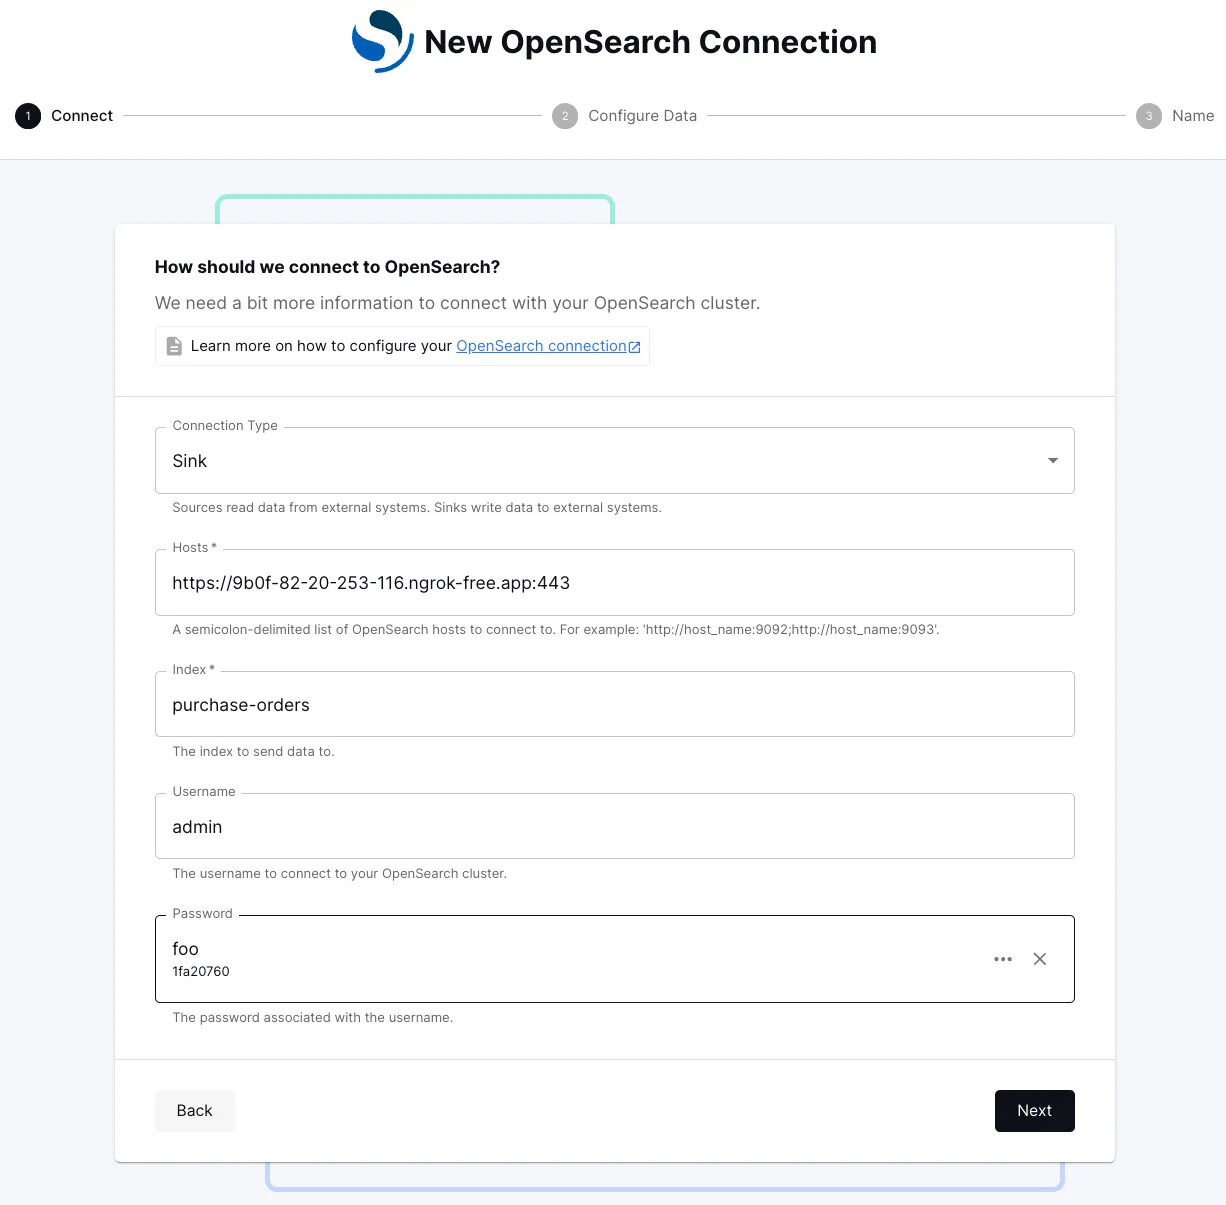
Click “Next” and select the <span class="inline-code">ecom_orders_with_lines</span> stream as the source for this connection. Click “Next” twice more and on the final screen specify a name for this connection, for instance<span class="inline-code">ecom_sink</span>. Start the connection, choosing “Earliest” as the starting position. Once the connection is running, you’ll see HTTP requests being logged by ngrok in the terminal.
Examining the Data in OpenSearch
And with that, the entire data pipeline is running: it ingests any data changes as they occur in the source database, continuously computes the join for maintaining a denormalized view of all the purchase orders with all lines and product details, and persists these documents in OpenSearch. All that in real-time, i.e. the index in OpenSearch reflects any changes to the upstream data with a low latency.
As the last step, let’s examine the data in OpenSearch and make some good use of it. To check whether the purchase order data has been successfully ingested into OpenSearch, you can take a look at one of the indexed documents via its REST API like so:
Let’s update one of the lines of this purchase order in the source MySQL database:
Shortly thereafter, when retrieving the purchase order document from OpenSearch again—using the same curl invocation as before—it will be updated accordingly:
Just being able to retrieve such a denormalized data view by means of a simple key-based GET request—without incurring the cost of a query-time join—can be very useful for many applications, for instance helping to reduce load on the primary database. Note that if the same product is referenced by several order lines, that product data would be duplicated to all the lines. That’s the trade-off when using a document store like OpenSearch in comparison to a relational database with a highly normalized data model. The advantage is the higher query performance, and thanks to the streaming query, this denormalized data view gets updated continuously, ensuring it is in sync with the data in the primary data store.
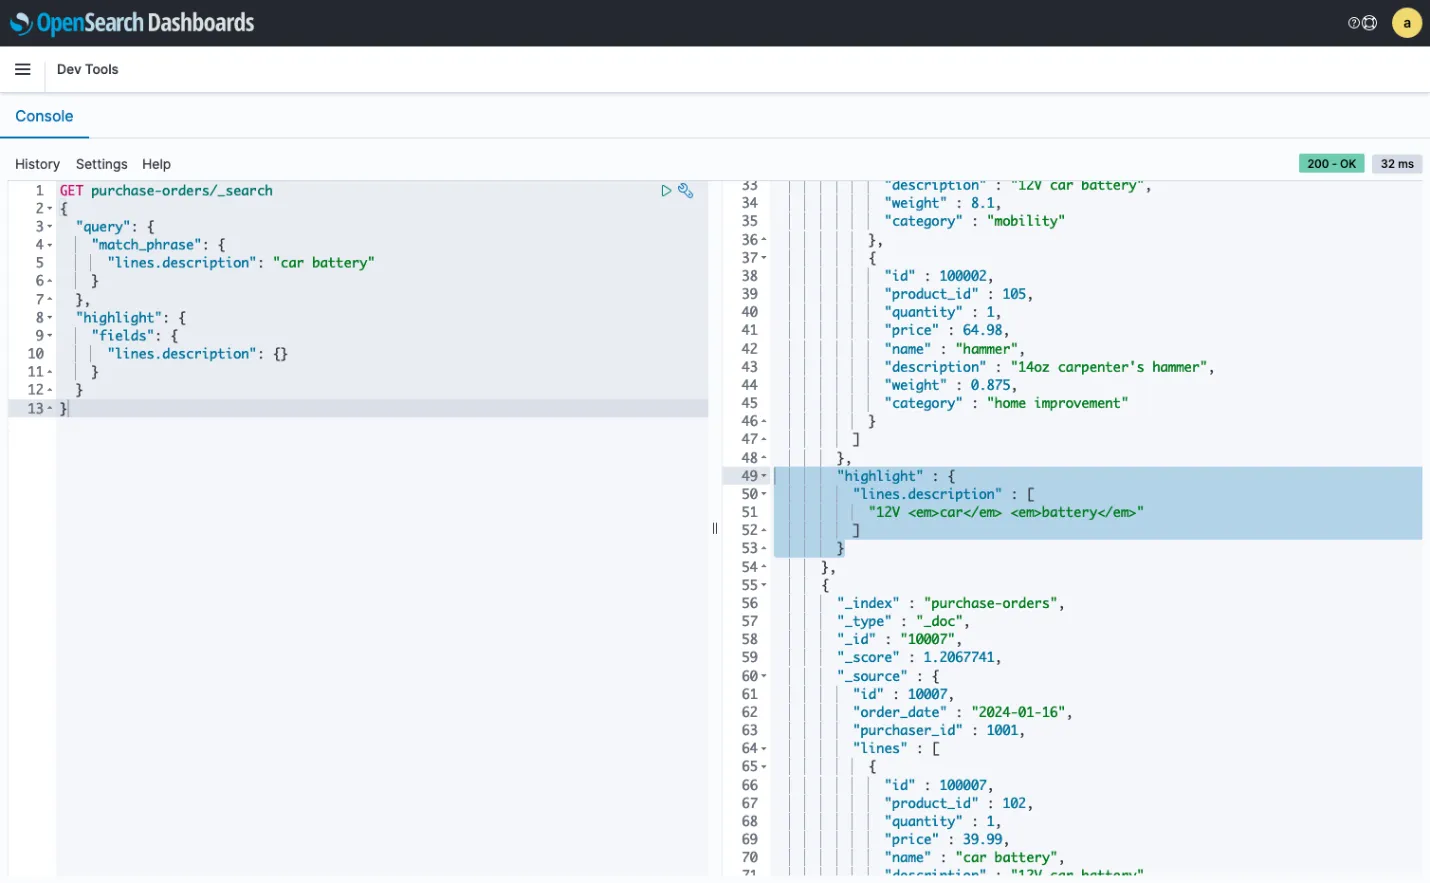
But of course, you can also take advantage of the powerful query capabilities of OpenSearch, for instance fuzzy and proximity search, pagination, query string completion, results scoring and highlighting, geo-spatial queries, and much more. As a very basic example, this shows a simple phrase query with results highlighting in the OpenSearch Dev Tools (accessible at http://localhost:5601/app/dev_tools#/console):
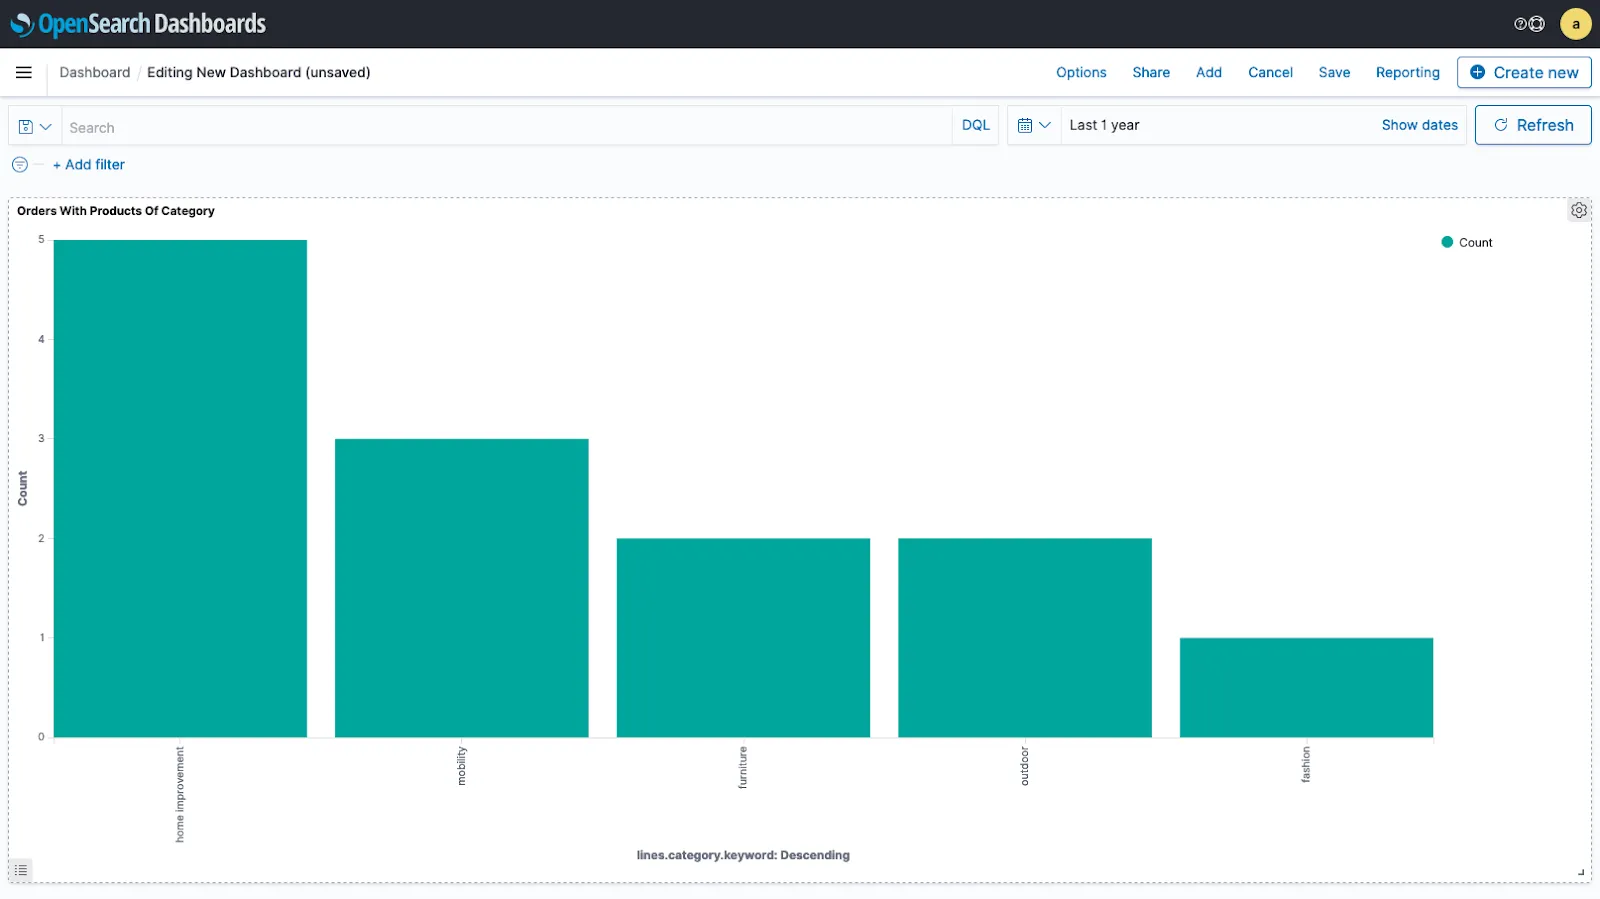
And it doesn’t stop there; ingesting your data into a system like OpenSearch enables a wide range of analytics and dashboarding use cases. For example, building a dashboard which shows the count of purchase orders with items in specific categories just takes a few clicks, updated automatically in real-time as your operational data changes:
This concludes this experiment for setting up a real-time data movement and processing pipeline on Decodable. Once you are done, don’t forget to stop and clean up all the involved resources:
- Stop and delete the connections and pipeline in Decodable
- Hit <span class="inline-code">Ctrl+C</span> in the terminal where you started ngrok for stopping the tunnels
- Run <span class="inline-code">docker compose down</span> for stopping MySQL and OpenSearch
- Run <span class="inline-code">docker volume rm array-agg_opensearch-data1</span> and <span class="inline-code">docker volume rm array-agg_opensearch-data2</span> for removing the Docker volumes for OpenSearch
Wrapping Up
Decodable’s mission is to make real-time data movement as simple and efficient as possible, with as little, or as much processing as needed. Setting up a fully managed data pipeline from an OLTP database such as MySQL to a search and analytics store like OpenSearch is a matter of just a few minutes.
And when it’s needed, SQL-based pipelines can be added to a data flow for processing the data. This can be simple stateless operations—such as filtering, mapping, or routing—but also stateful operations like joins, window queries, and data aggregation. One example is the new <span class="inline-code">ARRAY_AGG()</span> UDF, which comes in handy for creating strongly-typed, denormalized data views with a hierarchical structure, continuously updated by the system as the underlying data changes.
To get started creating your own data pipelines on Decodable, sign up for a free account here. We can’t wait to see what you’re gonna build!
Many thanks to Hans-Peter Grahsl and Robin Moffatt for their feedback while writing this post!
.svg)


